


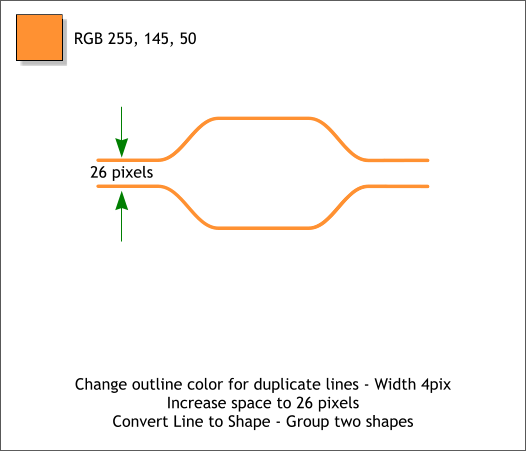
 Select the duplicate lines you made earlier. Change the outline width to
4pix (select 4px from the Width drop down list on the Inforbar).
Change the outline color to the same orange as the orange circle.
Move the two path together until the flat portions align then move the
paths apart 26 pixels.
Arrange > Convert Line to Shape. Then Arrange > Group or Ctrl g.
Select the duplicate lines you made earlier. Change the outline width to
4pix (select 4px from the Width drop down list on the Inforbar).
Change the outline color to the same orange as the orange circle.
Move the two path together until the flat portions align then move the
paths apart 26 pixels.
Arrange > Convert Line to Shape. Then Arrange > Group or Ctrl g.
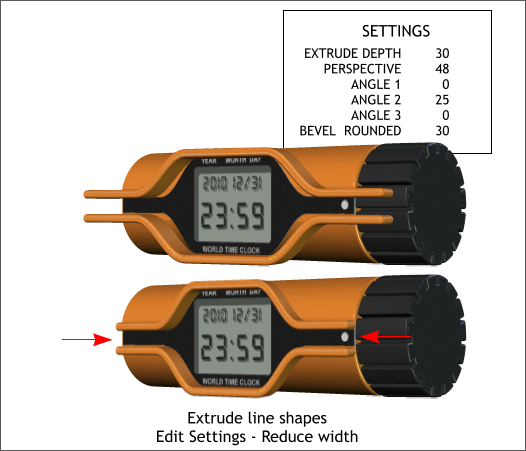
 Extrude the group using the settings shown. Reduce the width as shown
by dragging the outside middle control handles towards the center.
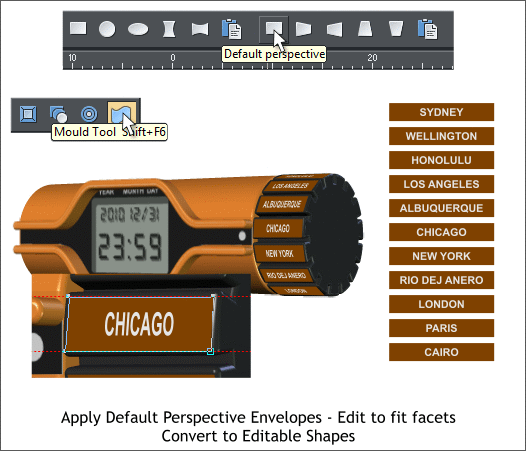
We can only add seven of the 11 city names to our dial. So figure out
which seven you want to use. The city names represent the different
world time zones.
Move the names and rectangles close to the dial and zoom in (press z to
select the Zoom Tool, then drag a rectangle around the dial and text).
Shift-select the first name and rectangle then select the Mould Tool
(Shift F6). Click the Default Perspective rectangle icon on the Infobar.
Drag the envelope’s corner control points and align them to the top
facet of the dial. Repeat this step to attach the other city names to the
facets. Be patient and take your time. This is the hardest step.
Select all of the enveloped city name/rectangle shapes and from the
Arrange menu, select Convert to Editable Shapes.
NOTE: Most of Xara’s effects and functions are called “Live
Effects,” which means that they can be edited at any time be it
five seconds, five months or five years. For example, any of the
enveloped shapes can be edited at any time with the Mould Tool.
But when you convert to editable shapes, the live effects are
disabled and you can edit with other tools such as we will see.
Extrude the group using the settings shown. Reduce the width as shown
by dragging the outside middle control handles towards the center.
We can only add seven of the 11 city names to our dial. So figure out
which seven you want to use. The city names represent the different
world time zones.
Move the names and rectangles close to the dial and zoom in (press z to
select the Zoom Tool, then drag a rectangle around the dial and text).
Shift-select the first name and rectangle then select the Mould Tool
(Shift F6). Click the Default Perspective rectangle icon on the Infobar.
Drag the envelope’s corner control points and align them to the top
facet of the dial. Repeat this step to attach the other city names to the
facets. Be patient and take your time. This is the hardest step.
Select all of the enveloped city name/rectangle shapes and from the
Arrange menu, select Convert to Editable Shapes.
NOTE: Most of Xara’s effects and functions are called “Live
Effects,” which means that they can be edited at any time be it
five seconds, five months or five years. For example, any of the
enveloped shapes can be edited at any time with the Mould Tool.
But when you convert to editable shapes, the live effects are
disabled and you can edit with other tools such as we will see.


