


 We’ll use the new 3D Extrude Tool to shape the clock, city selector
dial and clock, and the faceplate.
Select the orange circle with the facet missing with the 3D Extrude
Tool (e). Click the 3D icon on the Infobar. Because we need for all the
elements to align with one another, we’ll enter exact values instead of
interactively dragging the shape. I have done all the heavy lifting for
you, all you need to do is enter the values listed in the chart top right.
It will be a lot of fun. Trust me, I’m a doctor. OK, I am not really a
doctor, I just play one in front of my computer.
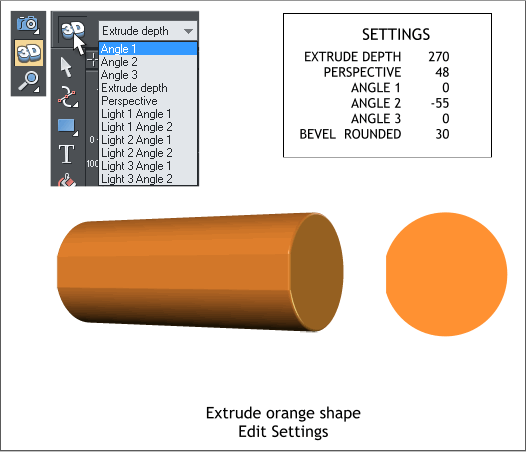
Select the options shown from the Extrusion Parameters drop down list
on the Infobar and key in the values shown. Press Enter to apply each
change.
Your shape should look like the one shown above.
We’ll use the new 3D Extrude Tool to shape the clock, city selector
dial and clock, and the faceplate.
Select the orange circle with the facet missing with the 3D Extrude
Tool (e). Click the 3D icon on the Infobar. Because we need for all the
elements to align with one another, we’ll enter exact values instead of
interactively dragging the shape. I have done all the heavy lifting for
you, all you need to do is enter the values listed in the chart top right.
It will be a lot of fun. Trust me, I’m a doctor. OK, I am not really a
doctor, I just play one in front of my computer.
Select the options shown from the Extrusion Parameters drop down list
on the Infobar and key in the values shown. Press Enter to apply each
change.
Your shape should look like the one shown above.
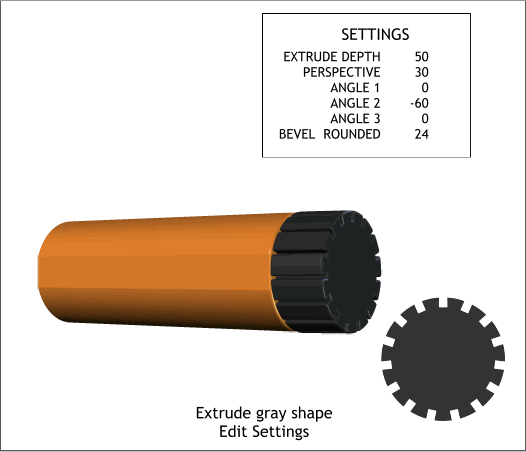
 Extrude the gray shape and edit the settings to those displayed here.
Position this shape (the cities dial) to the right of the orange shape. It
looks really cool and 3D. And we’re just getting started!
Select all the faceplate/clock objects and extrude them using the
settings shown. Center the extrusion as shown above top.
The faceplate is a quite a bit wider than the orange shape. No problem.
Select the extruded faceplate then move the left and right middle
control handles (the small black boxes) towards the center.
Extrude the gray shape and edit the settings to those displayed here.
Position this shape (the cities dial) to the right of the orange shape. It
looks really cool and 3D. And we’re just getting started!
Select all the faceplate/clock objects and extrude them using the
settings shown. Center the extrusion as shown above top.
The faceplate is a quite a bit wider than the orange shape. No problem.
Select the extruded faceplate then move the left and right middle
control handles (the small black boxes) towards the center.


