


 Select the four control points shown above with the Shape Editor Tool.
NOTE: Unlike most of Xara’s tools, you cannot select an object
with the Shape Editor Tool. The shape or path must first be
selected with one of the other tools such as the Selector Tool
before you can edit with the Shape Editor Tool.
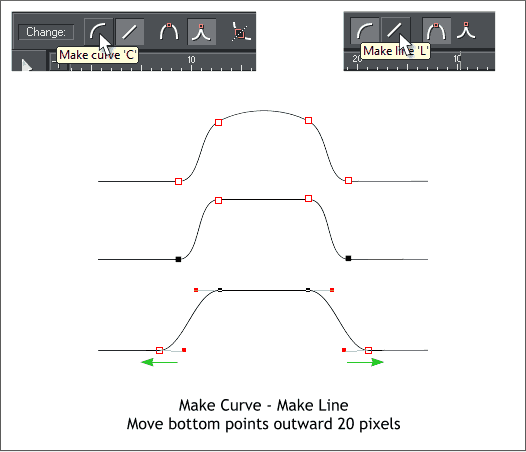
Click the Make Curve icon or press C. Select just the top two control
points and click the Make Line icon or press L.
Select and move the bottom two control points shown highlighted
outward 20 pixels.
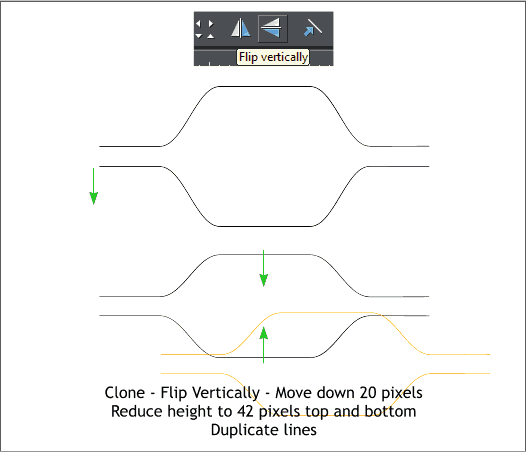
Clone the shape (Ctrl k). Press the Flip Vertically icon to flip the clone.
Move the two flat portions of the shapes so that they align then move
the two shapes 20 pixels away.
Duplicate the pair of shapes (paths) and set them to the side for later.
Hold down the Shift key and select the two paths.
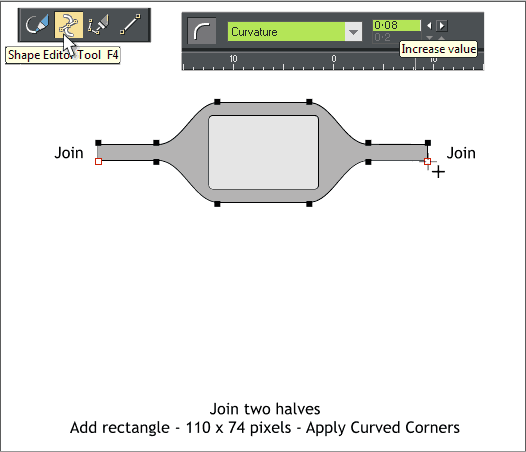
Switch to the Shape Editor Tool (F4). Click the top left control point.
Drag a line away from the point, then drag the line down to the top left
of the lower path. The cursor will change to a plus to indicate the two
paths are about to be joined. Repeat this step on the right side. When
you are done you should have a closed path which will be filled with
your default fill color (my default fill color is gray).
Select the Rectangle Tool (M) and draw a rectangle to the size shown
above. Double click on any corner to apply curved corners or click the
quarter round Curved Corners icon on the Infobar.
From the Editable Items drop down list, select Curvature. Increase the
value using the right little arrow key to 0.08.
Select the four control points shown above with the Shape Editor Tool.
NOTE: Unlike most of Xara’s tools, you cannot select an object
with the Shape Editor Tool. The shape or path must first be
selected with one of the other tools such as the Selector Tool
before you can edit with the Shape Editor Tool.
Click the Make Curve icon or press C. Select just the top two control
points and click the Make Line icon or press L.
Select and move the bottom two control points shown highlighted
outward 20 pixels.
Clone the shape (Ctrl k). Press the Flip Vertically icon to flip the clone.
Move the two flat portions of the shapes so that they align then move
the two shapes 20 pixels away.
Duplicate the pair of shapes (paths) and set them to the side for later.
Hold down the Shift key and select the two paths.
Switch to the Shape Editor Tool (F4). Click the top left control point.
Drag a line away from the point, then drag the line down to the top left
of the lower path. The cursor will change to a plus to indicate the two
paths are about to be joined. Repeat this step on the right side. When
you are done you should have a closed path which will be filled with
your default fill color (my default fill color is gray).
Select the Rectangle Tool (M) and draw a rectangle to the size shown
above. Double click on any corner to apply curved corners or click the
quarter round Curved Corners icon on the Infobar.
From the Editable Items drop down list, select Curvature. Increase the
value using the right little arrow key to 0.08.
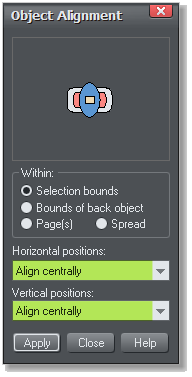 Select the shape and the curved corners rectangle and center align
them. (Arrange > Alignment).
TIP: The interactive way to align a selection is to simply click in
the Object Alignment preview window, in this case in the very
center. The icons rearrange to indicate the alignment. I added
green squares to show the other interactive alignment points.
Select the shape and the curved corners rectangle and center align
them. (Arrange > Alignment).
TIP: The interactive way to align a selection is to simply click in
the Object Alignment preview window, in this case in the very
center. The icons rearrange to indicate the alignment. I added
green squares to show the other interactive alignment points.


