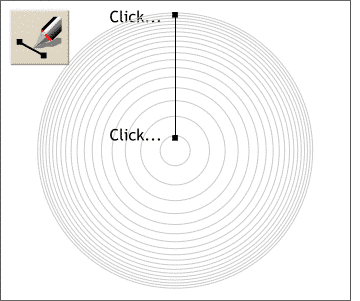
Select the Pen Tool
and click a start and end point to create a vertical line connecting the two circles. (Center the line over the circles).
TIP: To constrain a line horizontally or vertically, after clicking the second point, drag the last point with the Pen Tool cursor while holding down the Ctrl and Shift
keys. The line will snap vertical, horizontal, or any of the angles specified in the Page Options > General tabbed section.
Using the Selector Tool
(the arrow icon), click twice on the vertical line to enter rotate - skew mode.
Drag the rotation bulls eye to the exact center of the two circles.
TIP: Enable Snap To Objects (press the red magnet icon on the Infobar). Then drag a
guideline from the horizontal screen rulers (Window > Bars > Rulers) until it snaps in the center of the circle. Repeat to add a vertical guideline. Now
drag the rotation bulls eye to the intersection of the two guidelines. When you drag a guideline onto the page, Snap To Guides is automatically enabled.
Hold down the Ctrl key and
drag the top right rotation handle (the double curved arrows) until the line snaps to 30 degrees.
Before you release the left mouse button, press the right mouse button to drop a duplicate.
If the line does not snap to 30
degrees you may need to open the Page Options menu (Utilities menu) and set the Angle Constraint to 30°

 Select the Pen Tool
and click a start and end point to create a vertical line connecting the two circles. (Center the line over the circles).
Select the Pen Tool
and click a start and end point to create a vertical line connecting the two circles. (Center the line over the circles).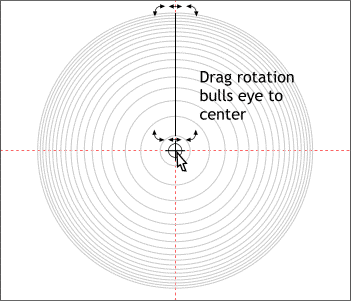 Using the Selector Tool
(the arrow icon), click twice on the vertical line to enter rotate - skew mode.
Using the Selector Tool
(the arrow icon), click twice on the vertical line to enter rotate - skew mode.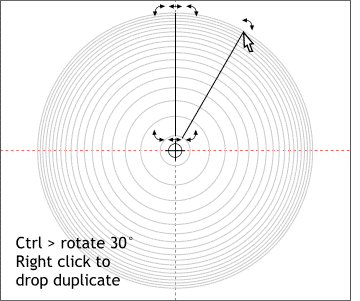 Hold down the Ctrl key and
drag the top right rotation handle (the double curved arrows) until the line snaps to 30 degrees.
Hold down the Ctrl key and
drag the top right rotation handle (the double curved arrows) until the line snaps to 30 degrees.