
 WEBSITE AND WEBSITE GRAPHICS CREATED WITH XARA DESIGNER PRO 6


 Apply Linear and Circular fills to the areas shown above
using 30 and 60% Black.
Select the gray-filled shapes then select the Transparency
Tool (F6). Apply a Flat, Brightness transparency. Adjust the
Transparency slider setting to 50%.
Clone the shapes (Ctrl k) and change the transparency to
Stained Glass, 50%. Send the small circles to the back.
Alt click to select the solid shape and clone it (Ctrl k).
Select the Transparency Tool (F6) and from the Transparency
Types drop down list, select Enhance (Designer Pro 6 and
Photo & Graphics Designer 6 only).
You will not see anything, but this becomes a mask under
which you can edit with the Photo Tool.
Select the Photo Tool (p) and edit the Enhance Photo settings
shown above.
The purpose of this step is to deepen the transparencies and
to shift the colors towards red.
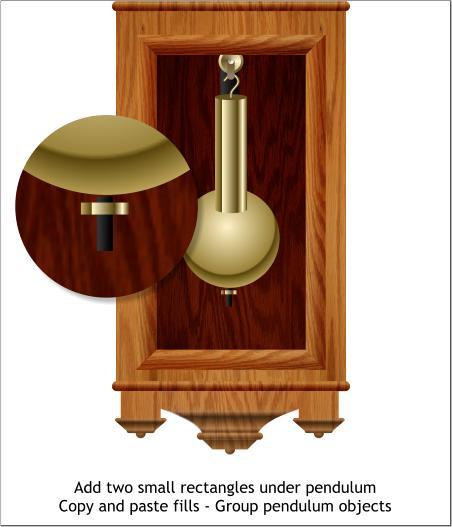
Add two small rectangles under the pendulum and copy and
paste attributes from the pendulum shaft and the weight
(Edit > Paste Attributes or Shift Ctrl a). Group all of the
pendulum objects.
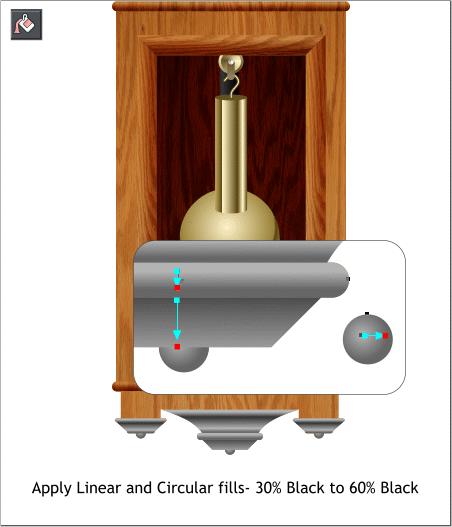
Apply Linear and Circular fills to the areas shown above
using 30 and 60% Black.
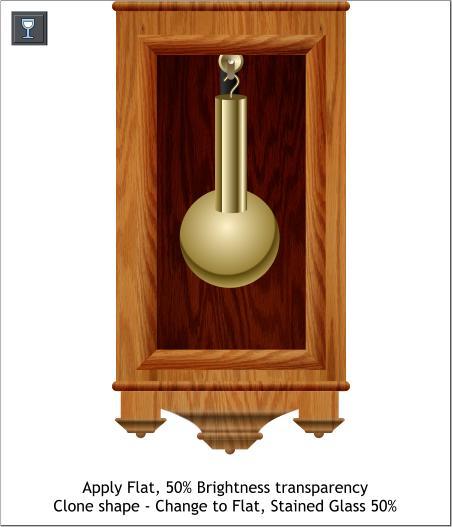
Select the gray-filled shapes then select the Transparency
Tool (F6). Apply a Flat, Brightness transparency. Adjust the
Transparency slider setting to 50%.
Clone the shapes (Ctrl k) and change the transparency to
Stained Glass, 50%. Send the small circles to the back.
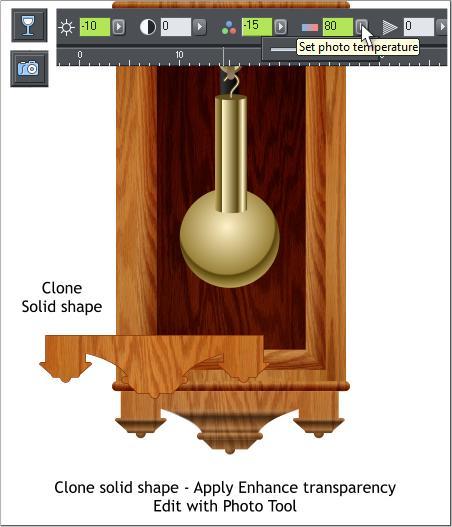
Alt click to select the solid shape and clone it (Ctrl k).
Select the Transparency Tool (F6) and from the Transparency
Types drop down list, select Enhance (Designer Pro 6 and
Photo & Graphics Designer 6 only).
You will not see anything, but this becomes a mask under
which you can edit with the Photo Tool.
Select the Photo Tool (p) and edit the Enhance Photo settings
shown above.
The purpose of this step is to deepen the transparencies and
to shift the colors towards red.
Add two small rectangles under the pendulum and copy and
paste attributes from the pendulum shaft and the weight
(Edit > Paste Attributes or Shift Ctrl a). Group all of the
pendulum objects.

 DOWNLOAD ZIPPED TUTORIAL


