
 WEBSITE AND WEBSITE GRAPHICS CREATED WITH XARA DESIGNER PRO 6


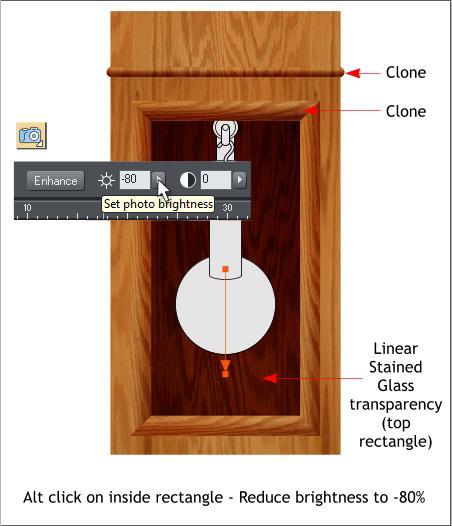
 OK, pay attention, as this gets a wee bit complicated.
First, clone the two rectangles indicated above (Ctrl k). This
increases the light and dark and adds more depth.
Select the top inside rectangle with the Transparency Tool.
Click and drag downward as indicated by the fill path arrow
in the center. The end of the transparency should be 100% on
the Transparency slider on the Infobar.
Hold down the Alt key and click twice on the darker inside
rectangle to select the original rectangle. Switch to the
Photo Tool (P). Change the Photo Brightness setting to -80.
This makes the inside rectangle (the back of the pendulum
box) darker, but a bit lighter at the bottom.
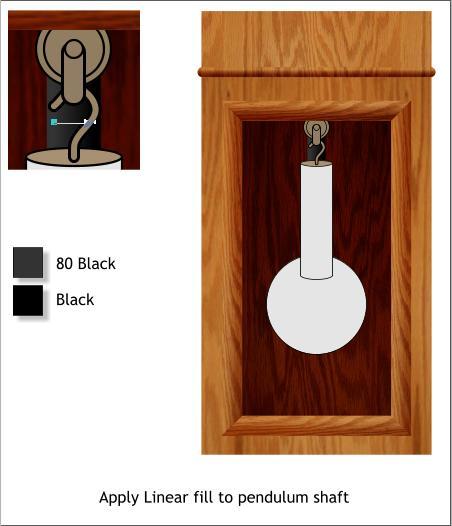
Select the pendulum shaft rectangle and apply a Linear fill
using 80% Black and Black. Start and end the fill a little bit
short of each side as shown in the enlargement.
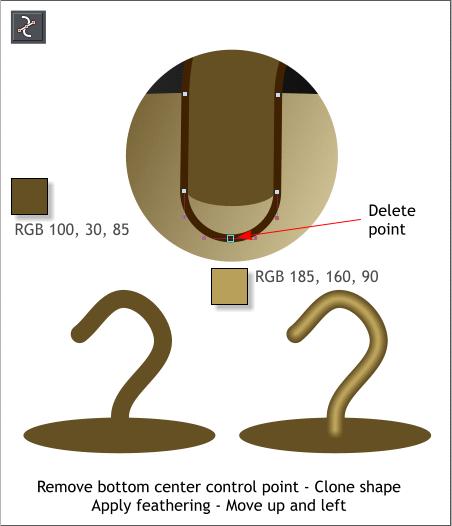
Zoom in close to the question mark hook shape (press 3 on
the keyboard to zoom in 300%). Select the shape and from
the Arrange menu, select Convert Line to Shape.
Select the Shape Editor Tool (F4). Select the bottom control
point and delete it. Apply a Flat fill to the top of the weight
and the hook shape. Use the Color Editor > RGB Color Model
to edit the color.
Clone the hook shape and change the fill to the lighter brass
color. Apply a small amount of feathering using the Adjust
Size of Feather Region slider on the top right area of the
Infobar. Just enough to soften the edges. Move the feathered
shape up and left a smidgen.
NOTE: If your RGB values in the Color Editor are shown
in percent (%) instead of 0-255, right click on the page,
select Page Options... > Units and change the Color
Units to 0-255.
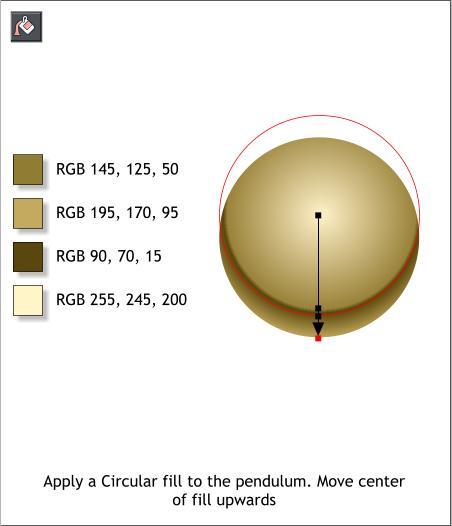
Select the large circle with the Fill Tool (F5). From the drop
down list of Fill Types on the Infobar select Circular.
Drag the center of the fill up to the top 1/3 of the circle.
Double click on the fill path arrow to add a new color. Double
click again to add a second color. Move these two colors down
towards the bottom and arrange them close together. Apply
the four colors shown (click on any of the small squares with
the Fill Tool to select and edit that color).
OK, pay attention, as this gets a wee bit complicated.
First, clone the two rectangles indicated above (Ctrl k). This
increases the light and dark and adds more depth.
Select the top inside rectangle with the Transparency Tool.
Click and drag downward as indicated by the fill path arrow
in the center. The end of the transparency should be 100% on
the Transparency slider on the Infobar.
Hold down the Alt key and click twice on the darker inside
rectangle to select the original rectangle. Switch to the
Photo Tool (P). Change the Photo Brightness setting to -80.
This makes the inside rectangle (the back of the pendulum
box) darker, but a bit lighter at the bottom.
Select the pendulum shaft rectangle and apply a Linear fill
using 80% Black and Black. Start and end the fill a little bit
short of each side as shown in the enlargement.
Zoom in close to the question mark hook shape (press 3 on
the keyboard to zoom in 300%). Select the shape and from
the Arrange menu, select Convert Line to Shape.
Select the Shape Editor Tool (F4). Select the bottom control
point and delete it. Apply a Flat fill to the top of the weight
and the hook shape. Use the Color Editor > RGB Color Model
to edit the color.
Clone the hook shape and change the fill to the lighter brass
color. Apply a small amount of feathering using the Adjust
Size of Feather Region slider on the top right area of the
Infobar. Just enough to soften the edges. Move the feathered
shape up and left a smidgen.
NOTE: If your RGB values in the Color Editor are shown
in percent (%) instead of 0-255, right click on the page,
select Page Options... > Units and change the Color
Units to 0-255.
Select the large circle with the Fill Tool (F5). From the drop
down list of Fill Types on the Infobar select Circular.
Drag the center of the fill up to the top 1/3 of the circle.
Double click on the fill path arrow to add a new color. Double
click again to add a second color. Move these two colors down
towards the bottom and arrange them close together. Apply
the four colors shown (click on any of the small squares with
the Fill Tool to select and edit that color).

 DOWNLOAD ZIPPED TUTORIAL


