
 WEBSITE AND WEBSITE GRAPHICS CREATED WITH XARA DESIGNER PRO 6


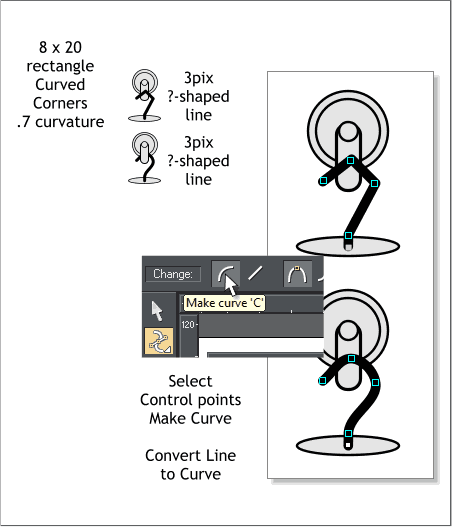
 Those three small circles are the bottom part of the pulley
that the weight attaches to. There is a question mark shaped
hook that attaches the weight to the pulley. We will create
this hook shape next.
Create a small vertical rectangle 8 x 20 pixels. Apply Curved
Corners and set the Curvature to 0.7. Center this under the
smallest of the three pulley circles (use the Arrange > Move
Backwards command until the rectangle moves behind the
smallest circle).
Switch to the Shape Editor Tool (F4). Select the Make Line
icon on the Infobar.
Draw a question mark-like shape with line segments as shown
in the top illustration. Change the line Width to 3px (or
3pix—both work) in the Width text entry box. Hold down the
Shift key and select all but the very bottom control point.
Press the Make Curve icon or press c. This gives us a question
mark shape. Edit the shape if it does not look quite right.
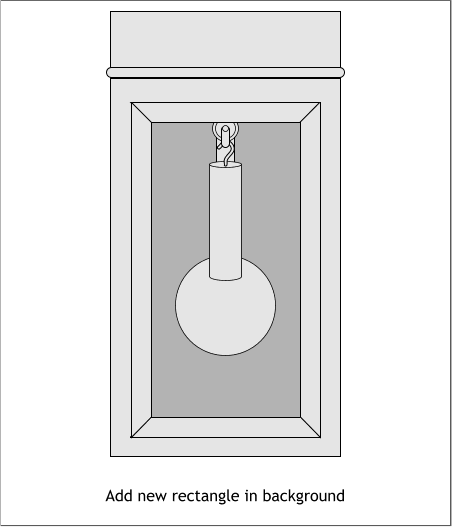
Add a new rectangle (shown in darker gray) and send it to the
back (Ctrl b).
Those three small circles are the bottom part of the pulley
that the weight attaches to. There is a question mark shaped
hook that attaches the weight to the pulley. We will create
this hook shape next.
Create a small vertical rectangle 8 x 20 pixels. Apply Curved
Corners and set the Curvature to 0.7. Center this under the
smallest of the three pulley circles (use the Arrange > Move
Backwards command until the rectangle moves behind the
smallest circle).
Switch to the Shape Editor Tool (F4). Select the Make Line
icon on the Infobar.
Draw a question mark-like shape with line segments as shown
in the top illustration. Change the line Width to 3px (or
3pix—both work) in the Width text entry box. Hold down the
Shift key and select all but the very bottom control point.
Press the Make Curve icon or press c. This gives us a question
mark shape. Edit the shape if it does not look quite right.
Add a new rectangle (shown in darker gray) and send it to the
back (Ctrl b).
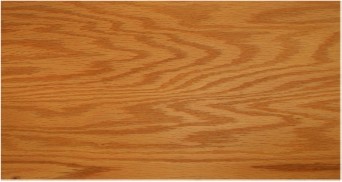 Drag this wood grain image from your browser and onto the
desktop. Then drag and drop it into Designer Pro 6.
Open the Bitmap Gallery (F11).
Select one of the rectangles, select the wood image and
press Fill. Repeat this step and fill each of the rectangles.
Switch to the Fill Tool (F5). Click on each rectangle, and
rotate and move the center of the fills around so that each
piece looks unique. Click twice on each bitmap with the Fill
Tool and change the Bitmap Resolution on the Infobar to 96.
Select each of the rectangles shown above with a red outline
(including the center rectangle) and clone each one (Ctrl k).
NOTE: The difference between Clone (Ctrl k) and
Duplicate (Ctrl Alt d) is this: Clone creates a duplicate
copy exactly on top of the original shape. Duplicate
creates a duplicate copy and then offsets the duplicate
copy down and to the right.
Drag this wood grain image from your browser and onto the
desktop. Then drag and drop it into Designer Pro 6.
Open the Bitmap Gallery (F11).
Select one of the rectangles, select the wood image and
press Fill. Repeat this step and fill each of the rectangles.
Switch to the Fill Tool (F5). Click on each rectangle, and
rotate and move the center of the fills around so that each
piece looks unique. Click twice on each bitmap with the Fill
Tool and change the Bitmap Resolution on the Infobar to 96.
Select each of the rectangles shown above with a red outline
(including the center rectangle) and clone each one (Ctrl k).
NOTE: The difference between Clone (Ctrl k) and
Duplicate (Ctrl Alt d) is this: Clone creates a duplicate
copy exactly on top of the original shape. Duplicate
creates a duplicate copy and then offsets the duplicate
copy down and to the right.
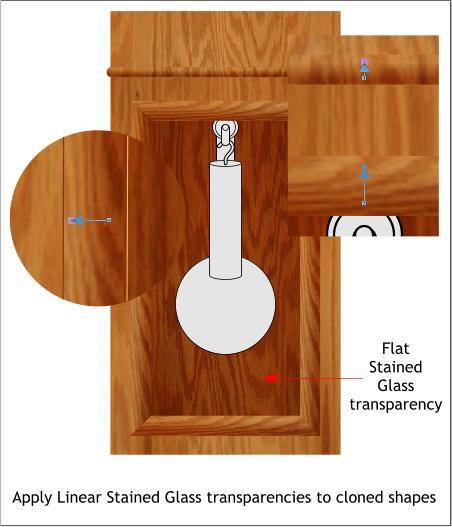
 Select the Transparency Tool (F6). Select the inside
rectangle (the rectangle behind the pendulum) and apply a
Flat, Stained Glass transparency (select Stained Glass from
the Transparency Type drop down list).
Apply Linear, Stained Glass transparencies to the other
cloned shapes as shown above.
TIP: Click on a selection with the Transparency Tool,
then hold down the Ctrl key (to constrain the direction)
and drag to apply an “interactive” Linear transparency.
Start and end the transparencies inside the rectangles as
shown in the enlargements. The light end of the transparency
will be 100% and the dark end will be 0% on the Transparency
slider on the Infobar.
NOTE: When you clone or duplicate an object it comes
to the top. You will need to use the Arrange > Move
Backwards (Shift Ctrl b) command to send the center
rectangle behind the other objects.
Select the Transparency Tool (F6). Select the inside
rectangle (the rectangle behind the pendulum) and apply a
Flat, Stained Glass transparency (select Stained Glass from
the Transparency Type drop down list).
Apply Linear, Stained Glass transparencies to the other
cloned shapes as shown above.
TIP: Click on a selection with the Transparency Tool,
then hold down the Ctrl key (to constrain the direction)
and drag to apply an “interactive” Linear transparency.
Start and end the transparencies inside the rectangles as
shown in the enlargements. The light end of the transparency
will be 100% and the dark end will be 0% on the Transparency
slider on the Infobar.
NOTE: When you clone or duplicate an object it comes
to the top. You will need to use the Arrange > Move
Backwards (Shift Ctrl b) command to send the center
rectangle behind the other objects.

 DOWNLOAD ZIPPED TUTORIAL


