
 WEBSITE AND WEBSITE GRAPHICS CREATED WITH XARA DESIGNER PRO 6


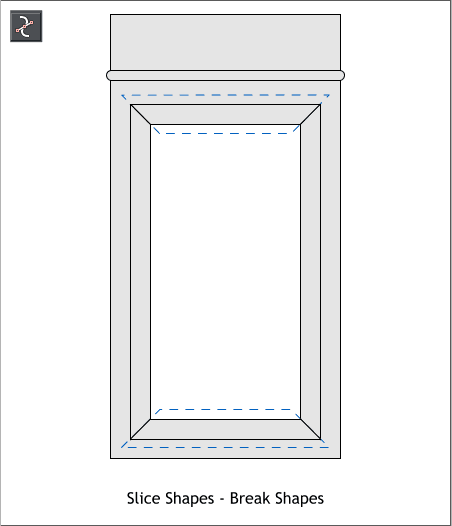 Select the top shape, and the frame shape and from the
Arrange menu select Combine Shapes > Slice Shapes or use
the keyboard shortcut, Ctrl 4. Repeat this step for the
bottom half of the frame.
The left and right sides of the frame will still be one shape.
Select the left or right side of the frame. From the Arrange
menu, select Break Shapes. You should now be able to select
each of the four sides individually.
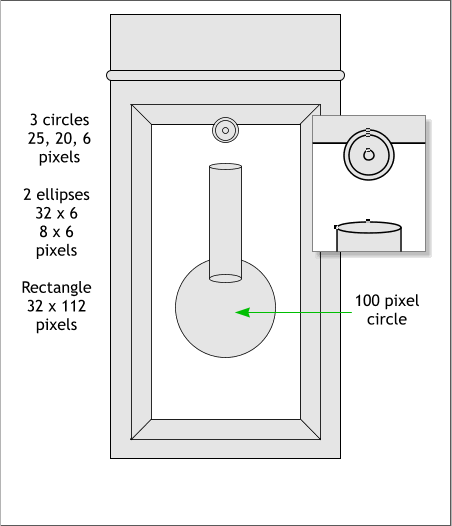
Select the Ellipse Tool (L). Hold down the Ctrl key, to
constrain the ellipse to a circle) and draw the circles to the
sizes shown. And add the two ellipses and one new rectangle.
TIP: For the three centered circles on the top, create
the first circle to the largest size. Clone the circle (Ctrl
k) and reduce the size on the Infobar and press Enter to
apply the change. Repeat this step to create the
smallest circle.
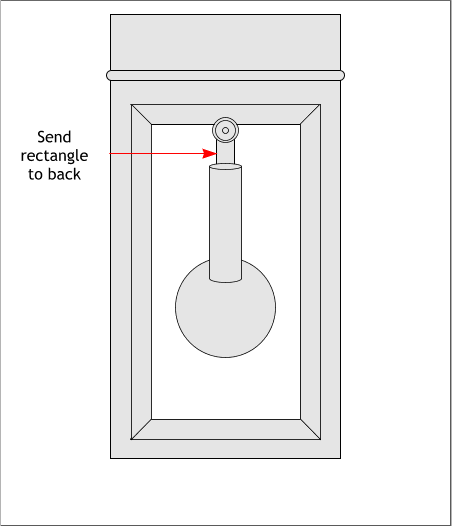
Add a new rectangle for the pendulum shaft. Send this shape
to the back (Ctrl b or Arrange > Put to Back).
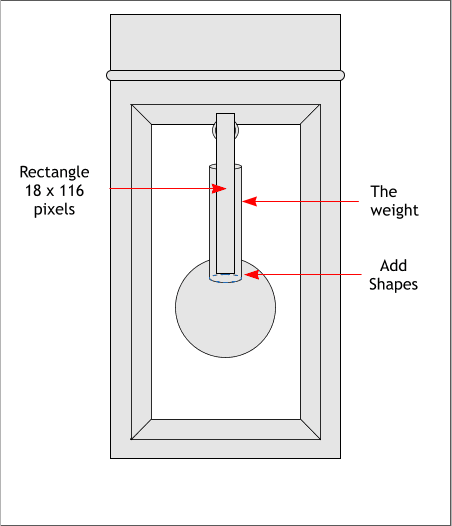
Center the rectangle for the weight (show behind the shaft),
and the two ellipses. Align the vertical center of the small
ellipses to the top and bottom sides of the weight rectangle.
Select the weight rectangle and the bottom ellipse and
Arrange > Combine Shapes > Add Shapes (Ctrl 1). Bring the
top ellipse in front of the weight shape (Ctrl f).
OK, if you did not already do this, select the shaft rectangle
and send it to the back.
Select the top shape, and the frame shape and from the
Arrange menu select Combine Shapes > Slice Shapes or use
the keyboard shortcut, Ctrl 4. Repeat this step for the
bottom half of the frame.
The left and right sides of the frame will still be one shape.
Select the left or right side of the frame. From the Arrange
menu, select Break Shapes. You should now be able to select
each of the four sides individually.
Select the Ellipse Tool (L). Hold down the Ctrl key, to
constrain the ellipse to a circle) and draw the circles to the
sizes shown. And add the two ellipses and one new rectangle.
TIP: For the three centered circles on the top, create
the first circle to the largest size. Clone the circle (Ctrl
k) and reduce the size on the Infobar and press Enter to
apply the change. Repeat this step to create the
smallest circle.
Add a new rectangle for the pendulum shaft. Send this shape
to the back (Ctrl b or Arrange > Put to Back).
Center the rectangle for the weight (show behind the shaft),
and the two ellipses. Align the vertical center of the small
ellipses to the top and bottom sides of the weight rectangle.
Select the weight rectangle and the bottom ellipse and
Arrange > Combine Shapes > Add Shapes (Ctrl 1). Bring the
top ellipse in front of the weight shape (Ctrl f).
OK, if you did not already do this, select the shaft rectangle
and send it to the back.

 DOWNLOAD ZIPPED TUTORIAL


