
 WEBSITE AND WEBSITE GRAPHICS CREATED WITH XARA DESIGNER PRO 6


 Select the Rectangle Tool (M). Draw two centered rectangles to the
sizes shown. Select the smaller rectangle and click the Curved Corners
icon on the Infobar. Select Curvature from the drop down list and
change the setting to 0.7.
NOTE: You need to draw the small rectangle to the exact size for
the curved corners to be correct. If you resize the rectangle first,
the curves will be wrong. Draw any size rectangle then change the
W and H settings on the Infobar and press Enter to apply the
change. This drawing method works with circles and ellipses.
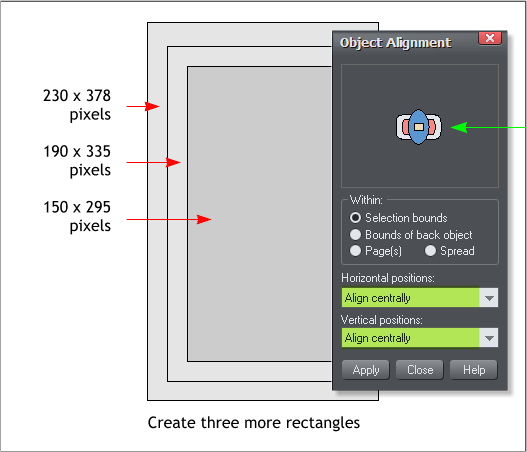
Create three more rectangles to the sizes shown and center all three
rectangles. Use the Object Alignment dialog (Arrange > Alignment...
or press Shift Ctrl L) to center the three rectangles.
Center the first two rectangles over and on top of the three
new rectangles.
Select the two middle rectangles and from the Arrange
menu, select Combine Shapes > Subtract Shapes or press
Ctrl 2, the keyboard shortcut. This removes the center of the
middle rectangle and creates a frame shape (pale yellow).
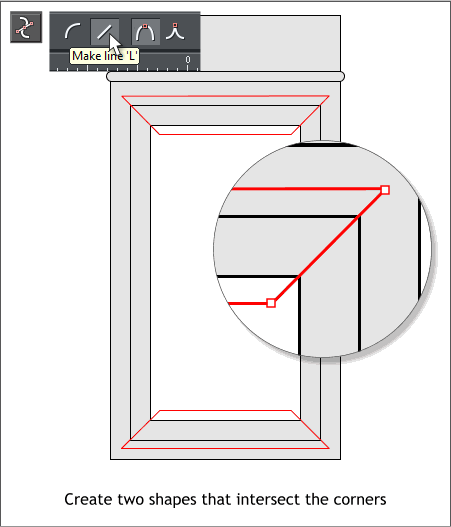
Select the Shape Editor Tool (F4). Click the Make Line option
on the Infobar.
Draw two shapes (shown in red outline) that pass through the
corners of the frame shape. Adjust the control points if
necessary so the line passes precisely through the corners.
TIP: Click
here to
center
selected
objects
Select the Rectangle Tool (M). Draw two centered rectangles to the
sizes shown. Select the smaller rectangle and click the Curved Corners
icon on the Infobar. Select Curvature from the drop down list and
change the setting to 0.7.
NOTE: You need to draw the small rectangle to the exact size for
the curved corners to be correct. If you resize the rectangle first,
the curves will be wrong. Draw any size rectangle then change the
W and H settings on the Infobar and press Enter to apply the
change. This drawing method works with circles and ellipses.
Create three more rectangles to the sizes shown and center all three
rectangles. Use the Object Alignment dialog (Arrange > Alignment...
or press Shift Ctrl L) to center the three rectangles.
Center the first two rectangles over and on top of the three
new rectangles.
Select the two middle rectangles and from the Arrange
menu, select Combine Shapes > Subtract Shapes or press
Ctrl 2, the keyboard shortcut. This removes the center of the
middle rectangle and creates a frame shape (pale yellow).
Select the Shape Editor Tool (F4). Click the Make Line option
on the Infobar.
Draw two shapes (shown in red outline) that pass through the
corners of the frame shape. Adjust the control points if
necessary so the line passes precisely through the corners.
TIP: Click
here to
center
selected
objects

 DOWNLOAD ZIPPED TUTORIAL


