|
|
 |
 |
|
 Once the printing film is output it
is used by the printer to create printing plates that go on the printing press and eventually transfer the image onto the selected paper stock. Once the printing film is output it
is used by the printer to create printing plates that go on the printing press and eventually transfer the image onto the selected paper stock.
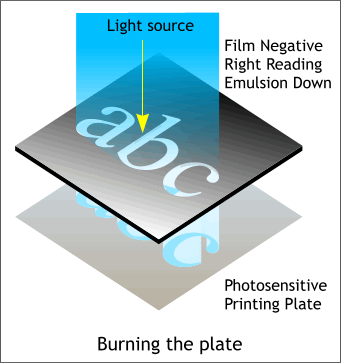
The film is placed right reading, emulsion side down, on top of the printing plate, which has been coated with a photosensitive emulsion. When light is passed
through the film onto the plate, the image from the film is burned onto the printing plate.
|
 |
 |
|
 The most common form of printing is called
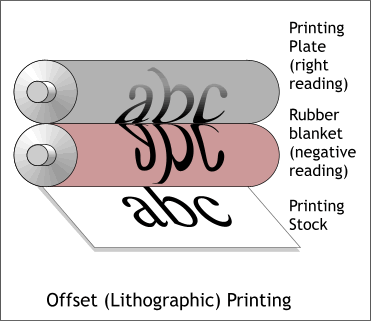
Lithographic or Offset. Unlike Letterpress printing, which prints directly from the plate to the paper, Offset printing transfers a right reading image onto a rubber blanket which then
transfers the wrong reading inked image onto the paper stock where once again, it is right reading. In 4-color printing (CMYK), each color is printed from a separate plate. This is why the plates need to
have registration marks on the film to enable the pressperson to ensure that each plate is precisely registered. Most four color presses today can have an extra plate
which is often used to apply a fifth color, if needed, or to apply a varnish. A fifth color can be used to increase the density of a difficult color, such as bright red,
which is a difficult color to reproduce accurately. Often a fifth color is used on what is called a "touch plate" to overprint the red area only and increase the
density and accuracy of the red, or other color, in the image. The most common form of printing is called
Lithographic or Offset. Unlike Letterpress printing, which prints directly from the plate to the paper, Offset printing transfers a right reading image onto a rubber blanket which then
transfers the wrong reading inked image onto the paper stock where once again, it is right reading. In 4-color printing (CMYK), each color is printed from a separate plate. This is why the plates need to
have registration marks on the film to enable the pressperson to ensure that each plate is precisely registered. Most four color presses today can have an extra plate
which is often used to apply a fifth color, if needed, or to apply a varnish. A fifth color can be used to increase the density of a difficult color, such as bright red,
which is a difficult color to reproduce accurately. Often a fifth color is used on what is called a "touch plate" to overprint the red area only and increase the
density and accuracy of the red, or other color, in the image.
|
 |
 |
|
 In a perfect world, the four printing plates
would align perfectly and each color would be laid down precisely on top of the next. In a perfect world, the four printing plates
would align perfectly and each color would be laid down precisely on top of the next.
Commercial printing is not always a perfect world. Commercial printing establishments like to have a bit of safety in the form of color
trapping built into color images to compensate for slight shifts in the printing plates.
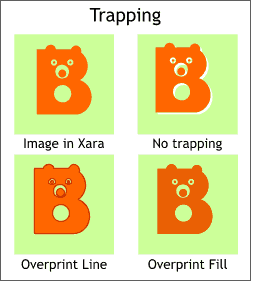
Here's why. In the image shown on the top left, the bear image aligns perfectly over the green background. When the image is sent to
the imagesetter for film output, the area beneath the bear is removed or "knocked out". Hence if the printing plates are slightly out of alignment, a small white outline can appear on one side as shown in
the No trapping image. To compensate for this, you can use color trapping. This involves either overprinting an outline around the object or overprinting the fill
directly over the background without knocking out the background.
As we saw on the last page, in the Imagesetting tabbed section of the print options, we have the option to Always Overprint Black. If the only black
overprinting is text and small shapes and lines, this is OK. But what about the other colors? One way to add what is known in the printing world as "trap" to objects,
(because one color traps another) such as the bear in this example, is to add a same color outline of between .5 and 1 point in width. If you add a same color, 1
point line and set it to overprint, Xara adds one half of the line (.5) point to the inside of the object and one half to the outside. This in essence covers the white
outline should the plates be slightly out of alignment.
If you chose to Overprint Fill, the background is not knocked out and the bear is
printed directly on the green background. This works as long as the overprinting image is sufficiently dark and the background is very light. Otherwise the
overprinting image's color can become muddied by the background color. Overprint Fill works best if you are overprinting black on objects such as black text or small black shapes.
TIP:
Solid black is not really as black as you might think. Especially if you are printing on a dull coated or uncoated paper stock. You can attain a richer black if
you add 15-20% cyan, magenta, and yellow to your black color.
|
 |
 |
|
 Xara has two kinds levels of Overprinting
known as Ink Level and Object Level. You can select an ink color in the Separations tabbed section of the Print Options dialog and set it to overprint. This causes
the selected color to overprint all other colors and is an example of Ink Level printing. But for four color printing this is not a very good idea. Xara has two kinds levels of Overprinting
known as Ink Level and Object Level. You can select an ink color in the Separations tabbed section of the Print Options dialog and set it to overprint. This causes
the selected color to overprint all other colors and is an example of Ink Level printing. But for four color printing this is not a very good idea.
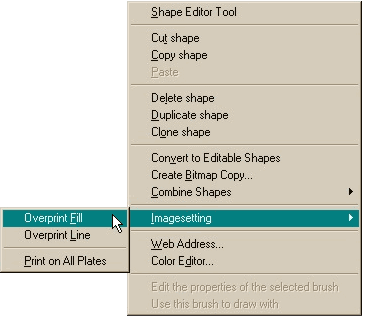
Object Level overprinting lets you specify overprinting on an object-by-object basis. To overprint a selected object, or objects, or text object,
right click on the object and select from the popup menu shown above either Overprint Fill, to overprint the entire shape over the background or objects below, or select Overprint Line
to only overprint the object's outline. (The selected object will need to have an outline for Overprint Line to work). The outline does not need to be the same color as the object.
To print what is know as a registration color, (100% CMY and K) select Print on all Plates
. This causes the selected text or object to output to all four pieces of film and to print on all four plates. This is useful if you want to add your own crop
marks, or other information, such as your company name and logo, on all four printing plates.
|
 |
|
|
|
|

