|
Printing from Xara is pretty much like printing from any application. There are a few things you need to know however to make your printing experience a positive
and happy one.
 To print your page, select Print
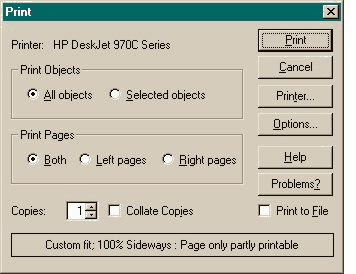
from the File pull down menu. The Print dialog opens (shown here). Let's begin by covering the options in the Print dialog. To print your page, select Print
from the File pull down menu. The Print dialog opens (shown here). Let's begin by covering the options in the Print dialog.
The first area is Print Objects and has two options: All Objects and Selected Objects. All Objects prints all objects on the
printable portion of the page while Selected Objects prints only selected objects.
NOTE: While you are close to the screen shot above, notice the text at the very
bottom, Custom Fit: 100% Sideways: Page only partially printable. All this means is Xara cannot print to cover the entire sheet of paper in your printer. This is true of
just about all desktop printers. Each has a margin around the page beyond which cannot be printed . To see the margin settings for your printer, select Show Print Borders in the Window pull down menu.
Print Pages is only enabled if you have specified Double Page Spread checked in the Page Options > General dialog (Utilities
> Options...) You can specify Both pages, or the Left or Right page only.
Copies: lets you specify how many copies you want to print.
Collate Copies is only enabled if you are printing both pages, and multiple copies,
of a double page spread. When checked, Xara prints left page, right page, left page, right page, etc. When disabled, Xara prints all the left pages first, and then prints all the right pages.
Print to File You use this option to create a PRN (printer) file which you can supply
to your service bureau for output. This will be explored further in the Imagesetting section.
The Printer button takes you to a page of options that are specific to your selected
printer. In this dialog, you also determine which direction the paper is feeding into your printer. This is different from the Landscape or Portrait settings in the Options
section. Most desktop printers feed paper vertically, or in what is known as the Portrait direction. If the page you are printing is Landscape (horizontal) select Landscape in the Options
dialog, but select Portrait in the Printer dialog. Once you have set the correct feed in the printer section, there is no need to change this again. You only need to change the setting in the
Options section if you change the paper orientation.
Options will be covered on page 3.
Help provides context-sensitive information related to the current dialog.
Problems? takes you to the Printing Troubleshooter dialog and is helpful if you are having printing problems.
|

