 |
 |
 |
 |
 |
 |
 |
 |
Xara X. Circular Fills (Continued)
Conical Fills can be rotated by dragging either end of the semicircular fill path or repositioned by dragging the center control point. Colors can be dropped onto the semicircular
fill path producing a symmetrical fill pattern. Profiles can be applied to 2-color fills only. The Tiling options do not apply to Conical Fills.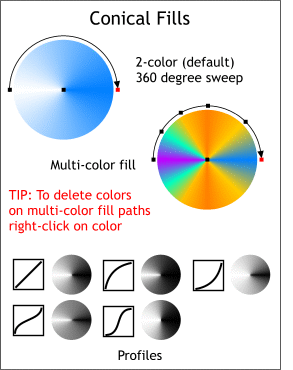 Conical Fills fill from the center in a 360 degree sweep. By default the sweep begins white, reaching 100 percent of the second color at 180 degrees and returns 180 degrees back to white.
Each of the two fill path arrows can operate independently and can be rotated and/or
skewed. Colors can be dropped onto the horizontal fill path. (Colors dropped onto the vertical fill path arrow become the center color). Geometric patterns can be achieved using the Repeating Tiling option and Profiles
can be applied as shown on the bottom left.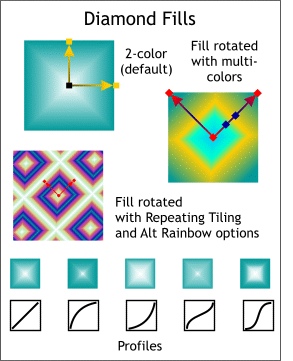 Diamond Fills, when applied to a square object, produce a white four-pointed star appearance.
The bottom left corner fill path point, though inflexible, may be repositioned, while the other two end points are flexible and can be resized and skewed. Profiles
and dropping additional colors are not available. The Repeating Tiling option can produce some engaging effects.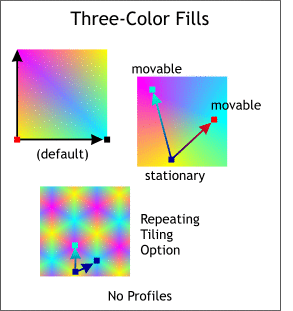 Three-Color Fills are, again to the best of my knowledge, unique to Xara. They produce a three-way blending of three colors that is similar to the effect achieved with mesh fills
in other drawing applications.
The bottom left corner fill path point may be
repositioned, while the other three end points are flexible and can be resized or skewed. Profiles and dropping additional colors are not available. The Repeating Tiling option can produce some amusing effects.
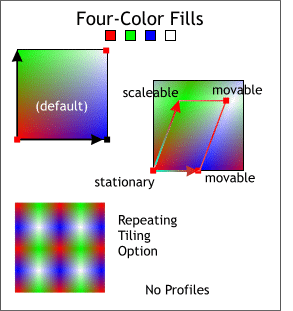 Like the Three-Color Fills,
Four Color Fills are unique to Xara. They produce a four-way blending of four colors that is also similar to the effect achieved with mesh fills in other drawing applications.
To apply a Bitmap Fill, the bitmap needs to
be present in either the Fill Gallery or the Bitmap Gallery. (Any bitmap image created in Xara, or imported into Xara, can be found in the Bitmap Gallery on the Infobar, even if
the bitmap has been deleted from the screen). To apply a bitmap fill using a bitmap that is already in the Bitmap Gallery, select the object to be filled with the Fill Tool, then select the bitmap fill from the
Bitmap Name drop down list on the Infobar. Once applied, the Bitmap Fill has two independent fill path arrows which can be resized, rotated, and/or skewed. The handles, when they first appear, indicate the
actual size of the bitmap image as indicated in the top example with the red dotted outline. Bitmap fills can be reedited at any time unless the filled object is Converted to Editable Shapes (Arrange menu).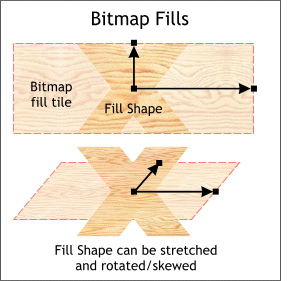 Xara can easily fill almost any selected object, or text object, with a bitmap image. Unlike some applications, when applied to text, the text remains editable.
You can use your keyboard's arrow keys to modify a Bitmap Fill
. To do this, click select either end point (shown in red) then press the appropriate arrow key. This provides more control when modifying the fill.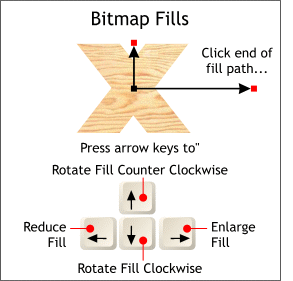 Bitmap Fills can be Tiled using the Simple, Repeat and Repeat Inverted Tiling options.
TIP: You can also use the Ctrl, Shift, and Alt keys to adjust the amount of the rotation. Ctrl rotates in 7.5 degree increments, Shift in 15 degree increments. Alt in 1 pixel increments. These keys can be used when nudging an object as well.
The first Fractal Fill is Fractal Clouds. As with other fills with two fill paths, the fill
paths can operate independently and can be rotated, resized and/or skewed. Fills can be Tiled and Xara's three Fill Effects applied. Either of the two colors can be changed by
clicking the end point and selecting a color on from the screen palette. Fractal Clouds can be used to produce realistic cloud and mist patterns.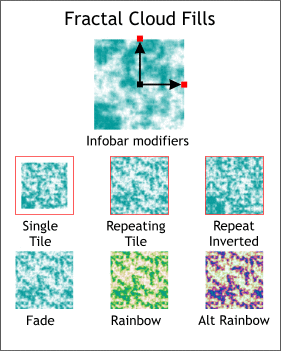 Xara has two kinds of Fractal Fills
, so called because of the Fractal generation algorithm used to produce the pattern.