 |
 |
 |
 |
 |
 |
 |
 |
Xara X. Chapter 5 The Text Tool
![]() While Xara's Text Tool
is not the ultimate desktop publishing text tool, there is no shortage of power features. We'll start easy and then work our way on to the more esoteric features. If I leave anything out, let me know.
While Xara's Text Tool
is not the ultimate desktop publishing text tool, there is no shortage of power features. We'll start easy and then work our way on to the more esoteric features. If I leave anything out, let me know.
Press Enter to start a new line.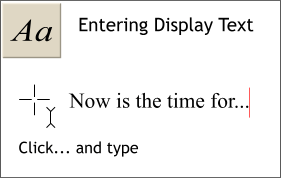 To enter display text, select the Text Tool, click where you want the text to begin, and start typing.
Keyboard Text Shortcuts: Most of these shortcuts work in any Windows application, but they
can come in very hand when working with text in Xara. The red vertical line ( Home:
End: Jumps to the end of a line of text|
Ctrl - Home: |
Jumps to the top left of a column of text
Ctrl - End: Jumps to the very end of the column|
Ctrl - right arrow key: Jumps |to the next word
Shift - right arrow key: Highlights one character at a time
Ctrl - Shift + right arrow key: Highlights one word at a time
Shift + End: Highlights entire line of text
Ctrl - Shift - End: Highlights all lines of text to
the end of the paragraph
To highlight text, either use the keyboard
shortcuts in the previous section, or drag the text cursor across the text.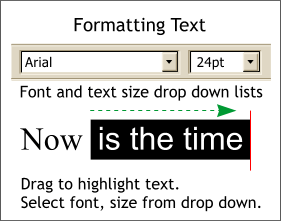 To change text's size or font, highlight the appropriate text, then select the font and/or point size from the drop down lists on the Infobar.
TIP: You can right click on any text with the Selector Tool (the arrow cursor) and select Text Tool from the pop up menu to switch to the Text Tool.
Highlight the text, then press the appropriate button(s) on the Infobar. (Some fonts may not have italic or bold fonts).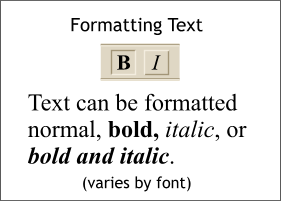 Text can also be formatted in Italic, Bold, and Bold Italic.
Keyboard shortcut: Ctrl - b will apply boldface to highlighted text. Ctrl - i will apply italic to highlighted text. Ctrl - b - i will apply bold italic to highlighted text.
You can adjust the width of the measure by
dragging the red box at the end of the text. The text will redraw to the new width.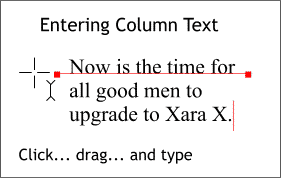 To create text to a given measure (width), click the Text Tool cursor on the screen and drag to the desired width. Text will automatically word wrap.
These options are shown on the left and will be covered below.
Auto Kerning (d) is a new feature in Xara X.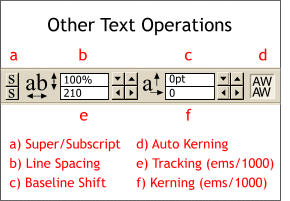 There are additional formatting operations that are enabled when you select the Text Tool and/or when the Text Tool is inserted into the text.
Superscript and Subscript can be used to add
scientific and mathematical notations to text.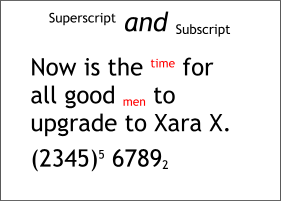 Superscript (a) reduces the size of the text
by about one half and aligns it to the top of the cap height. Subscript also reduces the size of the text and alligns it to the baseline.
Superscript (a) reduces the size of the text
by about one half and aligns it to the top of the cap height. Subscript also reduces the size of the text and alligns it to the baseline.
You can use the up and down arrow buttons (to the right of the text entry boxes) or enter a numerical amount and press Enter to apply the changes.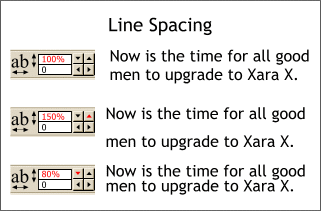 The Line Spacing
adjustment (b) adds or subtracts space between highlighted,
multiple lines of text as illustrated on the left.
The Line Spacing
adjustment (b) adds or subtracts space between highlighted,
multiple lines of text as illustrated on the left.
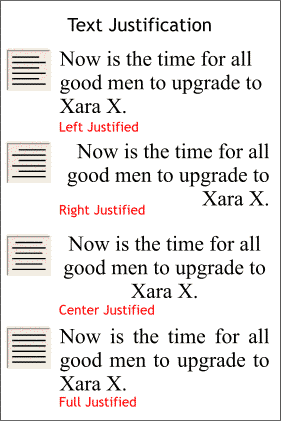 Selected text can be justified (aligned) by pressing the appropriate justify text buttons on the Infobar. The last button, Full Justified, only works in Column text mode.