 |
 |
 |
 |
 |
 |
 |
 |
Xara X. Button and Navbar Tutorial
With the Bevel Tool, apply a Chiseled bevel. Add the words Page One using the Text Tool. Center the text on the button.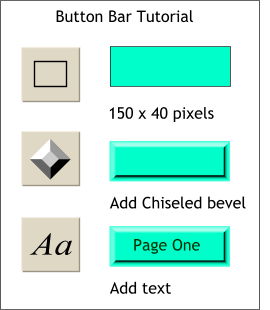 Using the Rectangle Tool
, create a rectangle 150 by 40 pixels.
Using the Rectangle Tool
, create a rectangle 150 by 40 pixels.
TIP: If the text for your buttons is going to be centered, select the text then select the Center Justify icon on the Infobar. Center the text over the button. When you edit the text on the new buttons it will automatically be centered.
Press New... on the Infobar at the top of the screen. The New bar dialog opens as shown. Use the settings shown here. Press Create.
Four identical buttons are created in the vertical position with no space between. 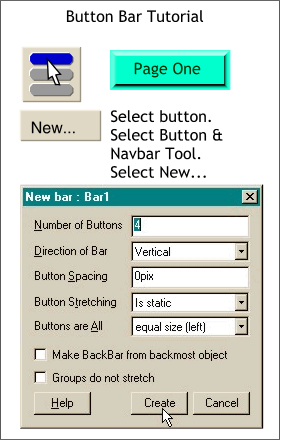 Select the button and text, then select the
Button & Navbar Tool.
Select the button and text, then select the
Button & Navbar Tool.
Notice, as the text is changed for Page Three, the buttons widen a little to accommodate the wider text.  Using the Text Tool
, highlight the text on buttons 2, 3, and 4 and change the text as shown.
Using the Text Tool
, highlight the text on buttons 2, 3, and 4 and change the text as shown.
With the New State Looks Distinct option selected, click the Mouse Over radio button and press Create. Repeat this for Mouse Down and
Selected. As each new state is created, the buttons on the page change to reflect the current state.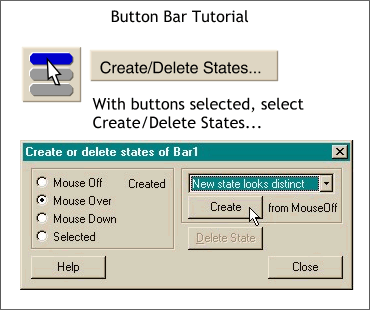 Press Create/Delete States on
the Infobar to open the Create or Delete States dialog.
Press Create/Delete States on
the Infobar to open the Create or Delete States dialog.
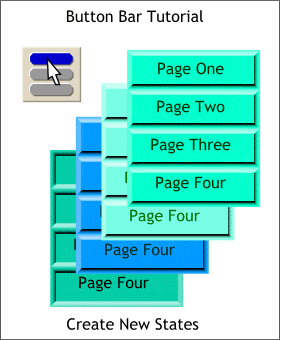 Shown on the left are the four button states.
Add a bevel of your choice to the shape. 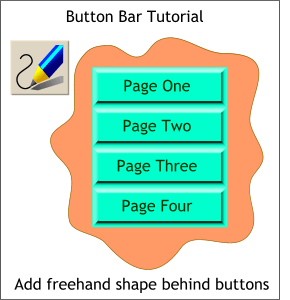 Using the Freehand Tool
, draw a freeform shape behind the buttons.
Using the Freehand Tool
, draw a freeform shape behind the buttons.
In the Bar Properties dialog, click Create BackBar from Selection. A dialog box should appear telling you that
the back bar has been successfully created. With the new free form shaped selected,
select the Button & Navbar Tool, then select Bar Properties... on the Infobar.
With the new free form shaped selected,
select the Button & Navbar Tool, then select Bar Properties... on the Infobar.
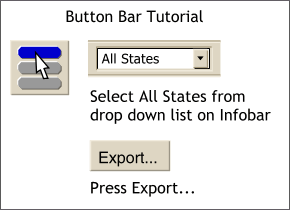 Select the Button & Navbar Tool
then select All States from the drop down list of button states on the Infobar. Marquee select all four buttons (drag a rectangular shape around the buttons with the Button & Navbar Tool cursor) and press Export...
Select the Button & Navbar Tool
then select All States from the drop down list of button states on the Infobar. Marquee select all four buttons (drag a rectangular shape around the buttons with the Button & Navbar Tool cursor) and press Export...
NOTE: Selecting All States ensures that all button states will be exported.
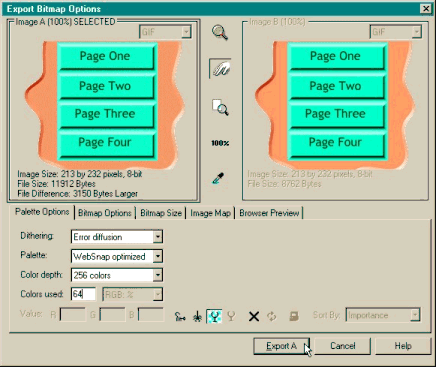 Use the settings shown
on the left and press Export A.
Use the settings shown
on the left and press Export A.
NOTE: You can compare settings before committing to Export. Click in either the Image A or Image B preview window and select the image type and options. When you decide on one group of settings, click in that window and click Export.
Of course you do. Press Yes and Xara will launch your
default Web Browser and display the final pages. Xara creates a separate page for each button and links the buttons to each page. URLs can also be assigned each button by right clicking on each button before exporting, selecting
Web address..., and entering the appropriate information. Xara names the new HTML pages based upon these URLs.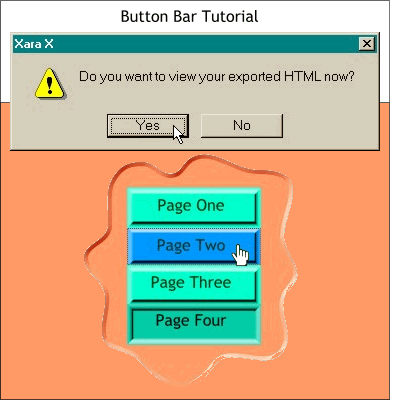 Xara will now create all the
necessary elements for the JavaScript and HTML page script. When Xara finishes, a dialog appears asking if you want to view your exported HTML now?
Xara will now create all the
necessary elements for the JavaScript and HTML page script. When Xara finishes, a dialog appears asking if you want to view your exported HTML now?