 |
 |
 |
 |
 |
 |
 |
 |
More Xara X than You Can Shake a Stick At
The example top left is a simple freehand line. I increased the line weight to 8 points, applied a Round Cap
in the Line Gallery and Converted Line to Shape in the Arrange menu. I applied a Fractal Clouds fill. I used a duplicate for a drop shadow and added Stained Glass transparency.
Another thing that drives your editor (that's me, I think) bonkers is arrows. When you apply an arrowhead and tail in the Line Gallery it might look fine at 1 point, but as the
line weight increases, so does the size of the head and tail. By converting a 1 point arrow to a shape, the proportion remains more consistent. My sanity has been saved!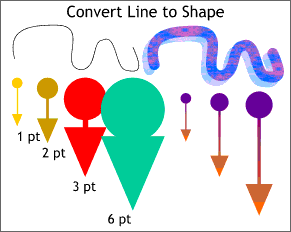 Show of hands. How many times have you wished you could apply a fill to a path? I knew it! Me too. Well now we can!
Not only that, the transparency options are now referred to as Painting Modes. And there are seven new modes in addition to Normal
(formerly mix), Stained Glass, and Bleach. You can more or less see the effect of each Painting Mode as it has been applied to the top split, fountain-filled circles. Saturation
produced no visible effect, so I changed the fill to black, which in turn desaturated the color underneath transforming it to grayscale.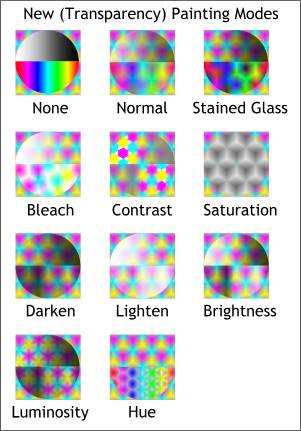 Remember how simple the Transparency
feature used to be? (Maniacal chortle). Well it ain't that simple any more.
Remember how simple the Transparency
feature used to be? (Maniacal chortle). Well it ain't that simple any more.
I've mentioned Profiles a few times and now might be a good time to describe once again what they are and how they work. Those of you who have worked
with recent versions (or is it aversions?) of CorelDRAW will be aware of DRAW's Interactive Controls. DRAW offers a movable slider along a fountain fill path for example that repositions the midway point of the fill. As you will see on the next page, Profiles effect each
tool in different ways but the basic principle is the same. Some Profiles have only one dialog (less confusing), such as the Fountain Fill Profile dialog shown here. All Profile
dialogs have a standard set of drop down preset settings. The area just under the white square with the squggly line shows a graphical representation of what effect the selected Profile will have. You can also modify the
Profile using the sliders.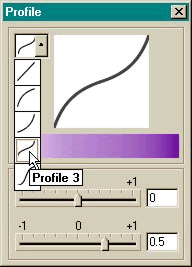 Xara X takes this interactivity to new heights with the Profile settings. Many tools now have Profile
dialogs, including some, but not all, Fill Tool fills, Blends, Contours, Shadows, Contours, Bevels, and more.
Xara X takes this interactivity to new heights with the Profile settings. Many tools now have Profile
dialogs, including some, but not all, Fill Tool fills, Blends, Contours, Shadows, Contours, Bevels, and more.
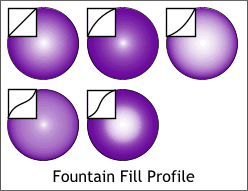 The five Circular-filled Circles on the left show the results of the five Profile settings. The diagonal line is the default setting. The other four Profiles effect the fill as you can see, and
fortunately, in this case, a picture is worth a thousand words for I'm hard pressed to describe exactly what is happening here.
The five Circular-filled Circles on the left show the results of the five Profile settings. The diagonal line is the default setting. The other four Profiles effect the fill as you can see, and
fortunately, in this case, a picture is worth a thousand words for I'm hard pressed to describe exactly what is happening here.