 |
 |
 |
 |
 |
 |
 |
 |
Xara X Tour Continued
Xara X can create a PNG file format with Alpha Transparency both when you export to the PNG file format and when you Create a Bitmap Copy (Arrange
menu). The two images shown here demonstrate this. The image on the left has a 24-bit color depth and shows a white background. The image on the right has Alpha Channel transparency applied and the background
color is now transparent. This is useful for placing one bitmap image over another. Photoshop users will be happy to know that the alpha channels import beautifully. Another much requested feature for
Xara X was Alpha Channel transparency.
Another much requested feature for
Xara X was Alpha Channel transparency.
 As I mentioned on the front page, the new
Create a Brush feature has changed a bit. This feature is now similar to the image sprayer tool found in many applications. You can select a preset brush shape from a drop down list or create one of your own from either a
vector or bitmap object. (Vector shapes seem to work better).
As I mentioned on the front page, the new
Create a Brush feature has changed a bit. This feature is now similar to the image sprayer tool found in many applications. You can select a preset brush shape from a drop down list or create one of your own from either a
vector or bitmap object. (Vector shapes seem to work better).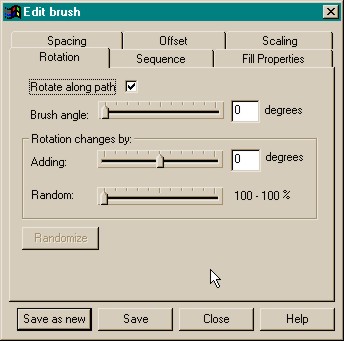 You can either draw freehan d with
the brush or apply it to a path as I have done to the X outline. You can control the size, rotation, spacing, fill properties, and more, creating some intriguing results. When used with a pressure-sensitive tablet you
can vary the thick and thin aspects of the brush size.
You can either draw freehan d with
the brush or apply it to a path as I have done to the X outline. You can control the size, rotation, spacing, fill properties, and more, creating some intriguing results. When used with a pressure-sensitive tablet you
can vary the thick and thin aspects of the brush size.
Recycling the same path upon which the blend was
placed, I created a small chrome salt crystal, which I made into a Brush and applied to the path. Couldn't you do this as a blend? you ask. You could. And by using the new Profile
settings, you could vary the space between the crystals.  Some of you might remember my example of a chrome pretzel which was created using two new features: multicolor fountain fills, and blend along a path.
 But the beauty of the
Edit Stroke controls is you can offset the brush shape (the chrome salt crystals) so they crystals fall on, or on either side of, the path. And, you can make this placement random, so with one or two tweaks of the controls,
the crystals appear to be randomly placed on the chrome pretzel. Pretty tasty, huh?
But the beauty of the
Edit Stroke controls is you can offset the brush shape (the chrome salt crystals) so they crystals fall on, or on either side of, the path. And, you can make this placement random, so with one or two tweaks of the controls,
the crystals appear to be randomly placed on the chrome pretzel. Pretty tasty, huh?
All these tools have additional settings on the Infobar such as distance between lines,
number of steps, Rainbow and Alt Rainbow, and Profiles which I will cover later. The Contour Tool is pretty
much squared away and works in the same interactive way as the Bevel Tool. Select an object, then select the Contour Tool. The control handle arrows appear. Dragging away from the shape adds contours to the
outside, while dragging towards the center contours to the inside.
The Contour Tool is pretty
much squared away and works in the same interactive way as the Bevel Tool. Select an object, then select the Contour Tool. The control handle arrows appear. Dragging away from the shape adds contours to the
outside, while dragging towards the center contours to the inside.