


 WEBSITE AND WEBSITE GRAPHICS CREATED WITH XARA XTREME PRO

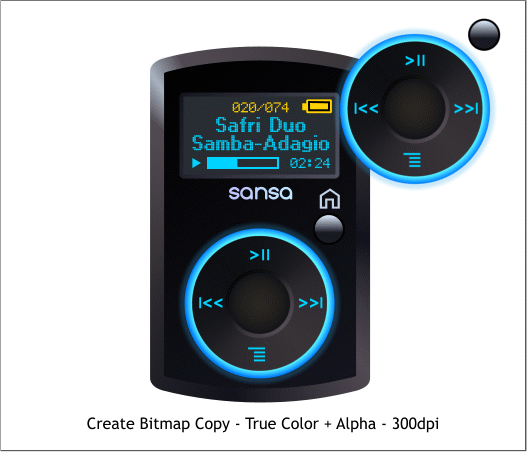
 Select all of the dial objects and the button under the house icon.
From the Arrange menu, select Create Bitmap Copy.... Use the True
Color + Alpha color depth option and change the Bitmap Resolution to
300dpi. Click Create. Set this bitmap to one side for a moment.
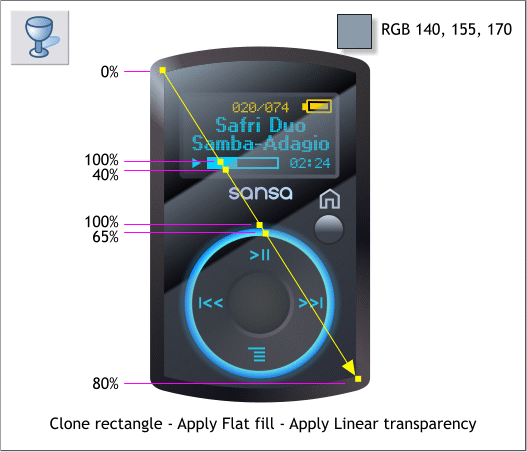
Clone the faceplate rectangle (Ctrl k). Change the fill color to the blue
gray shown above.
Select the clone with the Transparency Tool (F6). Click and drag from
the upper left to the lower right. Double click on the fill path arrow to
add new control points. Change the Transparency slider settings as
shown to the left. The two sets of inner control points should be closer
together than shown to create a more pronounced difference.
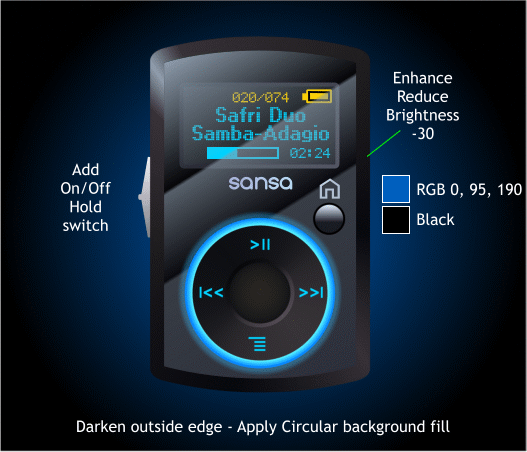
Add a 525 x 450 pixel rectangle behind the player. Apply a Circular fill
using blue and black. Add an On/Off slider switch on the left (two
combined rectangles edited with Shape Editor Tool).
Select the largest rectangle. Use the Live Effects Tool > Enhance dialog
to reduce the Brightness to -30.
Finally, bring the bitmap copy of the dial to the front (Ctrl f) and
position it.
Some of you are wondering why we did not just bring the non-bitmap
dial and button to the front? The simple answer is the bitmap copy
seemed like a good idea at the time. It’s not a perfect world. OK?
H 1 2 3 4 5 6 7 8 9 Download Zipped Tutorial
Select all of the dial objects and the button under the house icon.
From the Arrange menu, select Create Bitmap Copy.... Use the True
Color + Alpha color depth option and change the Bitmap Resolution to
300dpi. Click Create. Set this bitmap to one side for a moment.
Clone the faceplate rectangle (Ctrl k). Change the fill color to the blue
gray shown above.
Select the clone with the Transparency Tool (F6). Click and drag from
the upper left to the lower right. Double click on the fill path arrow to
add new control points. Change the Transparency slider settings as
shown to the left. The two sets of inner control points should be closer
together than shown to create a more pronounced difference.
Add a 525 x 450 pixel rectangle behind the player. Apply a Circular fill
using blue and black. Add an On/Off slider switch on the left (two
combined rectangles edited with Shape Editor Tool).
Select the largest rectangle. Use the Live Effects Tool > Enhance dialog
to reduce the Brightness to -30.
Finally, bring the bitmap copy of the dial to the front (Ctrl f) and
position it.
Some of you are wondering why we did not just bring the non-bitmap
dial and button to the front? The simple answer is the bitmap copy
seemed like a good idea at the time. It’s not a perfect world. OK?
H 1 2 3 4 5 6 7 8 9 Download Zipped Tutorial


