


 WEBSITE AND WEBSITE GRAPHICS CREATED WITH XARA XTREME PRO

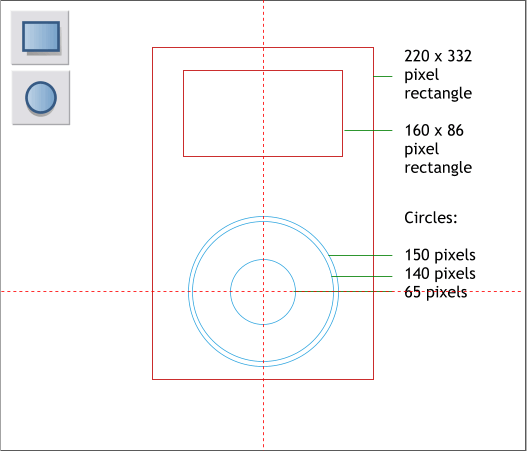
 We will start with some basic shapes. Using the Rectangle Tool
(keyboard shortcut: M) draw two rectangles to the sizes shown above.
Select the Ellipse Tool (L) and draw three concentric circles to the sizes
shown. Hold down the Ctrl key to constrain the ellipse to a circle.
Center all of the objects as shown.
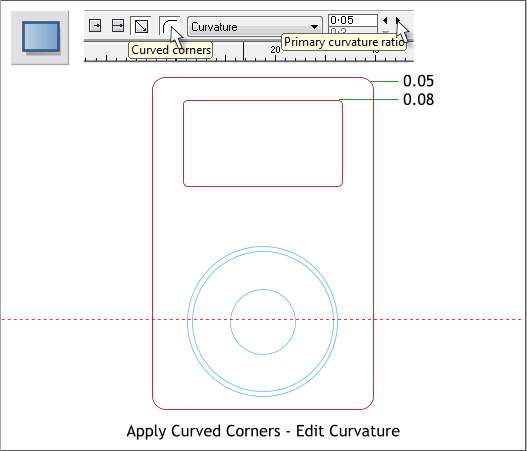
Select the large rectangle with the Rectangle Tool. Click the Curved
Corners icon on the Infobar.
From the Editable Items drop down list, select Curvature. Use the arrow
keys to change the Primary Curvature Ratio to 0.5. Select the smaller
rectangle and change the curvature setting to 0.08.
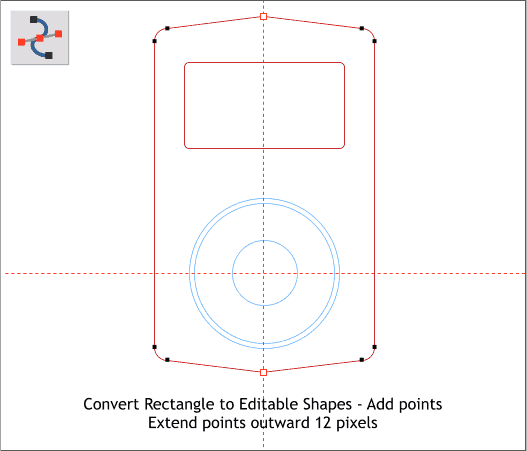
Select the large rectangle with the Selector Tool (the arrow pointer).
From the Arrange drop down menu, select Convert to Editable Shapes.
Switch to the Shape Editor Tool (F4). Click in the very center of the top
edge of the rectangle to add a new control point. Move the point up 12
pixels. Do the same thing to the bottom side. Add guidelines in the
center of the rectangle and in the center of the circles to help select.
TIP: I like to set the “Nudge” distance (Utilities > Options General
> Nudge Size) to 1pix. The nudge size is the distance a selected
object or control point moves with each click of an arrow key on
your keyboard. So to move the top and bottom points 12 pixels, I
can just click the up or down arrow key 12 times.
H 1 2 3 4 5 6 7 8 9 Download Zipped Tutorial
We will start with some basic shapes. Using the Rectangle Tool
(keyboard shortcut: M) draw two rectangles to the sizes shown above.
Select the Ellipse Tool (L) and draw three concentric circles to the sizes
shown. Hold down the Ctrl key to constrain the ellipse to a circle.
Center all of the objects as shown.
Select the large rectangle with the Rectangle Tool. Click the Curved
Corners icon on the Infobar.
From the Editable Items drop down list, select Curvature. Use the arrow
keys to change the Primary Curvature Ratio to 0.5. Select the smaller
rectangle and change the curvature setting to 0.08.
Select the large rectangle with the Selector Tool (the arrow pointer).
From the Arrange drop down menu, select Convert to Editable Shapes.
Switch to the Shape Editor Tool (F4). Click in the very center of the top
edge of the rectangle to add a new control point. Move the point up 12
pixels. Do the same thing to the bottom side. Add guidelines in the
center of the rectangle and in the center of the circles to help select.
TIP: I like to set the “Nudge” distance (Utilities > Options General
> Nudge Size) to 1pix. The nudge size is the distance a selected
object or control point moves with each click of an arrow key on
your keyboard. So to move the top and bottom points 12 pixels, I
can just click the up or down arrow key 12 times.
H 1 2 3 4 5 6 7 8 9 Download Zipped Tutorial


