


 WEBSITE AND WEBSITE GRAPHICS CREATED WITH XARA XTREME PRO

 With the large rectangle and the Shape Editor Tool still selected, drag
the top left and top right upward a very short distance. This changes
each half of the top to curves. Click on the control points and adjust the
Bezier control handles as shown in the enlargement to make a gentle
curve. This may take some doing. Take your time until the corners are a
smooth arched curve.
Notice in the enlargement above how the Bezier control handles form a
straight line that is tangent to the curve. The blue dashed line
represents the proper angle for both of the handles.
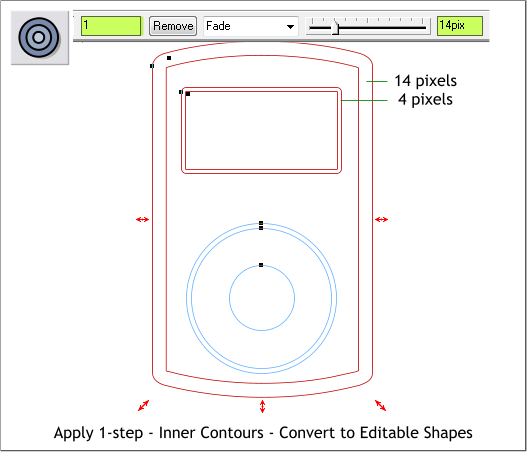
Select the large rectangle, then switch to the Contour Tool (Ctrl F7).
Drag any of the red arrow control handles toward the center a very
short distance. Change the Contour Width slider setting to 14pix and
press Enter to apply the change. Change the Number of Contour Steps
to 1 and press Enter to apply the change.
Arrange > Convert to Editable Shapes and then Arrange > Ungroup.
Repeat this step with the smaller rectangle. Except change the width
setting to 4 pixels and 1 step.
With the large rectangle and the Shape Editor Tool still selected, drag
the top left and top right upward a very short distance. This changes
each half of the top to curves. Click on the control points and adjust the
Bezier control handles as shown in the enlargement to make a gentle
curve. This may take some doing. Take your time until the corners are a
smooth arched curve.
Notice in the enlargement above how the Bezier control handles form a
straight line that is tangent to the curve. The blue dashed line
represents the proper angle for both of the handles.
Select the large rectangle, then switch to the Contour Tool (Ctrl F7).
Drag any of the red arrow control handles toward the center a very
short distance. Change the Contour Width slider setting to 14pix and
press Enter to apply the change. Change the Number of Contour Steps
to 1 and press Enter to apply the change.
Arrange > Convert to Editable Shapes and then Arrange > Ungroup.
Repeat this step with the smaller rectangle. Except change the width
setting to 4 pixels and 1 step.
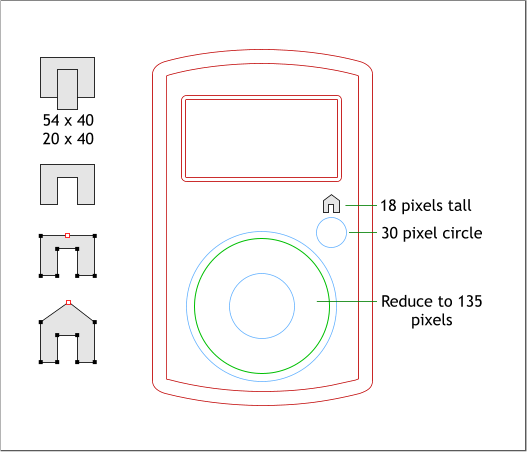 Reduce the middle circle (shown in green outline) to 135 pixels.
Add a new 30 pixel circle. And create a small house icon. Here’s how to
make the house icon:
Create two rectangles as shown top left. Center the two rectangles. Let
the vertical rectangle extend over the bottom of the wide rectangle.
Select both rectangles and Arrange > Combine Shapes > Subtract
Shapes (or press Ctrl 2).
Add a new control point with the Shape Editor Tool and use the up
arrow key on your keyboard to nudge it upwards as shown. Reduce the
height to 18 pixels and center it over the 30 pixel circle.
H 1 2 3 4 5 6 7 8 9 Download Zipped Tutorial
Reduce the middle circle (shown in green outline) to 135 pixels.
Add a new 30 pixel circle. And create a small house icon. Here’s how to
make the house icon:
Create two rectangles as shown top left. Center the two rectangles. Let
the vertical rectangle extend over the bottom of the wide rectangle.
Select both rectangles and Arrange > Combine Shapes > Subtract
Shapes (or press Ctrl 2).
Add a new control point with the Shape Editor Tool and use the up
arrow key on your keyboard to nudge it upwards as shown. Reduce the
height to 18 pixels and center it over the 30 pixel circle.
H 1 2 3 4 5 6 7 8 9 Download Zipped Tutorial


