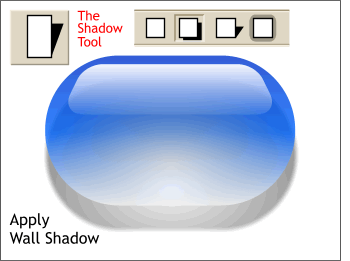
 What's missing from our gel
capsule is a shadow. We can add a soft diffused shadow with Xara X's new Shadow Tool. What's missing from our gel
capsule is a shadow. We can add a soft diffused shadow with Xara X's new Shadow Tool.Select the blue capsule shape, then select the Shadow Tool. Click the second effect from the left, Wall Shadow
(the far left box removes the shadow). Reposition the shadow so it is directly beneath the capsule by dragging the shadow with the Shadow Tool.
NOTE: You can also intuitively add a drop shadow to any object, or text object, by selecting the
Shadow Tool, then dragging on an object in the direction you want the shadow to fall. It's kind of like magic! |

 It's not that I don't have the greatest respect for Apple's
design team, but a gel-filled capsule does not cast a gray shadow. It casts a shadow the color of the gel.
It's not that I don't have the greatest respect for Apple's
design team, but a gel-filled capsule does not cast a gray shadow. It casts a shadow the color of the gel.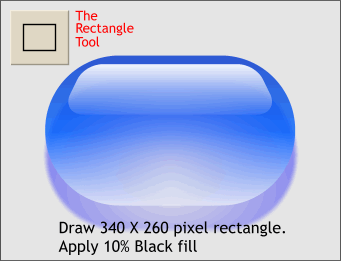 We are going to add a light gray
background behind our capsule. It doesn't need to be exact, but draw it more or less to the size shown using the Rectangle Tool. Apply a 10% black fill.
We are going to add a light gray
background behind our capsule. It doesn't need to be exact, but draw it more or less to the size shown using the Rectangle Tool. Apply a 10% black fill.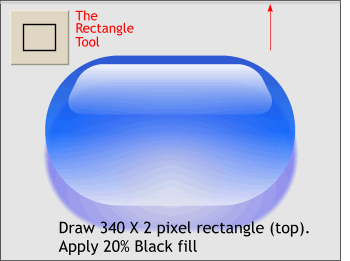 Draw another rectangle, this time exactly the width of your
rectangle and 2 pixels in height. The easiest way to specify this is in the W and H (Width and Height) text entry boxes on the Infobar. To apply changes that are not linked to one another,
press the tiny lock icon button on the Infobar so it is in the raised (non-proportional scaling) position.
Draw another rectangle, this time exactly the width of your
rectangle and 2 pixels in height. The easiest way to specify this is in the W and H (Width and Height) text entry boxes on the Infobar. To apply changes that are not linked to one another,
press the tiny lock icon button on the Infobar so it is in the raised (non-proportional scaling) position.