
|
||
|
|
|
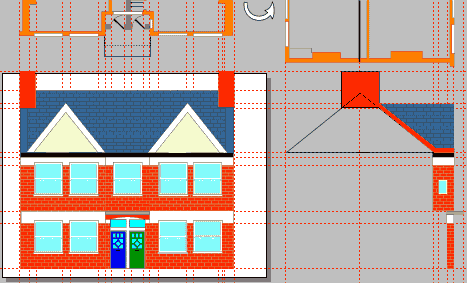
Now you can fill in your two elevations. Consider and group each flat surface independently. In the case of my own plan that meant the main front wall and gables, the slightly recessed front door wall, the further recessed alcove above and the front porch, not forgetting chimneys and roof. Repeat the procedure for the side elevation. If you are filling your surfaces with bricks you will need to make the heights and edges match. In my case I prepared a large area of bricks adjacent to the elevations and grouped them. Then I cloned the outlines of the elevations' brick surfaces, nudged them across (thus maintaining vertical positions) and used arrange/combine/slice shapes to cut out what I needed (not very well!). Now all that remains is to assemble the picture. Creating the picture
|
|
|
|
When complete, pick out surfaces in shadow and cover with a black shape set to 50% brightness transparency. In the final illustration on the front, the left gable roof looked odd, perhaps Leonardo's effect was kicking in, so I adjusted it by eye. Finally add sky and trim the borders. If you wanted to, you could replace the windows with cut-outs and develop the surfaces behind them from the plan, using an additional layer for convenience. Having created the elevation sections, you can always adjust viewing angle, viewing height or field of vision and so place these same elements in a different picture. Questions? Comments? Criticisms? Please use the form on the next page to send me your comments. |
|
Suggested reading: Alison Cole, Perspective 1992, Dorling Kindersley Charts the development of perspective techniques in painting through the ages with examples of the masters, and includes a summary of the principles. John Montagu Basic Perspective Drawing 3rd Ed 1998 John Wiley & Sons A comprehensive compendium of perspective techniques from simple to complex, all clearly illustrated with pen and ink sketches. If there is one book on the subject for the artist, this is it. |
|
 Open a copy of the grid template file
saved on Page 3 or create a similar one with your desired horizon, angle of view etc. Copy over your house plan and angle it on the plan grid; it simplifies matters if one corner touches the front (bottom)
of the grid). Copy the front and side elevation sections you have prepared and paste them onto the outer margin (resize this margin with page options if necessary), on a new layer. (Exit the
previous drawing and save it in case of rework). Draw an empty rectangle exactly round the plan grid and group this with a clone of the angled plan. With the mould tool apply a default floor perspective and resize the mould
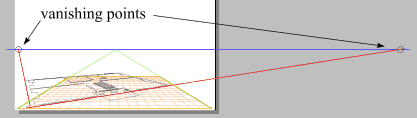
and its vanishing point to exactly fit the foreshortened grid, just as you did on Page 3. Now create the two vanishing points for your building. Carefully
draw a line along one of the main front faces of the building and extend it until it crosses the horizon. Repeat with one of the end faces to get the other vanishing point. If you have, say, an angled bay window you'll have
more lines to project and more vp's
Open a copy of the grid template file
saved on Page 3 or create a similar one with your desired horizon, angle of view etc. Copy over your house plan and angle it on the plan grid; it simplifies matters if one corner touches the front (bottom)
of the grid). Copy the front and side elevation sections you have prepared and paste them onto the outer margin (resize this margin with page options if necessary), on a new layer. (Exit the
previous drawing and save it in case of rework). Draw an empty rectangle exactly round the plan grid and group this with a clone of the angled plan. With the mould tool apply a default floor perspective and resize the mould
and its vanishing point to exactly fit the foreshortened grid, just as you did on Page 3. Now create the two vanishing points for your building. Carefully
draw a line along one of the main front faces of the building and extend it until it crosses the horizon. Repeat with one of the end faces to get the other vanishing point. If you have, say, an angled bay window you'll have
more lines to project and more vp's
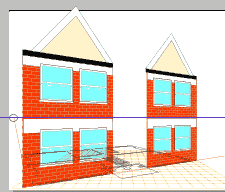 Back on the new layer, copy the most
significant surface from the front or side elevation and apply a right or left perspective (in my case, left). Align the front edge with its point on the floor plan, squeeze until the other
edge lines up horizontally with its end on the plan and finally draw its vanishing point out to line up with the picture's vanishing point. If the front edge lines up with the front of the
plan you shouldn't have to make adjustments to the height. If it doesn't you will need to reduce its height using Alberti's method explained on Page 4.
Back on the new layer, copy the most
significant surface from the front or side elevation and apply a right or left perspective (in my case, left). Align the front edge with its point on the floor plan, squeeze until the other
edge lines up horizontally with its end on the plan and finally draw its vanishing point out to line up with the picture's vanishing point. If the front edge lines up with the front of the
plan you shouldn't have to make adjustments to the height. If it doesn't you will need to reduce its height using Alberti's method explained on Page 4.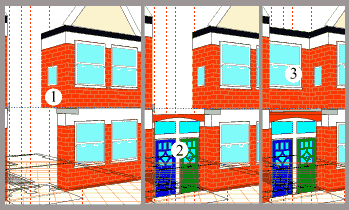 Once you have the first surface in place you can add the others
in the same way. Adjust their heights so that they line up with the adjacent surfaces already in place, squeeze their widths to fit the plan as on Page 4, then use Ctrl-Shift b to
move them backwards to their correct position in the stack. You could go on to add window ledges, etc. When you place the chimney stack you will need to convert to editable shapes and cut off the part obscured by the roof.
Once you have the first surface in place you can add the others
in the same way. Adjust their heights so that they line up with the adjacent surfaces already in place, squeeze their widths to fit the plan as on Page 4, then use Ctrl-Shift b to
move them backwards to their correct position in the stack. You could go on to add window ledges, etc. When you place the chimney stack you will need to convert to editable shapes and cut off the part obscured by the roof.