|
Xara's Mould Tool Perspective
Much of what we previously learned about envelopes also applies to the perspectives. If you take an object and apply the default perspective
(rightmost rectangle on mould tool infobar) you'll see the original selection handles disappear and instead instead a rectangular bounding box with  corner handles will wrap itself tightly round, showing a mould has been applied. Unlike the default envelope the sides are lines not curves, and as you drag in, say,
the top right corner handle, a couple of target icons move in from top and right. corner handles will wrap itself tightly round, showing a mould has been applied. Unlike the default envelope the sides are lines not curves, and as you drag in, say,
the top right corner handle, a couple of target icons move in from top and right.
These icons automatically mark the points where the opposite sides of the perspective converge. Xara calls them vanishing points. I have added the
dotted lines above to make things clear.
I have also shown an inset of the same shape with the envelope applied (click the 'copy' and 'paste as envelope' icons) to demonstrate another
difference - the distortion of objects within the shape also differs.
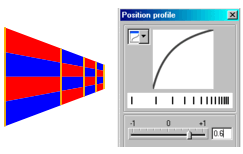 Unlike the envelope distortion, the contents
get more compressed in all directions as they get closer to the vanishing point. This is one feature which makes the perspective tool such a useful one for the job. (Unfortunately, line
widths do not shrink; to achieve this you will need to create a bitmap copy and use that). Note that the spacing of perspectives can be mimicked by the blend tool position attributes
as instanced by the orange lines on the right. Unlike the envelope distortion, the contents
get more compressed in all directions as they get closer to the vanishing point. This is one feature which makes the perspective tool such a useful one for the job. (Unfortunately, line
widths do not shrink; to achieve this you will need to create a bitmap copy and use that). Note that the spacing of perspectives can be mimicked by the blend tool position attributes
as instanced by the orange lines on the right.
(TONY--What if you used a Tapered Brush for your lines? --Gary)
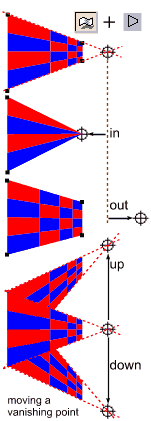 Manipulating perspectives. Use the Mould Tool for
applying, copying or removing perspectives just as you do with envelopes - the same precautions apply. Manipulating perspectives. Use the Mould Tool for
applying, copying or removing perspectives just as you do with envelopes - the same precautions apply.
 As soon as you have applied your perspective, click on the
Selector Tool and use it for everything else. Click Show Object Edit Handles to see VP's. You have the full range of facilities available to objects in this mode and more. As soon as you have applied your perspective, click on the
Selector Tool and use it for everything else. Click Show Object Edit Handles to see VP's. You have the full range of facilities available to objects in this mode and more.
The four corner handles. You can drag any combination of the four corners of the perspective (shift click for multiples) and use Ctrl to constrain movement.
The vanishing point markers will read just appropriately. Not ideal, however, as the vp's can rush off to infinity, or even come back on the opposite side! If you lose a vp, zoom to selected will help you to find
it. Fix the front two edges first.
The vanishing points. You can drag either vanishing point independently. This is the other feature which makes the perspective tool such a 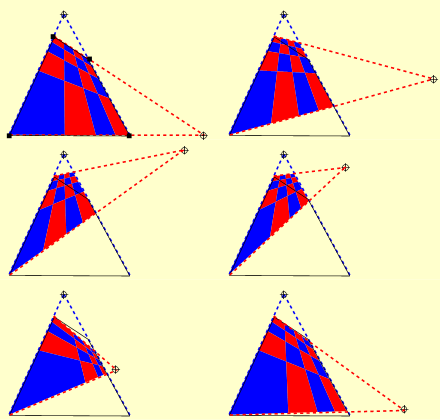 useful one for the job. The larger side, furthest way, remains fixed, the two intermediate converging sides adjust themselves to continue to line up with the
vanishing point and the side nearest the vanishing point changes in length but not position, so maintaining the other vanishing point; it is easier to see than to describe. useful one for the job. The larger side, furthest way, remains fixed, the two intermediate converging sides adjust themselves to continue to line up with the
vanishing point and the side nearest the vanishing point changes in length but not position, so maintaining the other vanishing point; it is easier to see than to describe.
As the vanishing point gets closer, the distortion gets more extreme. As the distance approaches infinity, the effect gradually disappears altogether.
Stretch, rotate, skew.  When you stretch, rotate, skew etc. with the selector
tool, the mould and its vanishing points act as a single object and are stretched, skewed or rotated together as you might expect. The dimensions displayed on the infobar are those of the mould alone,
although 'view selected' takes the VP's into account. Set origin position can be useful for maintaining the significant edge in the required place. When you stretch, rotate, skew etc. with the selector
tool, the mould and its vanishing points act as a single object and are stretched, skewed or rotated together as you might expect. The dimensions displayed on the infobar are those of the mould alone,
although 'view selected' takes the VP's into account. Set origin position can be useful for maintaining the significant edge in the required place.
The object edit tool. Occasionally you may wish to set the length of a side or an angle with this tool. You can marquee-select points but not nudge them.
|
