 |
 |
 |
 |
 |
 |
 |
 The Fill Tool
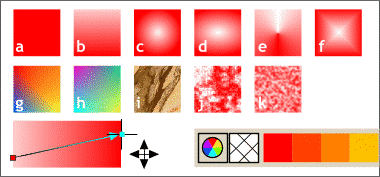
  applies one of the eleven kinds of fills in the Fill Type drop-down list on the Infobar (a-k). You can apply a solid fill to an object in several ways.
With an object or text object selected, click a color on the screen palette with the left mouse button for fill color and the right mouse button for outline color. You can drag a color from the
screen palette to an object. To apply a two color fill, select the fill and then selct the Fill Tool and select a fill type from the drop down list on the Infobar. For two-color fills click on
either end of the direction arrow and click a screen color to add the color to the beginning or end of the fill. Drag the fill path arrow to change the direction of the fill. Click the crosshatched box to the left of the
screen palette with the left mouse button to set the fill to none and click the right mouse button to set the outline color to none. The color wheel icon opens the Color Editor.
 The Transparency Tool
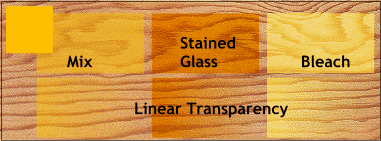
  is one of Xara's most sophisticated tools. There are three transparency types: Mix, a
half and half mix of the object to which transparency is applied and the area beneath, Stained Glass (Subtractive) and Bleach (Additive) which add darker or lighter values. There are the same number of
Transparency Operations as there are fills and the types are similar. Linear Transparency, one of the 11 is shown on the bottom.
 The Mould Tool
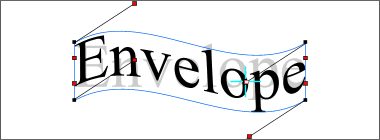
  applies a transparent envelope that can be manipulated to change the shape of an object or text object. There are ten Envelope styles that appear on the Infobar when the Mould Tool is
selected. Shown here is the default Envelope. Dragging the control handles alters the shape of the envelope. Changes are reflected in real time.
 The Text Tool
  is used to add and edit text. To use the Text Tool, click on the screen and start typing. To edit text, highlight the text with the Text cursor and change
size, font and style from the options on the Infobar. You can alter line spacing (a), tracking (b),
baseline (c) and kerning
(d
). Text can be cut, copied and pasted (Ctrl X, Ctrl C, Ctrl V).
 The Push Tool, or severed hand tool as I like to call it, is used when working in a magnified
view where parts of the image are off the screen. Drag the screen with the severed hand as you would a sheet of paper to shift the contents.
 The Zoom Tool zooms in or out of the page up to 25,601 percent! Clicking once on the page
increases the magnification to 200%, consecutive clicks increase the magn
 ification to 500%
and 1000%. You can select a percentage from the Inforbar Zoom Factor drop down list including Drawing, Page and Selected. Two buttons on the Infobar shown right are Previous View and
Zoom to All Objects. You can also drag a rectangle to designate an area with the Zoom Tool to zoom in on a specific area.
Next month, we'll continue with more in-depth examples of the tools and their functions. Finally there are two important tools not found on the main tool bar, the Help Menu and the F1 function key. Xara's Help menu contains easy to understand
information on all areas of the application. If you want to know what any of the drop down menu functions do, simply highlight them and press the F1 function key and a help screen with
a complete description of the selected function or command will appear. Most dialog boxes (menus) have context - sensitive Help buttons that will explain all the available options.