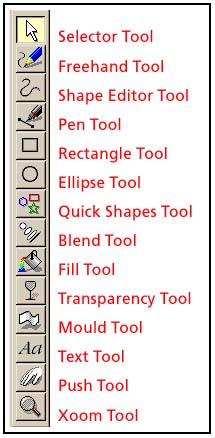
Shown on the left is Xara's main toolbar
. Each of these tools can be accessed by clicking their button/icon with the Selector Tool. Here is a brief description of each tool, and how
it works.
The Selector Tool
is used to select and move objects and text. Clicking once on an object or text object selects the object and produces 8 bounding box handles (the black squares). You can move any object
or text object by dragging it with the selector tool. If the object has no fill, drag its outline. To resize an object, drag one of the handles. The corner handles resize the object proportionately.
Click twice on an object or text object and the bounding box handles change into rotate and skew handles. Drag on the corner handles to rotate an object, drag on the middle handles to skew
an object. The rotation bulls eye can be dragged to a new location to change the point of rotation. Click on an empty part of the screen to deselect. Multiple objects can be marquee selected by
dragging a box around them with the Selector Tool.
The Freehand Toolis used to draw freehand lines and shapes. The smoothing slider, which appears on the Infobar when the Freehand Tool is selected, can be used to adjust the
smoothness of the line. The top line was drawn with 10% smoothing. Sliding the smoothing slider to 50% smoothes out the line producing a more pleasing line. If you draw a shape where the ends meet, a
circle for example, a + appears over the pencil and the shape will be closed. Closed shapes can be filled.
The Shape Editor Tool is used to edit curves and lines. Click on a path to add a node. In some cases, such as an ellipse or rectangle, you may need to Convert to Editable Shapes(Arrange
menu) first before you can edit with the Shape Editor Tool. Dragging on a path or closed shape with the Shape Editor Tool converts a line to curve which can be dragged and reshaped like a rubber band.
The Pen Tool is used to draw straight line segments and Bezier curves. To draw straight line segments simply click two points, the starting and end points. If you add lines
segments to make a polygon for example and place the last anchor point over the starting point the shape will be a closed shape and a fill can be applied. With the Pen Tool still selected, you can drag on
line segments to reshape the lines just as you can with the Shape Editor. To draw Bezier curves, click to place the first point then click and drag in the opposite direction in which you want the line to curve.
The Rectangle Tool is used to create rectangles and squares. To draw a rectangle click at the starting point of the rectangle and drag to the
end of the rectangle. When you release the mouse button, the rectangle will be drawn. Hold down the Ctrl key to constrain the rectangle to a square. There are several options on the Inforbar including Rounded
Corners. Rectangles, and all other objects, can be resized and rotated with the Selector Tool.
The Ellipse Tool works the same way as the Rectangle Tool. There are additional constraints which you can use with
either the Ellipse or Rectangle Tools. Hold down the Shift key to draw from the center outwards. Hold down the Shift and Ctrl keys to draw a circle or square from the center.
The Quick Shapes Tool creates symmetrical polygons and star shapes. You set the number of points on the Inforbar as
well as the configurations: Star, Polygon and RoundedCorners. Drag on a point with the Quick Shapes Tool and the other points move symmetrically. Double click on a point with the Quick Shapes Tool
to change the corner to round and double click again to change it back to a sharp angle.


 The Selector Tool
is used to select and move objects and text. Clicking once on an object or text object selects the object and produces 8 bounding box handles (the black squares). You can move any object
or text object by dragging it with the selector tool. If the object has no fill, drag its outline. To resize an object, drag one of the handles. The corner handles resize the object proportionately.
Click twice on an object or text object and the bounding box handles change into rotate and skew handles. Drag on the corner handles to rotate an object, drag on the middle handles to skew
an object. The rotation bulls eye can be dragged to a new location to change the point of rotation. Click on an empty part of the screen to deselect. Multiple objects can be marquee selected by
dragging a box around them with the Selector Tool.
The Selector Tool
is used to select and move objects and text. Clicking once on an object or text object selects the object and produces 8 bounding box handles (the black squares). You can move any object
or text object by dragging it with the selector tool. If the object has no fill, drag its outline. To resize an object, drag one of the handles. The corner handles resize the object proportionately.
Click twice on an object or text object and the bounding box handles change into rotate and skew handles. Drag on the corner handles to rotate an object, drag on the middle handles to skew
an object. The rotation bulls eye can be dragged to a new location to change the point of rotation. Click on an empty part of the screen to deselect. Multiple objects can be marquee selected by
dragging a box around them with the Selector Tool. The Freehand Tool
 is used to draw freehand lines and shapes. The smoothing slider, which appears on the Infobar when the Freehand Tool is selected, can be used to adjust the
smoothness of the line. The top line was drawn with 10% smoothing. Sliding the smoothing slider to 50% smoothes out the line producing a more pleasing line. If you draw a shape where the ends meet, a
circle for example, a + appears over the pencil and the shape will be closed. Closed shapes can be filled.
is used to draw freehand lines and shapes. The smoothing slider, which appears on the Infobar when the Freehand Tool is selected, can be used to adjust the
smoothness of the line. The top line was drawn with 10% smoothing. Sliding the smoothing slider to 50% smoothes out the line producing a more pleasing line. If you draw a shape where the ends meet, a
circle for example, a + appears over the pencil and the shape will be closed. Closed shapes can be filled. The Shape Editor Tool is used to edit curves and lines. Click on a path to add a node. In some
 cases, such as an ellipse or rectangle, you may need to Convert to Editable Shapes (Arrange
menu) first before you can edit with the Shape Editor Tool. Dragging on a path or closed shape with the Shape Editor Tool converts a line to curve which can be dragged and reshaped like a rubber band.
cases, such as an ellipse or rectangle, you may need to Convert to Editable Shapes (Arrange
menu) first before you can edit with the Shape Editor Tool. Dragging on a path or closed shape with the Shape Editor Tool converts a line to curve which can be dragged and reshaped like a rubber band. The Pen Tool is used
  to draw straight line segments and Bezier curves. To draw straight line segments simply click two points, the starting and end points. If you add lines
segments to make a polygon for example and place the last anchor point over the starting point the shape will be a closed shape and a fill can be applied. With the Pen Tool still selected, you can drag on
line segments to reshape the lines just as you can with the Shape Editor. To draw Bezier curves, click to place the first point then click and drag in the opposite direction in which you want the line to curve.
to draw straight line segments and Bezier curves. To draw straight line segments simply click two points, the starting and end points. If you add lines
segments to make a polygon for example and place the last anchor point over the starting point the shape will be a closed shape and a fill can be applied. With the Pen Tool still selected, you can drag on
line segments to reshape the lines just as you can with the Shape Editor. To draw Bezier curves, click to place the first point then click and drag in the opposite direction in which you want the line to curve.  The Rectangle Tool is used
  to create rectangles and squares. To draw a rectangle click at the starting point of the rectangle and drag to the
end of the rectangle. When you release the mouse button, the rectangle will be drawn. Hold down the Ctrl key to constrain the rectangle to a square. There are several options on the Inforbar including Rounded
Corners. Rectangles, and all other objects, can be resized and rotated with the Selector Tool.
to create rectangles and squares. To draw a rectangle click at the starting point of the rectangle and drag to the
end of the rectangle. When you release the mouse button, the rectangle will be drawn. Hold down the Ctrl key to constrain the rectangle to a square. There are several options on the Inforbar including Rounded
Corners. Rectangles, and all other objects, can be resized and rotated with the Selector Tool. The Ellipse Tool
  works the same way as the Rectangle Tool. There are additional constraints which you can use with
either the Ellipse or Rectangle Tools. Hold down the Shift key to draw from the center outwards. Hold down the Shift and Ctrl keys to draw a circle or square from the center.
works the same way as the Rectangle Tool. There are additional constraints which you can use with
either the Ellipse or Rectangle Tools. Hold down the Shift key to draw from the center outwards. Hold down the Shift and Ctrl keys to draw a circle or square from the center. The Quick Shapes Tool
  creates symmetrical polygons and star shapes. You set the number of points on the Inforbar as
well as the configurations: Star, Polygon and Rounded Corners. Drag on a point with the Quick Shapes Tool and the other points move symmetrically. Double click on a point with the Quick Shapes Tool
to change the corner to round and double click again to change it back to a sharp angle.
creates symmetrical polygons and star shapes. You set the number of points on the Inforbar as
well as the configurations: Star, Polygon and Rounded Corners. Drag on a point with the Quick Shapes Tool and the other points move symmetrically. Double click on a point with the Quick Shapes Tool
to change the corner to round and double click again to change it back to a sharp angle.