|

 Galleries provide you with an easy way to
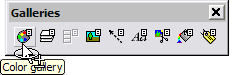
select items from external libraries or where there is a wide range of possibilities. There are several galleries; pictured below from left to right are icons for: The Color Gallery, The
Layers Gallery, Frames Gallery (grayed out, is only available in the Animation window), Bitmap Gallery, Line Gallery, Fonts Gallery, Clipart Gallery, Fill Gallery, and Name Gallery. For more information, see the
Galleries overview covered in WebXealot 22, 23, and 24. Galleries provide you with an easy way to
select items from external libraries or where there is a wide range of possibilities. There are several galleries; pictured below from left to right are icons for: The Color Gallery, The
Layers Gallery, Frames Gallery (grayed out, is only available in the Animation window), Bitmap Gallery, Line Gallery, Fonts Gallery, Clipart Gallery, Fill Gallery, and Name Gallery. For more information, see the
Galleries overview covered in WebXealot 22, 23, and 24.
GIF CompuServe GIF files are bitmap files compressed using lossless compression. GIF files can contain up to 256 colors. They are widely used
for pictures on Internet pages. Xara X supports both interlacing and transparency (import and export) in GIF files. You can also create animated GIF files with Xara X. For more information, see the Bitmaps
overview in WebXealot 30 and 31.
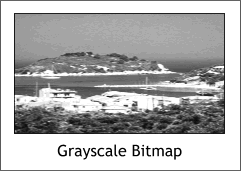 Grayscale Bitmap A grayscale bitmap is a
bitmap with a palette consisting of 256 values of gray. Grayscale images are often called "black and white" images. Grayscale bitmaps have 0% color saturation. Grayscale Bitmap A grayscale bitmap is a
bitmap with a palette consisting of 256 values of gray. Grayscale images are often called "black and white" images. Grayscale bitmaps have 0% color saturation.
Xara can convert a color bitmap to a grayscale bitmap. To do this, from the Utilities menu, select Bitmap Effects and Plug-ins >
Bitmap Effects > Color Depth and then select Grayscale. You might need to make some adjustments to the Brightness and Contrast settings, also found in the Bitmap Effects
section. For an in depth look at Xara's bitmap editing tools and features, see page 5 of WebXealot 27.
Grayscale represents 256 shades of gray between black and white. With the Grayscale color model (found in the Color Models drop down list in
the Color Editor Ctrl e) you can edit colors so they range anywhere along the scale of grays from white to black. Note that grayscale colors are
always gray; you cannot create non-gray colors using the grayscale color model.
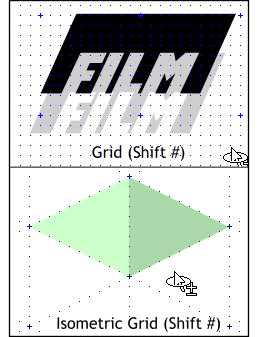 Grid A Grid is a set of regularly spaced
points to which objects and points can be snapped. By setting an appropriate grid spacing and turning grid snapping on, (right click on an empty portion of the screen and select Snap to Grid) it is very
easy to create drawings of very precise dimensions. The grid can be shown or hidden ( Shift #) even if grid snapping is not turned on. At small zoom levels, grid points may become very close to each
other. If they were all displayed, the screen would be covered by points and it would be difficult to see the drawing. To prevent this, Xara X leaves out some points if necessary. You can still snap to
these invisible points. Grid A Grid is a set of regularly spaced
points to which objects and points can be snapped. By setting an appropriate grid spacing and turning grid snapping on, (right click on an empty portion of the screen and select Snap to Grid) it is very
easy to create drawings of very precise dimensions. The grid can be shown or hidden ( Shift #) even if grid snapping is not turned on. At small zoom levels, grid points may become very close to each
other. If they were all displayed, the screen would be covered by points and it would be difficult to see the drawing. To prevent this, Xara X leaves out some points if necessary. You can still snap to
these invisible points.
To set the grid spacing and to determine the grid type (Rectangular or Isometric) go to the Grid and Ruler tabbed section in the
Page Options menu (Utilities > Options...) or right click on an empty portion of the page and select Page Options... from the pop up menu.
Rectangular Grids display a series of rows and columns of grid points. Isometric Grids
run vertically and at 30 degrees to the horizontal and are often used to create pseudo perspective drawings called Isometric drawings. For more information see Using Grids and Rulers in Xara's Help
menu. Also see WebXealot 27 for a review of Snap to functions. For a
tutorial on Creating Isometric Drawings, see John Clements' Excellent Guest Tutorial #5.
Group Group objects are compound objects which contain other objects (even groups). The group object is a single object and can be treated like
any other, for example applying attributes to it, rotating it, etc. Note that if you want to change one object in the group you do not have to ungroup
it, you can use select inside to select it from within the group. To group objects, select each object then either select Group from the Arrange pull down menu, or press Ctrl g
. To select an object within a group, hold down the Ctrl key and click on the object.
TIP: Once you have selected an item in a group by Ctrl clicking the
object, you can press the Tab key to cycle though the items in the group.
TIP: If you want to duplicate or clone an object in a group, Ctrl
click to select the object then select Copy from the Edit menu. Paste the object onto the page Ctrl v or Edit > Paste. If you drag and right click to drop a
grouped object that has been Ctrl click-selected, the dropped duplicate object will be included in the original group.
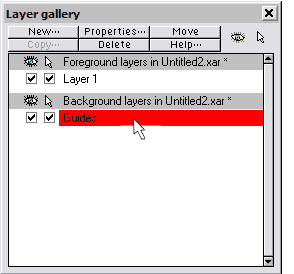
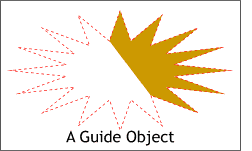 Guide Objects are objects placed or
created in the guides layer. They can be any type of object including text and QuickShapes. Use guide objects to align or position objects on other layers. To make this easier you can make guide objects
magnetic using the Snap to Guides command. Guide objects are non-printing and are always displayed as dotted outlines. To create a Guide Object, copy the object, open the Layers Gallery
, select the title bar for the Guides layer, and Paste the object onto the Guide layer. If you do not see a Guide layer, it is because the
are no other guidelines on the page. Drag a guideline from the screen rulers onto the page and the Guide layer will appear in the Layer Gallery. Guide Objects are objects placed or
created in the guides layer. They can be any type of object including text and QuickShapes. Use guide objects to align or position objects on other layers. To make this easier you can make guide objects
magnetic using the Snap to Guides command. Guide objects are non-printing and are always displayed as dotted outlines. To create a Guide Object, copy the object, open the Layers Gallery
, select the title bar for the Guides layer, and Paste the object onto the Guide layer. If you do not see a Guide layer, it is because the
are no other guidelines on the page. Drag a guideline from the screen rulers onto the page and the Guide layer will appear in the Layer Gallery.
TIP: The guide layer by default is placed in the background and behind
printing objects on the page. If you would like the Guides layer to be in front of the objects on the screen, drag the Guides layer title bar up to the top position in the Layers Gallery. Reminder:
If you drop an object onto the Guides layer, remember then to select Layer 1, or any other layer you are working on. Otherwise, anything pasted onto the screen, as well
as any new object created, will be placed on the Guides layer and will appear with a dotted red outline. For more information on The Layers Gallery and Guides Layer, see WebXealot 22.
Guidelines are horizontal and vertical dotted lines displayed across the entire width or height of the window. You can use them to align or
position objects. To make this easier you can make guidelines magnetic (Snap to Guides). Guidelines are non-printing and live in the guides
layer. By default guidelines are red. But you can change the guides color. Open the Layer Gallery. Select the Properties button then select the Guides
tabbed section and select your new guides color from the drop down list of colors.
 Guides Layer The Guides Layer is a
special layer containing guide objects and guidelines which are used to align and position objects accurately. All objects on the guides layer are shown as dotted outlines and can be made
magnetic to aid positioning by enabling Snap to Guides. If a blend object is placed on the guides layer the intermediate objects are ignored. The guide layer is created automatically when you create a
guideline and can be created manually using the Layer Gallery. The guides layer would normally be used to hold objects providing a framework to which objects in other layers are aligned. For more information on
The Layers Gallery and Guides Layer, see WebXealot 22. Guides Layer The Guides Layer is a
special layer containing guide objects and guidelines which are used to align and position objects accurately. All objects on the guides layer are shown as dotted outlines and can be made
magnetic to aid positioning by enabling Snap to Guides. If a blend object is placed on the guides layer the intermediate objects are ignored. The guide layer is created automatically when you create a
guideline and can be created manually using the Layer Gallery. The guides layer would normally be used to hold objects providing a framework to which objects in other layers are aligned. For more information on
The Layers Gallery and Guides Layer, see WebXealot 22.
TIP: If you try to paste a bitmap from the clipboard onto the screen, and
you see a preview in Import dialog but when you paste there is nothing there but a red outline, chances are the Guides layer is still selected as
shown in the illustration above. To remedy this, click on Layer 1, or any other layer upon which you wish to work.
|