|
 When enabled, Snap to Objects
causes one object to snap to another. Makes perfect sense, don't you agree? As in the case of Snap to Grid and Snap to Guides, Snap to Objects can be enabled from the pop up menu, from the
Window pull down menu, pressing Alt w o, pressing the * on the numeric keyboard, just to name a few. But the easiest method is by pressing the red magnet icon on the Infobar. Unfortunately, the
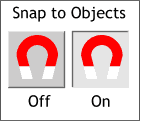
icon does not tell you when it is on or off and so I have included the illustration here for purposes of clarification. In its off position, the icon
appears to rise up when the mouse passes over it. In the on, or enabled position, it appears recessed and the background is lighter than the toolbar. When enabled, Snap to Objects
causes one object to snap to another. Makes perfect sense, don't you agree? As in the case of Snap to Grid and Snap to Guides, Snap to Objects can be enabled from the pop up menu, from the
Window pull down menu, pressing Alt w o, pressing the * on the numeric keyboard, just to name a few. But the easiest method is by pressing the red magnet icon on the Infobar. Unfortunately, the
icon does not tell you when it is on or off and so I have included the illustration here for purposes of clarification. In its off position, the icon
appears to rise up when the mouse passes over it. In the on, or enabled position, it appears recessed and the background is lighter than the toolbar.
 When Snap to Objects is enabled you can tell when
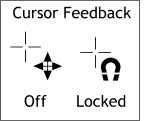
one object is going to snap to another by watching the cursor. As you drag an object on the screen the cursor changes to a cross hair and a four-pointed arrow. This is the standard cursor you see when
dragging objects. As the object approaches a snap point of another object, the four arrows change to the magnet. This does not ensure a snap, however. It only indicates you are within snapping range. When Snap to Objects is enabled you can tell when
one object is going to snap to another by watching the cursor. As you drag an object on the screen the cursor changes to a cross hair and a four-pointed arrow. This is the standard cursor you see when
dragging objects. As the object approaches a snap point of another object, the four arrows change to the magnet. This does not ensure a snap, however. It only indicates you are within snapping range.
 Unless you are very observant, or religiously check
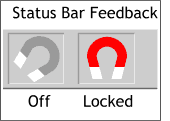
the status bar as you work, you may well have overlooked the other form of Snap to Objects feedback. There is a small, and rather unassuming magnet icon on the lower right side of the status
bar, at the bottom of the screen, that spends most of its screen life rotated a bit clockwise. But when an object is locked into the snapped position, the little icon snaps to
attention and displays bolt upright in bright red and white. Unless you are very observant, or religiously check
the status bar as you work, you may well have overlooked the other form of Snap to Objects feedback. There is a small, and rather unassuming magnet icon on the lower right side of the status
bar, at the bottom of the screen, that spends most of its screen life rotated a bit clockwise. But when an object is locked into the snapped position, the little icon snaps to
attention and displays bolt upright in bright red and white.
 Snap to Objects
will snap the corner of one object to the corner of another object. To ensure accuracy, drag the corner of the object you wish to snap to the corner of the object which you want the object to snap to. Snap to Objects
will snap the corner of one object to the corner of another object. To ensure accuracy, drag the corner of the object you wish to snap to the corner of the object which you want the object to snap to.
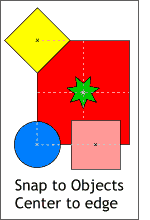
Xara also is smart enough to know when you want to snap the center of an object to the corner of another object. This only works however with ellipses,
rectangles, and QuickShape objects that have not been converted to editable shapes. Select the object with either the Rectangle, Ellipse, or QuickShape Tool
. A small X appears in the very center of the object. You can drag this with one of the aforementioned tools and it will snap to a corner, an end point of a path, or any control point along
a path. The object will also snap to the center of a path or side of an object such as a rectangle.
If you drag an object by its edge the edge then becomes a snapping candidate and will snap to all of the other snapping objects.
As with the other two snap to functions, increasing or decreasing the Magnetic Radii settings, in the Mouse tabbed section of the Page Options
dialog, will increase or decrease the sensitivity of object snapping. A word of caution, increasing the Magnetic Radii settings too high is hazardous to your mental health as the cursor will start
behaving in a most erratic state. I found this out while experimenting with the settings to see how the various settings effected the overall scheme of things. It was especially nettlesome when coming any where
near a guideline. Even with nothing selected. My advice is to leave the settings at their default values.
TIP: If you are coming to Xara from another application and are used to
being able to join two paths into one closed, fillable path, but have not been able to figure out how to do this in Xara, here is how you do it: When you Join (Arrange > Join
) the two paths, leave a tiny amount of space between the two paths. Select both paths and zoom in real close. Select the joined path with the Selector Tool (arrow), and then select the Shape Editor Tool
. Drag the end of one path over the end of the other path. As one end snaps to the other end, the cursor feedback changes to a + indicating the paths are now joined. Repeat this step
to the other two ends. Now you can fill the shape if it is not already filled.
RELATED TIP: You can close an open path by selecting one of the end
points with the Shape Editor Tool then pressing Enter which will close the path with a straight line between the two points.
ONE MORE WAY TIP: You can select a filled object, then select the
open path and Join the two (Arrange > Join). Break the two objects apart (Arrange > Break Shapes and delete the original filled object.
The open path is now closed and filled. (The outline portion of the object will remain as is, however).
|

