|
Just as there are several ways to enable Snap to Grid, there are even more ways to enable Snap to Guides. But the easiest way to enable
Snap to Guides is to simply drag a guideline from one of the screen rulers. What screen rulers you ask? (Window > Bars > Rulers or Ctrl L).
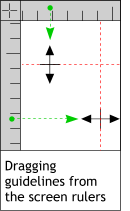 To drag a guideline onto the page, drag from the screen
ruler (drag down from the top ruler for a horizontal guideline and drag from the left ruler for a vertical guide line). When you drag a guideline onto the page, Snap to Guides
is automatically enabled. No need to fuss with the other steps, unless you like extra work. Once you have disabled Snap to Guides, however, dragging new
guidelines onto the page will not work and you will have to use one of the other legion methods including: right click on the screen and select from the pop up menu, Window > Snap to Guides
, or num pad 2 (pressing the number 2 on the Numeric KeyboardNum Lock has to be enabled). To drag a guideline onto the page, drag from the screen
ruler (drag down from the top ruler for a horizontal guideline and drag from the left ruler for a vertical guide line). When you drag a guideline onto the page, Snap to Guides
is automatically enabled. No need to fuss with the other steps, unless you like extra work. Once you have disabled Snap to Guides, however, dragging new
guidelines onto the page will not work and you will have to use one of the other legion methods including: right click on the screen and select from the pop up menu, Window > Snap to Guides
, or num pad 2 (pressing the number 2 on the Numeric KeyboardNum Lock has to be enabled).
There is another way to add a guideline (how many ways do we need for crying out loud?). Double click on the screen rulers at the point in which
you want to add a guide and low and behold a Guideline will appear.
TIP: If you want to add a bunch of evenly spaced guidelines to the
page, enable Snap to Grid and go along the screen ruler double clicking at each tick mark to add the guidelines.
Is there a way to add a guide or guides at precise location? You bet!
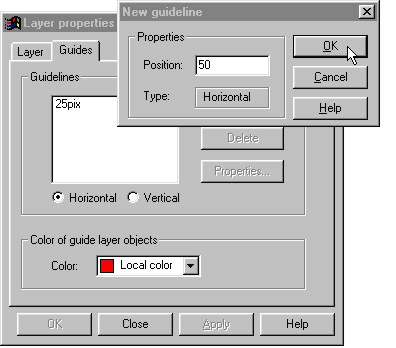 Right click on the screen rulers and select
Guideline Layer Properties. Click New in the Layers Properties dialog and key in the location of the desired guideline. Check the Horizontal or Vertical radio buttons
first to determine the orientation of the guide. Right click on the screen rulers and select
Guideline Layer Properties. Click New in the Layers Properties dialog and key in the location of the desired guideline. Check the Horizontal or Vertical radio buttons
first to determine the orientation of the guide.
Whilst we are here, please notice the little color drop down list. Don't like red guides? Or do the red guides get lost on your red page background? You can
change the color of Xara's guidelines to anything that suits your fancy. Only the named colors plus any web safe colors that you have selected from the screen palette are available, but you should find something to
your liking here.
TIP: Too many guidelines cluttering up your page? Right click on the
screen ruler and select Delete All Guidelines and poof! they are all gone.
OK That was a cool tip. But what if you only want to get rid of certain guidelines? In CorelDRAW you can drag the guidelines back to the ruler
from whence they came. Xara too. You can open the Guide Layer Properties dialog and select individual guides by their specific location and press Delete. Or right click on any guide and select Delete
from the pop up menu. If you want to see your drawing without the guidelines but don't want to delete them there is another option: right click on the page and select Show Guides
. To make the guides come back, right click and select Show Guides once more. I think that about covers that.
I mentioned CorelDRAW in the last paragraph and while I intend to keep my promise to Doug B way out west in California, and not speak
ill of the C product, I will point out one of DRAW's more desirable features (for me at any rate). DRAW (the Corel lawyers say it is OK to call it DRAW if I call it CorelDRAW first) places the guidelines in front of
the objects. I like that. I don't have to play where's the guideline when trying to snap something to a guideline hidden beneath a pile of other objects.
 Well we can do that too. In fact, we can
have our guidelines in front of, or behind the other objects on the screen. And if we really want to get clever, we could even have the guides in front of some objects and behind others. How? It's easy. Well we can do that too. In fact, we can
have our guidelines in front of, or behind the other objects on the screen. And if we really want to get clever, we could even have the guides in front of some objects and behind others. How? It's easy.
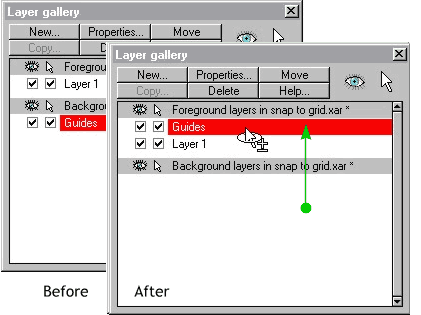
Xara's guidelines reside on their own layer in the Layer Gallery. By default the guides are placed on the Background
layer that lies beneath all other objects. To move the guidelines up or over all other objects, open the Layer Gallery (the icon is on the top right section of the Infobar) and drag the Guides
layer's title bar up to the top of the gallery, or to the desired layer if you work with many layers.
HELP! I did what you said and now everything I add to my page has a
red outline! Calm down. Don't panic. Everything is going to be all right. Trust me, I'm a doctor! When you move the Guides layer to the top, it
is automatically selected. Everything you place on this layer shows up as red dashed lines. No problem. Open the Layers Gallery again, and select Layer 1, or whatever layer you want to be on. Cut (
Ctrl X) your objects from the Guides layer and paste them onto Layer 1.
 Which brings me to the most astonishing feature
of the guides yet. OK, the C product from Ottawa, can do some pretty tricky things with guidelines, like rotate, drag and duplicate and other cool and useful things. But feel no shame and feel no envy.
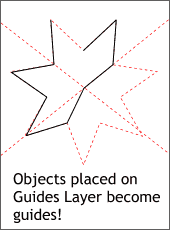
Anything we put on the guide layer becomes a guide! Yep, that's right. Cut (Ctrl X) or Copy (Ctrl C) any object, or group of objects, lines, etc., to the clipboard and paste them onto the Guides
layer in the Layers Gallery and they become guidelines like the two diagonal lines and QuickShape star shown on the left. If you enable Snap To Guides the pasted objects act just like
guidelines. Can the C product do this? I don't think so. Which brings me to the most astonishing feature
of the guides yet. OK, the C product from Ottawa, can do some pretty tricky things with guidelines, like rotate, drag and duplicate and other cool and useful things. But feel no shame and feel no envy.
Anything we put on the guide layer becomes a guide! Yep, that's right. Cut (Ctrl X) or Copy (Ctrl C) any object, or group of objects, lines, etc., to the clipboard and paste them onto the Guides
layer in the Layers Gallery and they become guidelines like the two diagonal lines and QuickShape star shown on the left. If you enable Snap To Guides the pasted objects act just like
guidelines. Can the C product do this? I don't think so.
|