|
If you have the hands of a skilled surgeon, perhaps you will never need the snap to functions: Snap to Grid, Snap to Guides and Snap to Objects
. For the rest of us, these snappy features make it easier to create objects to a precise size and position them on a precise grid, or to precisely align objects to a guideline, or guidelines. Connecting two
path ends can be a snap, when Snap to Objects is enabled. In the following pages we'll look at each of these three snap to functions and see how they work and try to discover any undocumented features.
Snap to Grid
Xara gives us several ways to enable Snap to Grid: you can right click on the page and select this option from the pop-up menu, select Snap to Grid
from the Window menu, press Alt w g (the Alt key then w for windows and g for grid), or press the dot (.) on the numeric keypad. On my keyboard the dot is in the lower
right just under the 3. I'm sure there are more ways to enable Snap to Grid but these should work for most of us.
TIP:
Almost every Windows application makes extensive use of commands enabled with the Alt key. These are indicated with an underscore under one of the characters in the name. For example, the Window
pull down menu has an underscore under the W. If you press Alt w the Window pull down menu drops down. Almost every entry has an underscored character. For Snap to Grid the G
is underscored, hence Alt w g enables Snap to Grid. Pressing Alt w g will also disable Snap to Grid if it is currently enabled.
 Once Snap to Grid
is enabled, Xara creates a series of snap to points. By default these grid points are invisible. If you want to practice using the Alt key, press Alt w s. What do you see? This sequence makes the
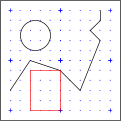
actual grid visible on the page seen in the illustration on the left. (You can also right click on the page and select Show Grid from the pop up menu or you can select Show Grid from the Window
pull down menu. Your call). Once Snap to Grid
is enabled, Xara creates a series of snap to points. By default these grid points are invisible. If you want to practice using the Alt key, press Alt w s. What do you see? This sequence makes the
actual grid visible on the page seen in the illustration on the left. (You can also right click on the page and select Show Grid from the pop up menu or you can select Show Grid from the Window
pull down menu. Your call).
When Show Grid is enabled you see a series of dots and crosses (+). The crosses represent your Major Spacing setting in the Page Options
Grid and Ruler tabbed section and the dots represent the Number of Subdivisions setting.
NOTE: When working at less than normal zoom levels (below 100%),
Xara may not display all the grid points. This keeps the screen from getting too cluttered. When working at 100% or higher, you should see all the grid points unless the number of subdivision is too high.
Some people like being able to see the grid. It's kind of like drawing on graph paper. They feel if they can't see the grid they are not convinced
it is really there. Know what I mean? You can even display the grid without having Snap to Grid enabled. (Personally I get confused enough without all those grid points cluttering up the page). When
Snap to Grid is enabled, circles and rectangles will automatically snap to the nearest grid settings. Line segments will snap to the grid points. If your
grid settings are set to 10 pixels, for example, any rectangle, ellipse, or QuickShape you draw will automatically snap to increments of 10 pixels. If you need to draw a checkerboard and want the checkered spaces to
be exactly spaced, you can use Snap to Grid.
TIP: In theory Snap to Grid
sounds really precise. In reality, it is not always that precise. What you see on the screen is not necessarily what you will get. Zoom in close to 200 or 400% for best results. Also, setting the View Quality to
Outline (move the View Quality slider on the Infobar all the way to the left or select Window > Quality > Outline for the most precise snapping. It Outline
view quality you can see if your objects are precisely aligned or not.
|

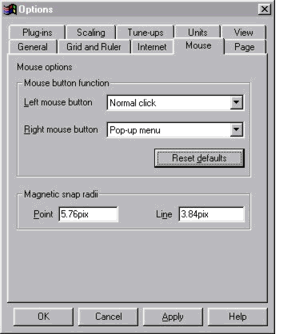 Close, they say, only counts in
horseshoes and dancing. Not true, it also counts in snapping. Xara by default snaps when you get pretty close to an object. However if you need to have more snap, or less snap, you can adjust the Magnetic Snap radii
found on the Mouse tabbed section in the Page Options dialog (Utilities > Options). A higher number will snap at greater distances. If you are working in a highly magnified view, a lower
number might be better.
Close, they say, only counts in
horseshoes and dancing. Not true, it also counts in snapping. Xara by default snaps when you get pretty close to an object. However if you need to have more snap, or less snap, you can adjust the Magnetic Snap radii
found on the Mouse tabbed section in the Page Options dialog (Utilities > Options). A higher number will snap at greater distances. If you are working in a highly magnified view, a lower
number might be better.