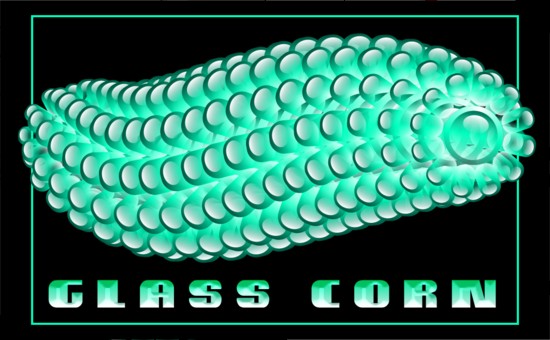
came up with what he calls a Corn Brush to create a mouthwatering ear of corn. It was pretty impressive.Your editor, who also is a frequent visitor and contributor to the Xara Conference, felt obliged to translate
Soquili's corn brush into glass. Here is a bonus Mini-Tutorial on how it was done. This tutorial assumes some familiarity with Xara X.
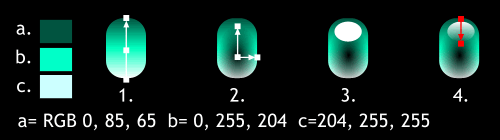
1. Create a small 40 x 60 pixel rectangle and round the corners to 0.7. Apply a 3-color Linear Fill using the colors shown.
2. Apply an
Elliptical, Mix Transparency. Drag the center of the transparency down a bit.
3. Add a small white ellipse for a highlight.
4. Add a Mix, Linear Transparency
to the highlight. (Just like the GEL buttons).
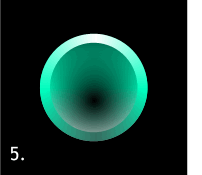 5.
Create and center two circles, 110 pixels and 106 pixels in diameter. Use Copy and Paste Attributes, to Copy the fill from step two and apply it to the large circle. Change the fill type to Conical
. Copy the fill and elliptical transparency and apply it to the smaller circle. Clone the small circle (Ctrl K) and Combine Shapes > Subtract Shapes with the large circle.
5.
Create and center two circles, 110 pixels and 106 pixels in diameter. Use Copy and Paste Attributes, to Copy the fill from step two and apply it to the large circle. Change the fill type to Conical
. Copy the fill and elliptical transparency and apply it to the smaller circle. Clone the small circle (Ctrl K) and Combine Shapes > Subtract Shapes with the large circle.

 6. Group the small rectangle and its highlight and center it over the two circles. Click twice to enable rotate/skew mode. Drag the rotation bulls eye to the
center of the two circles.
6. Group the small rectangle and its highlight and center it over the two circles. Click twice to enable rotate/skew mode. Drag the rotation bulls eye to the
center of the two circles.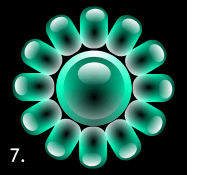 7. Here is the result. Group all the elements and reduce to 70%.
 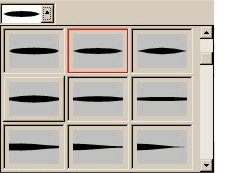 Select the Freehand Tool. From the
Stroke Shapes drop down list, select the Cigar stroke. (Let your cursor rest over the stroke shapes for a few seconds and a tool tip will appear with the stroke names).
Select the Freehand Tool. From the
Stroke Shapes drop down list, select the Cigar stroke. (Let your cursor rest over the stroke shapes for a few seconds and a tool tip will appear with the stroke names).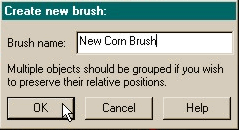 Select the grouped, glass objects with the Freehand Tool. On the Infobar, press Create Brush. Name your new brush and press OK. Using the Freehand Tool, elect the line you created and then from the
Existing Brush drop down list, select your new brush to apply it to the line.
Select the grouped, glass objects with the Freehand Tool. On the Infobar, press Create Brush. Name your new brush and press OK. Using the Freehand Tool, elect the line you created and then from the
Existing Brush drop down list, select your new brush to apply it to the line.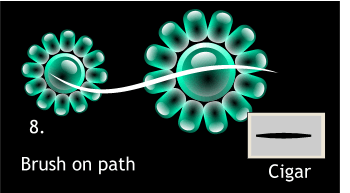 You will have two or three corn
shapes on the line.
You will have two or three corn
shapes on the line.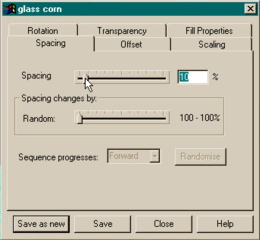 Select the Freehand Tool
. Click the corn path and then press Edit Brush on the Infobar. Reduce the Spacing setting to about 10 so that the rows of corn look realistic. You might need to increase or decrease this number.
Select the Freehand Tool
. Click the corn path and then press Edit Brush on the Infobar. Reduce the Spacing setting to about 10 so that the rows of corn look realistic. You might need to increase or decrease this number.