|
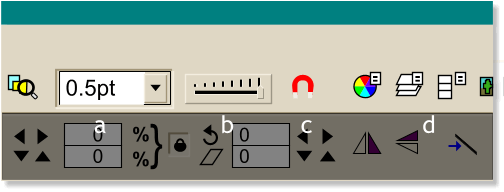
Moving to the right, and just to the right of the Zoom to Drawing icon: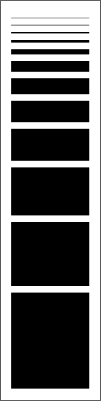 a. Set Line Width This drop down list contains presets ranging from
0.25 points to 72 points. (There are 72 points to an inch). The first three line widths shown on the left are 0.25, 0.50, and 1 point. The top two are less than one pixel in width (a pixel is .75 points) and as
such Xara displays them as 1 pixel wide but grays the color to make them appear lighter. a. Set Line Width This drop down list contains presets ranging from
0.25 points to 72 points. (There are 72 points to an inch). The first three line widths shown on the left are 0.25, 0.50, and 1 point. The top two are less than one pixel in width (a pixel is .75 points) and as
such Xara displays them as 1 pixel wide but grays the color to make them appear lighter.
NOTE: When creating Web images, try not to use line weights below .75 points if you want the line to appear solid. 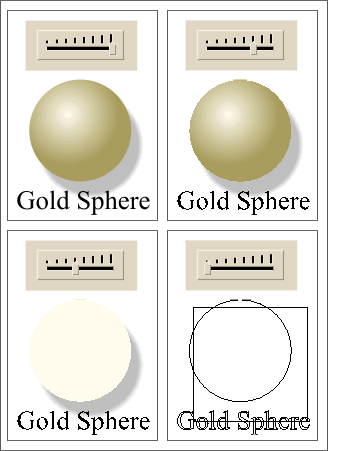 b. Set View Quality
(shown on the right) This slider controls the screen display quality and contrary to its appearance has but four settings, not the 8 indicated by the tick marks. The four settings are: Anti-aliased, Normal
, Simple, and Outline. b. Set View Quality
(shown on the right) This slider controls the screen display quality and contrary to its appearance has but four settings, not the 8 indicated by the tick marks. The four settings are: Anti-aliased, Normal
, Simple, and Outline. Anti-aliased smoothes the image and creates blending pixels to soften the hard edges. As a result the edges appear sharp and clean. Normal is a
non-anti-aliased display. Notice the jagged edge on the sphere and the text. Simple shows just the shapes with no gradient or non-flat fills. Outline is just that, outlines. As the
shadow is a bitmap, it is displayed as an outline. There are two other ways to select view quality: use the Window > Quality option, or right click on the page and select Quality
from the pop up menu. When anti-aliased view quality looks so cool, why would you use any of these other settings? If for some reason, you bring a bitmap into Xara and want to maintain the
original image when exporting your image, use Normal. Each pixel will be exported as it came into Xara. Simple and Outline view are good for working with complex images and speed redraw time.
Outline is handy when working with many blends as only the first and last blend steps are displayed. c. Snap to Objects Although this option is available by right clicking and selecting
from the pop up menu, or Window > Snap to Objects, or pressing the * on the Numeric Keypad (are there any I missed?), pressing the red magnet icon is often the easiest and quickest method.
d. The Galleries These are covered in Issues 22, 23, and 24.
|