|
Xara's Infobar, located at the top of the Xara application window, is a wealth of infomation. Because of its ingenious design, the many menus,
which typically clutter the screen and block valuable screen real estate in most applications, are unnecessary. Everything you need to know is at the top of the screen.The Infobar is referred to as "context
sensitive" as it changes to reflect the options for the currently selected tool or effect. Most of these context sensitive options have already been covered in the tools section. What I will cover in this issue are the
more generic functions. 
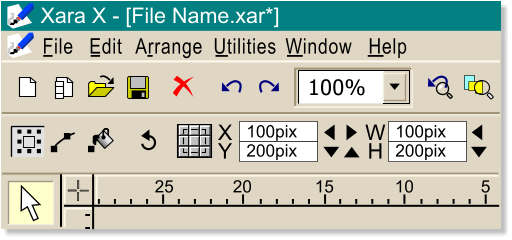
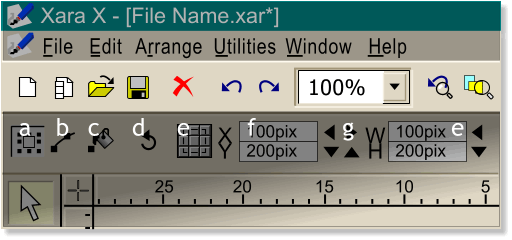
In order to make the various buttons and icons easier to see, I have made the illustrations larger. I will cover the Infobar in several, bite sized sections, the first of which is shown above. NOTE: For those who have asked how I achieve such clean screen captures, the
answer is, I don't. I create most of these images in Xara as vector images. I have several pages of generic shapes, icons, cursors, etc. which I use and recycle as
needed. The clean, crisp images are thanks to Xara's extraordinary Export filters. 
The top row begins with:a. New Page Click this icon to create a new page using your default page Template. b. New Animation This button opens a new
Animation window. It does not close your current drawing document. To move back and forth between open documents in Xara press and hold the Ctrl key, then press Tab. c. Open File
The standard Windows icon for opening a document. This is the same as File > Open. Xara can open many file formats that are not Xara XAR files. These are listed in the Files of Type
drop down list in the Open File dialog. NOTE:
Open File brings the file into a new window. If you want to bring a file into an open document, use File > Import. d. Save
The standard Windows icon for saving the current document to the same folder and directory from which the file was last saved, and/or opened, and is the same as File
> Save. If you wish to save a document with a new name, use File > Save As... If you press the Save icon and you have not previously saved your file, the Save
dialog will open. Otherwise the file is automatically saved. It is a good idea to save your documents, and take eye breaks often.e. The red X deletes the current selection. This is the same as Edit
> Delete or pressing the Delete button on your keyboard. If you accidentally delete a selection you can press Ctrl Z, select Undo from the Edit menu, or use the first button listed
in next paragraph. f. Undo and Redo The blue arrow icons undo and redo the last action, or actions, according to how much memory you have allocated for Undo in the Page Options
dialog. This is the same function as Undo and Redo found in the Edit menu. g. Set Zoom Factor By default the zoom factor is set to 100%, which represents a
1:1 ratio based on 96 dpi (Windows screen resolution). Images created for the Web at 100% Zoom Factor will display the same size on the Xara screen as in a Windows
Web Browser. At 100%, images will display 33% larger on Macintosh Browsers or in Macintosh documents, which uses a default 72 dpi screen resolution. When
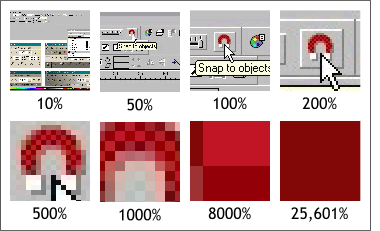
designing specifically for the Macintosh, set the Zoom Factor to 72 or 75 dpi and export your images at this resolution. The preset Zoom factors range from 10% to 25,601%. At 25,601 percent you can see
an individual pixel close up and personal. You can also highlight the Zoom Factor setting in the Set Zoom Factor text entry box, and key in any percentage you wish (as long as it is between 10 and 25,601%).
TIP: You can also enter a Zoom Factor as 2X, 3X
etc. This zooms by 200%, 300% and so forth. At the bottom of the Zoom Factor drop down list are four entries, Page, Drawing, Selected
, and Previous. These are the same functions as those of the icons that appear when the Zoom Tool is selected. TIP:
Any objects, or groups of objects, on the page that have been exported as bitmaps will be listed at the very bottom of the Set Zoom Factor
drop down list. Selecting any of these zooms fills the screen with the selection. e. Previous Zoom and Zoom to Drawing If you don't have the patience to scroll to the bottom of the Set Zoom Factor dialog, you can always press the Previous Zoom
icon to return to your last zoom percentage. Press the Zoom to Drawing icon to display all contents of the screen. TIP:
Zoom to Drawing is useful for locating objects that have somehow wandered
off the page and gotten lost in on the paste board (the gray area of the screen).  Shown on the left is a bitmap image of Xara's Infobar. At 200% you begin to see pixels. At 8000% you can only see a portion of 4 pixels. At 25,000%
you are zoomed in on one pixel. Shown on the left is a bitmap image of Xara's Infobar. At 200% you begin to see pixels. At 8000% you can only see a portion of 4 pixels. At 25,000%
you are zoomed in on one pixel.
If anybody knows how Xara arrived at 25,601, (as opposed to, say 25,000) your editor would be keen to hear. |

