 |
 |
 |
 |
 |
 |
 |
Xara X. Chapter 3 The Pen Tool
Bezier curves are a bit trickier and I will cover them a little later on.![]() The Pen Tool
can be used two ways: for creating a series of connected lines, or for creating Bezier curves. The first use, is very easy, you click at the point you want the line to begin, (this point is called an anchor point)
and then you click (a second anchor point) where you want the line to end.
The Pen Tool
can be used two ways: for creating a series of connected lines, or for creating Bezier curves. The first use, is very easy, you click at the point you want the line to begin, (this point is called an anchor point)
and then you click (a second anchor point) where you want the line to end.
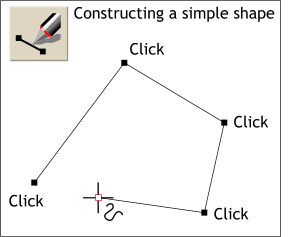 Drawing a line or lines with the
Pen Tool is very straight forward. Select the Pen Tool (click the Pen Tool icon) and then click where you want your line to begin. This drops the first anchor point. Click where you want the
first line segment to end. If you want to add more line segments, continue dropping anchor points.
Closed paths can be filled with a solid color or any of the
Fill Tool fills. Open paths, cannot be filled.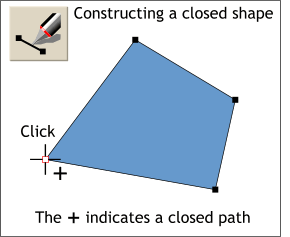 If you click the last anchor point on top of the first anchor point, the cursor changes from a squggly line to a plus, indicating you are about to create a closed path.
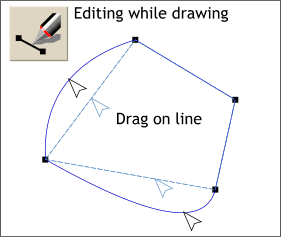 You can edit line segments while you are in the drawing stage. Simply drag any of the sides to convert them to curved line segments. The sides react as if they were rubber bands. Dragging in the center of the
line makes a more symmetrical curve. Dragging towards the anchor point makes a non-symmetrical curve.
Click on one of the end points of the path (the small black boxes) and then drag the end
point over the other end point. As you do so, the cursor changes to a + indicating the path will be closed.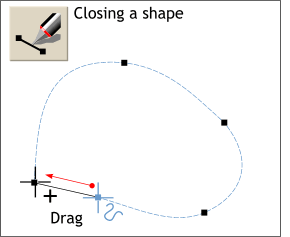 To close a previously drawn curve or path,
first select the curve or path with the Selector Tool (the arrow) then select the Pen Tool.
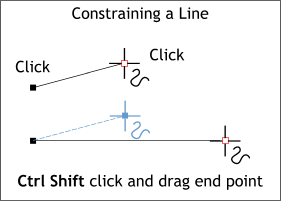 To constrain a straight line segment to
horizontal, vertical, or any of the angles specified in the Page Options dialog (Utilities > Options > General) specified in the Angles of Constraint, click the first and second
anchor points. After you have added the second point, drag the end point while holding down the Ctrl and Shift keys. Now as you drag, the line will snap to the horizontal, vertical, or specific angle.
TIP: You can also draw straight line segments with the Shape Editor Tool. Just click and click to add the first and second anchor points, just as you would do with the Pen Tool. The only difference is you cannot create Bezier curves with the Shape Editor Tool.
Click on the screen to add the first anchor point. You will not see anything. Click to drop the second anchor point and drag in the
opposite direction that you want the curve to go. In the example shown here, I clicked and dragged down and to the right to make the first segment of my curve arc upwards and slightly to the left. I clicked to add another
anchor point and this time dragged up and to the right to add the second segment of my curve, which in this case bowed downwards. Continue to add anchor points while
dragging in the opposite direction. To make a closed (fillable path), drop the final anchor point on top of the first.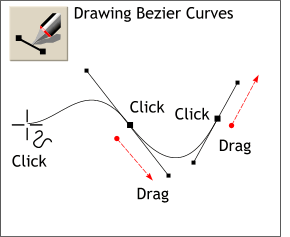 Drawing Bezier curves is a very powerful way to create a graceful and smooth path.
Changing the point properties will also effect the curve. Changing a point to a Cusp point, (see last month's WebXealot where the Shape Editor Tool
is discussed in depth), permits either Bezier handle to operate independent of the other and can be used to create angles of less than 90 degrees.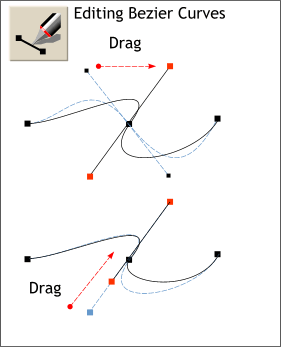 To edit a Bezier curve or curves, select the path with the Selector Tool, then select the Shape Editor Tool (the one with the squiggly line). Click the anchor point you wish to edit.
Two gray lines with red squares on the ends will appear. These are the Bezier curve control handles. You can drag either red handle from side to side which alters the shape of the curve. You can also shorten or
lengthen the handle to make the curve flatter or deeper.