WEBSITE AND WEBSITE GRAPHICS CREATED WITH XARA DESIGNER PRO 6


 Download Zipped Tutorial
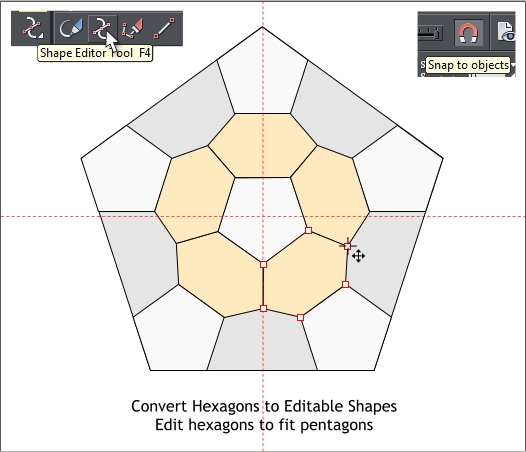
 Hold down the Shift key (to select multiple objects) and click on each
of the hexagons. From the Arrange menu, select Convert to Editable
Shapes.
Select each of the hexagons that do not align precisely to the other
polygons. Switch to the Shape Editor Tool (F4). Drag the control points
with the Shape Editor Tool and snap the ends to one another.
TIP: Click the orange magnet icon to enable Snap to Objects. The
magnet icon needs to be in the recessed position.
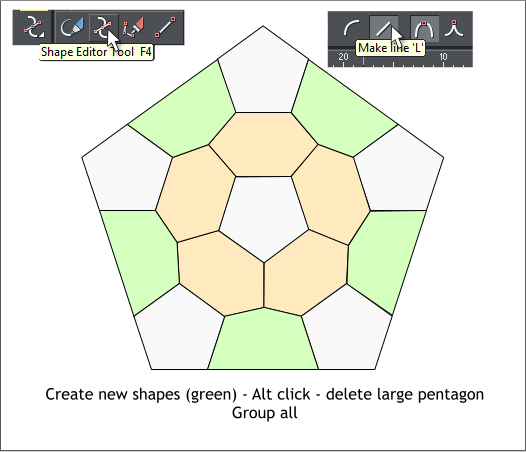
Select the Shape Editor Tool (F4). Make sure the Make Line option is
selected on the Infobar. Use the Shape Editor Tool to draw the shapes
shown in light green. Click on each corner to add a control point and
line segment. Click again on the first control point to close the shape.
Hold down the Alt key and click twice on any of the new shapes to drill
down one layer. When the original large pentagon is selected, delete it.
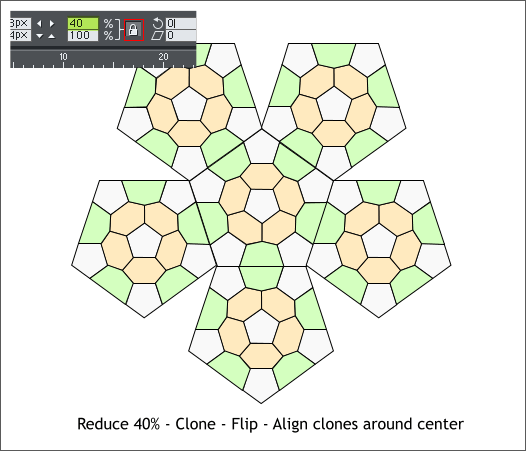
Drag a selection rectangle around all the objects in the pentagon with
the Selector Tool (the arrow pointer). Reduce the selection to 40%. The
Lock Aspect Ratio padlock icon has to be in the down (enabled)
position. Key in 40 in the % text entry window and press Enter.
Clone the selection (Ctrl k) and then press the Flip Vertically icon on
the Infobar. Clone the clones and arrange them around the center
pentagon as shown.
NOTE: Clone creates a duplicate in the exact same position.
Duplicate creates a duplicate copy but offsets it down and right.
Hold down the Shift key (to select multiple objects) and click on each
of the hexagons. From the Arrange menu, select Convert to Editable
Shapes.
Select each of the hexagons that do not align precisely to the other
polygons. Switch to the Shape Editor Tool (F4). Drag the control points
with the Shape Editor Tool and snap the ends to one another.
TIP: Click the orange magnet icon to enable Snap to Objects. The
magnet icon needs to be in the recessed position.
Select the Shape Editor Tool (F4). Make sure the Make Line option is
selected on the Infobar. Use the Shape Editor Tool to draw the shapes
shown in light green. Click on each corner to add a control point and
line segment. Click again on the first control point to close the shape.
Hold down the Alt key and click twice on any of the new shapes to drill
down one layer. When the original large pentagon is selected, delete it.
Drag a selection rectangle around all the objects in the pentagon with
the Selector Tool (the arrow pointer). Reduce the selection to 40%. The
Lock Aspect Ratio padlock icon has to be in the down (enabled)
position. Key in 40 in the % text entry window and press Enter.
Clone the selection (Ctrl k) and then press the Flip Vertically icon on
the Infobar. Clone the clones and arrange them around the center
pentagon as shown.
NOTE: Clone creates a duplicate in the exact same position.
Duplicate creates a duplicate copy but offsets it down and right.