


 WEBSITE AND WEBSITE GRAPHICS CREATED WITH XARA DESIGNER PRO 6


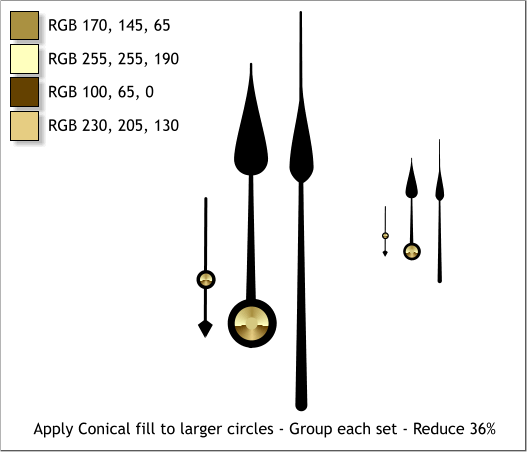
 Apply a Conical Fill to the larger circles. Apply a Flat fill to the inside
circle on the large hand. You can pick the color.
Group the objects for the large hand and group the two objects for the
seconds hand. Reduce the three hands to 36%.
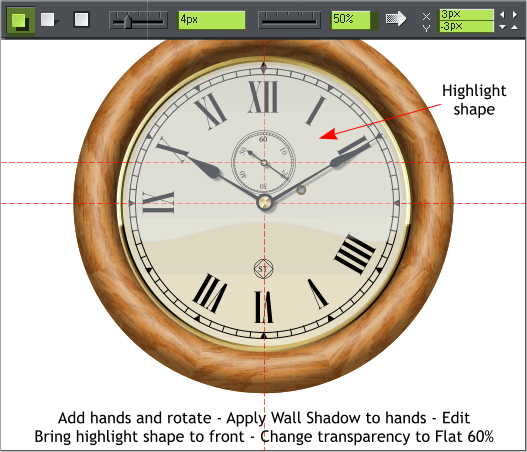
Add the hands to the clock and rotate them as shown.
Select the three hands then switch to the Shadow Tool (Ctrl F2). Apply
a Wall Shadow and change the settings on the Infobar as shown above.
Select the highlight shape and bring it to the front (Ctrl f).
Select the highlight shape with the Transparency Tool (F6). Change the
Transparency Type to Flat and the Transparency slider setting to 60%.
Delete the Guidelines.
TIP: Right click on the screen ruler and select Delete All
Guidelines to remove all the guidelines with one click.
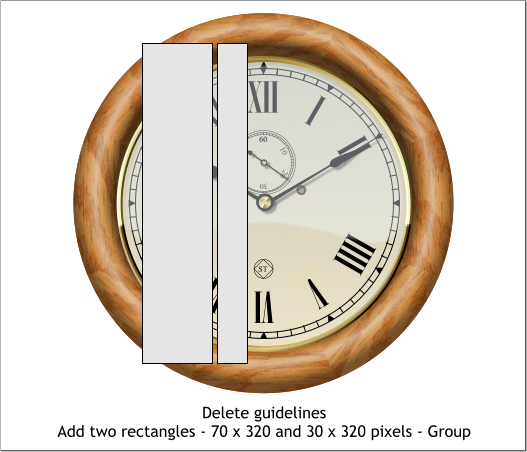
Create two rectangles to the sizes and position shown and Group them.
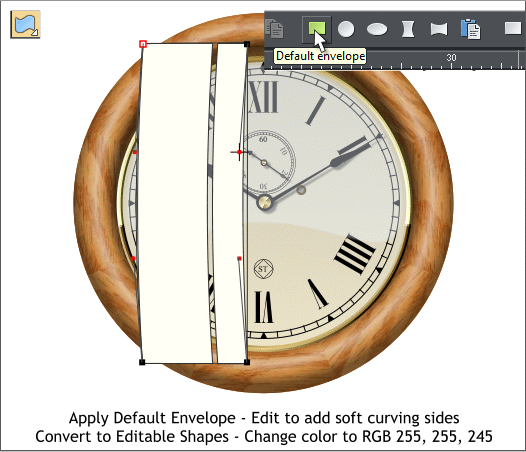
With the grouped rectangles selected, select the Mould Tool (Shift F6).
Click the Default Envelope rectangle icon on the Infobar (the first
rectangle icon).
Click the top left corner to enable the Bezier control handles and drag
the small red squares to edit the envelope to create a very subtle
curve. Click the other corners as needed to reveal the control handles.
Arrange > Convert to Editable Shapes.
Change the Fill color to the color shown above.
Apply a Conical Fill to the larger circles. Apply a Flat fill to the inside
circle on the large hand. You can pick the color.
Group the objects for the large hand and group the two objects for the
seconds hand. Reduce the three hands to 36%.
Add the hands to the clock and rotate them as shown.
Select the three hands then switch to the Shadow Tool (Ctrl F2). Apply
a Wall Shadow and change the settings on the Infobar as shown above.
Select the highlight shape and bring it to the front (Ctrl f).
Select the highlight shape with the Transparency Tool (F6). Change the
Transparency Type to Flat and the Transparency slider setting to 60%.
Delete the Guidelines.
TIP: Right click on the screen ruler and select Delete All
Guidelines to remove all the guidelines with one click.
Create two rectangles to the sizes and position shown and Group them.
With the grouped rectangles selected, select the Mould Tool (Shift F6).
Click the Default Envelope rectangle icon on the Infobar (the first
rectangle icon).
Click the top left corner to enable the Bezier control handles and drag
the small red squares to edit the envelope to create a very subtle
curve. Click the other corners as needed to reveal the control handles.
Arrange > Convert to Editable Shapes.
Change the Fill color to the color shown above.
 H 1 2 3 4 5 6 7 8 9 Download Zipped Tutorial
Tutorial ©2010 Gary W. Priester
H 1 2 3 4 5 6 7 8 9 Download Zipped Tutorial
Tutorial ©2010 Gary W. Priester


