


 WEBSITE AND WEBSITE GRAPHICS CREATED WITH XARA DESIGNER PRO 6


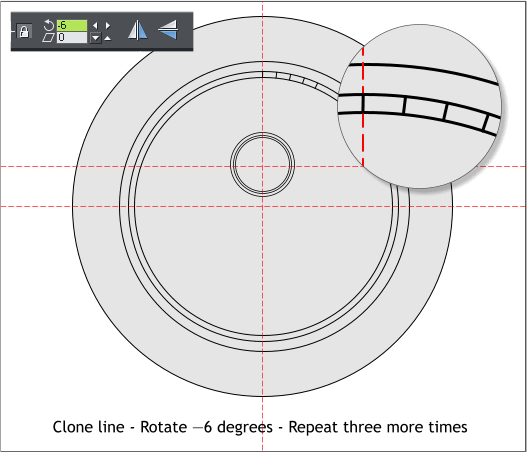 Clone the line (Ctrl k). In the Angle of Rotation text entry box on the
Infobar, key in -6 and press Enter to apply the rotation. Clone the line
and repeat these steps to add three more tick marks. Clone each time.
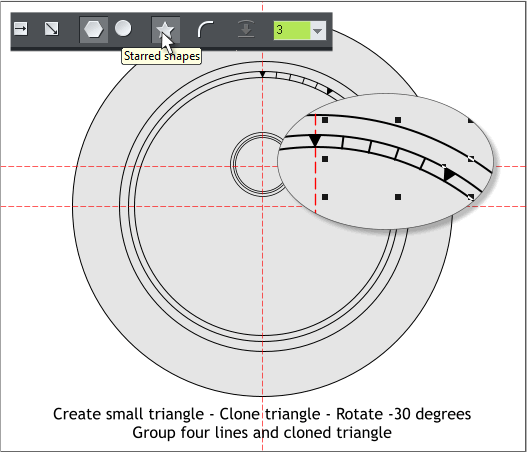
Select the QuickShape Tool (Shift F2). Click the Starred Shapes icon on
the Infobar and select 3 from the Number of Sides drop down list. Draw
a small downward pointing triangle the height of the two lines.
Clone the triangle, move the Center of Rotation bulls eye to the
intersection of the two guidelines, and rotate the clone -30 degrees.
Clone the four lines and the second triangle and group them (Ctrl g)
(do not add the first triangle to the group). Rotate the group -30
degrees around the center of the two guidelines. Repeat the clone and
rotate step until you have added all the tick marks. A second triangle
will be added right above the first triangle at the 12 o’clock position.
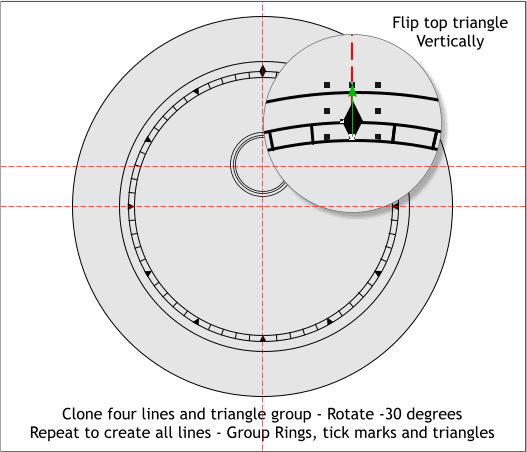
Hold down the Ctrl key and click on the duplicate triangle to select it.
Hold down the Ctrl key and drag the bottom center control handle (the
small black box) upwards until the triangle flips vertically and forms a
diamond with the bottom triangle as shown above.
NOTE: Ctrl + click selects an object that is part of a group.
Hold down the Shift key (to select multiple objects), and select the 12
groups of tick marks/triangles and the two circles that enclose the tick
marks. Group them (Ctrl g or Arrange > Group). Press Ctrl x (or Edit >
Cut). This will reveal if you have missed any of the circles or lines.
Press Ctrl z or Edit > Undo to undo the cut and to replace the objects.
If necessary, add to the group.
I was going to have you repeat the steps to add tick marks to the small
circles, when I had a brilliant thought! Why not clone the two lines and
tick marks from the large circles we already have and reduce them?!
Select the circle/tick marks group. Clone the group. Ctrl click on the
top triangle that points upward at the 12:00 o’clock position, delete it,
and reduce the width of the group to 64 pixels. Change the outline
Width to .5pix.
Unfortunately this also adds a outline to the triangle shapes. Ctrl click
on each triangle and set the outline to none (select None from the
Width drop down list on the Infobar). It’s a bit of a chore, I know.
Clone the line (Ctrl k). In the Angle of Rotation text entry box on the
Infobar, key in -6 and press Enter to apply the rotation. Clone the line
and repeat these steps to add three more tick marks. Clone each time.
Select the QuickShape Tool (Shift F2). Click the Starred Shapes icon on
the Infobar and select 3 from the Number of Sides drop down list. Draw
a small downward pointing triangle the height of the two lines.
Clone the triangle, move the Center of Rotation bulls eye to the
intersection of the two guidelines, and rotate the clone -30 degrees.
Clone the four lines and the second triangle and group them (Ctrl g)
(do not add the first triangle to the group). Rotate the group -30
degrees around the center of the two guidelines. Repeat the clone and
rotate step until you have added all the tick marks. A second triangle
will be added right above the first triangle at the 12 o’clock position.
Hold down the Ctrl key and click on the duplicate triangle to select it.
Hold down the Ctrl key and drag the bottom center control handle (the
small black box) upwards until the triangle flips vertically and forms a
diamond with the bottom triangle as shown above.
NOTE: Ctrl + click selects an object that is part of a group.
Hold down the Shift key (to select multiple objects), and select the 12
groups of tick marks/triangles and the two circles that enclose the tick
marks. Group them (Ctrl g or Arrange > Group). Press Ctrl x (or Edit >
Cut). This will reveal if you have missed any of the circles or lines.
Press Ctrl z or Edit > Undo to undo the cut and to replace the objects.
If necessary, add to the group.
I was going to have you repeat the steps to add tick marks to the small
circles, when I had a brilliant thought! Why not clone the two lines and
tick marks from the large circles we already have and reduce them?!
Select the circle/tick marks group. Clone the group. Ctrl click on the
top triangle that points upward at the 12:00 o’clock position, delete it,
and reduce the width of the group to 64 pixels. Change the outline
Width to .5pix.
Unfortunately this also adds a outline to the triangle shapes. Ctrl click
on each triangle and set the outline to none (select None from the
Width drop down list on the Infobar). It’s a bit of a chore, I know.


 H 1 2 3 4 5 6 7 8 9 Download Zipped Tutorial
Tutorial ©2010 Gary W. Priester
H 1 2 3 4 5 6 7 8 9 Download Zipped Tutorial
Tutorial ©2010 Gary W. Priester


