


 WEBSITE AND WEBSITE GRAPHICS CREATED WITH XARA DESIGNER PRO 6


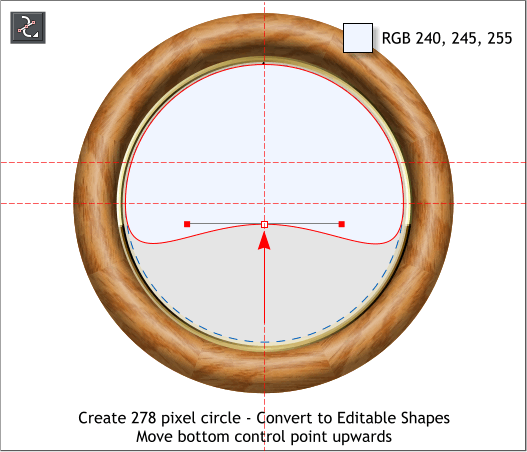 Create a new 278 pixel circle. With the circle selected, select Convert
to Editable Shapes (or press Shift Ctrl s).
Switch to the Shape Editor Tool (F4). Select the bottom center control
point and move the point upwards to about 20 pixels below the center
of the circle. Change the fill to the color shown. (No outline).
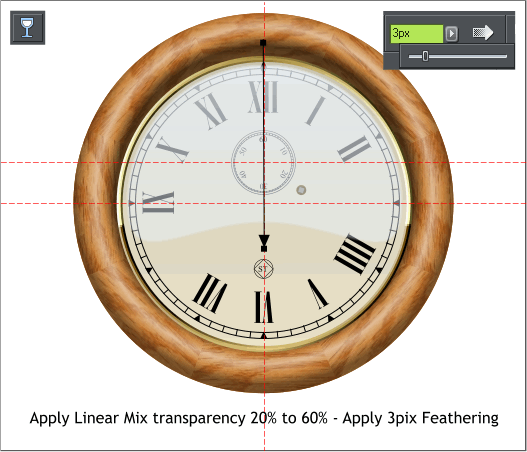
Select the Transparency Tool (F6). Click on the shape to select it, then
click slightly above the shape, hold down the Ctrl key to constrain the
angle and drag straight down to just above the ST logo. Click on the top
control point then change the Transparency slider setting to 20%. Click
on the bottom control point and change the slider setting to 80%
On the top, right side of the Infobar, move the Feathering slider to 3px.
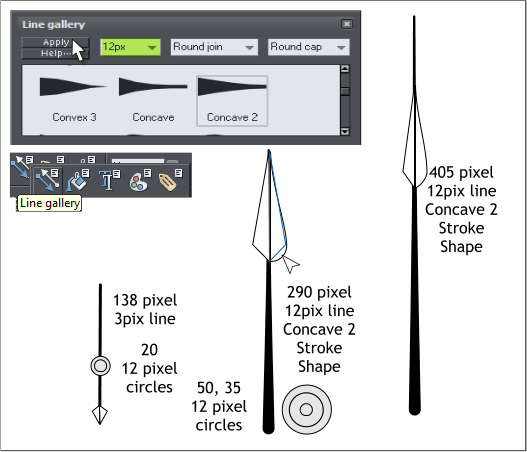
We will create the hands larger to make the job easier. We will reduce
them to the proper size later.
Create three vertical lines to the heights and line widths shown.
Open the Line Gallery (no more shortcut!) In the Stroke Shapes folder,
select Concave 2. Apply this stroke shape to the two large hands.
Create the two sets of centered circles shown.
Select the Shape Editor Tool (F4). Select Make Line mode on the
Infobar. Draw the triangle shapes shown on the left of each hand. Pull
on the edges with the Shape Editor Tool to gently curve the shape.
Clone the shape and flip horizontally.
Click here for a video on creating the top of the hands.
Select the three vertical lines (shown in red) and Arrange > Convert
Line to Shape.
Arrange the converted lines and circles as shown.
For each hand do the following: Select the objects shown in the right in
black, (do not select the circles shown in gray). From the Arrange menu
select Combine Shapes > Add Shapes or press Ctrl 1.
Create a new 278 pixel circle. With the circle selected, select Convert
to Editable Shapes (or press Shift Ctrl s).
Switch to the Shape Editor Tool (F4). Select the bottom center control
point and move the point upwards to about 20 pixels below the center
of the circle. Change the fill to the color shown. (No outline).
Select the Transparency Tool (F6). Click on the shape to select it, then
click slightly above the shape, hold down the Ctrl key to constrain the
angle and drag straight down to just above the ST logo. Click on the top
control point then change the Transparency slider setting to 20%. Click
on the bottom control point and change the slider setting to 80%
On the top, right side of the Infobar, move the Feathering slider to 3px.
We will create the hands larger to make the job easier. We will reduce
them to the proper size later.
Create three vertical lines to the heights and line widths shown.
Open the Line Gallery (no more shortcut!) In the Stroke Shapes folder,
select Concave 2. Apply this stroke shape to the two large hands.
Create the two sets of centered circles shown.
Select the Shape Editor Tool (F4). Select Make Line mode on the
Infobar. Draw the triangle shapes shown on the left of each hand. Pull
on the edges with the Shape Editor Tool to gently curve the shape.
Clone the shape and flip horizontally.
Click here for a video on creating the top of the hands.
Select the three vertical lines (shown in red) and Arrange > Convert
Line to Shape.
Arrange the converted lines and circles as shown.
For each hand do the following: Select the objects shown in the right in
black, (do not select the circles shown in gray). From the Arrange menu
select Combine Shapes > Add Shapes or press Ctrl 1.
 H 1 2 3 4 5 6 7 8 9 Download Zipped Tutorial
Tutorial ©2010 Gary W. Priester
H 1 2 3 4 5 6 7 8 9 Download Zipped Tutorial
Tutorial ©2010 Gary W. Priester


