


 WEBSITE AND WEBSITE GRAPHICS CREATED WITH XARA DESIGNER PRO 6


 Display the screen rulers (Ctrl L). Enable Snap to Grid (Window > Snap
to Grid). Drag a horizontal and vertical guideline from the screen rulers
onto the center of the page. Disable Snap to Grid.
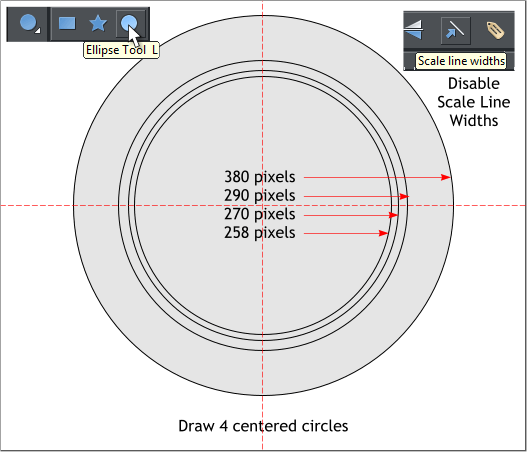
Select the Ellipse Tool (keyboard shortcut L). Click at the intersection
of the guidelines, hold down the Shift key (to draw from the center)
and the Ctrl key (to constrain the ellipse to a circle), and drag a 380
pixels circle. Set the Width to 1px. Disable Scale Line Widths (when
disabled, the icon will be in the up position)
Clone the circle (Ctrl k) and change the size on the Infobar to 290.
Press Enter (or Return) to apply the change. Clone again and change
the size to 270 pixels. Clone once more and reduce the size to 258px).
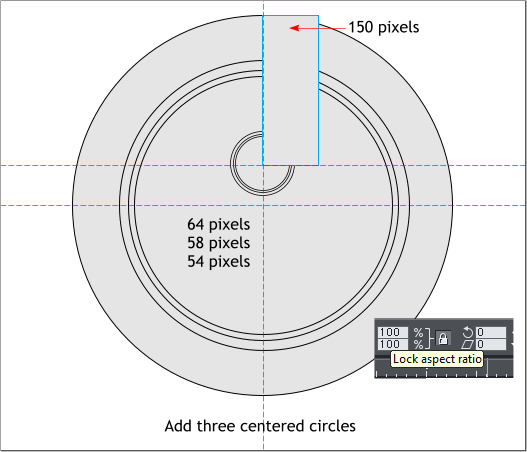
Select the Rectangle Tool (m) and draw a rectangle that is 150 pixels
tall (the width does not matter). Use the rectangle as a guide to
position a new guideline 150 pixels down from the top of the largest
circle. Once you have added the guideline, delete the rectangle.
Press 3 on the keyboard to zoom to 300%. Add three centered circles to
the sizes shown. Use the same technique as above to center the first
circle, then clone and resize each of the smaller circles by entering the
dimension in the H or W text entry box and pressing Enter to apply the
change. (The Lock Aspect Ratio padlock icon should be enabled)
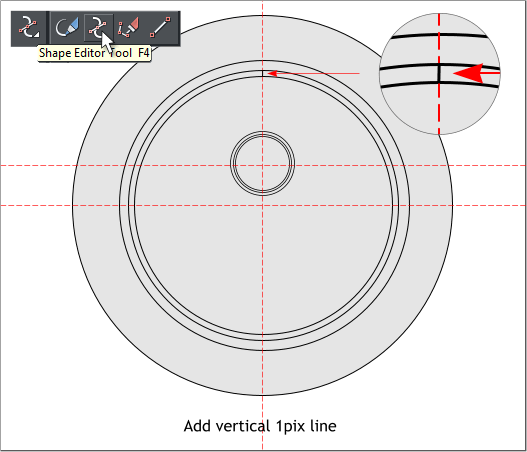
While you are still zoomed in at 300% select the Shape Editor Tool (F4)
or the new Straight Line Tool (found at the far right of the drawing
tools fly out menu). Draw a vertical 1px (1 pixel) line between the two
circles as shown above in the enlarged view.
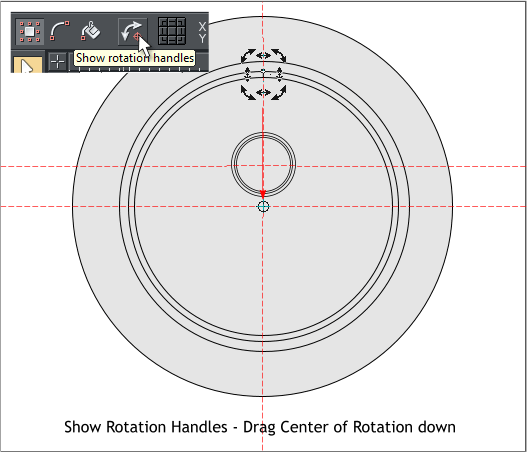
With the vertical line selected, click the Show Rotation Handles icon on
the Infobar. This displays the rotation handles/arrows and the Center of
Rotation bulls eye. Drag the Center of Rotation bulls eye to the
intersection of the two center guidelines. It is very important that the
bulls eye be exactly centered on the two guidelines. Zoom in closer if
need be and switch to Outline View (Window > Quality > Outlines).
Switch back to Very High Quality when you are done.
Display the screen rulers (Ctrl L). Enable Snap to Grid (Window > Snap
to Grid). Drag a horizontal and vertical guideline from the screen rulers
onto the center of the page. Disable Snap to Grid.
Select the Ellipse Tool (keyboard shortcut L). Click at the intersection
of the guidelines, hold down the Shift key (to draw from the center)
and the Ctrl key (to constrain the ellipse to a circle), and drag a 380
pixels circle. Set the Width to 1px. Disable Scale Line Widths (when
disabled, the icon will be in the up position)
Clone the circle (Ctrl k) and change the size on the Infobar to 290.
Press Enter (or Return) to apply the change. Clone again and change
the size to 270 pixels. Clone once more and reduce the size to 258px).
Select the Rectangle Tool (m) and draw a rectangle that is 150 pixels
tall (the width does not matter). Use the rectangle as a guide to
position a new guideline 150 pixels down from the top of the largest
circle. Once you have added the guideline, delete the rectangle.
Press 3 on the keyboard to zoom to 300%. Add three centered circles to
the sizes shown. Use the same technique as above to center the first
circle, then clone and resize each of the smaller circles by entering the
dimension in the H or W text entry box and pressing Enter to apply the
change. (The Lock Aspect Ratio padlock icon should be enabled)
While you are still zoomed in at 300% select the Shape Editor Tool (F4)
or the new Straight Line Tool (found at the far right of the drawing
tools fly out menu). Draw a vertical 1px (1 pixel) line between the two
circles as shown above in the enlarged view.
With the vertical line selected, click the Show Rotation Handles icon on
the Infobar. This displays the rotation handles/arrows and the Center of
Rotation bulls eye. Drag the Center of Rotation bulls eye to the
intersection of the two center guidelines. It is very important that the
bulls eye be exactly centered on the two guidelines. Zoom in closer if
need be and switch to Outline View (Window > Quality > Outlines).
Switch back to Very High Quality when you are done.


 H 1 2 3 4 5 6 7 8 9 Download Zipped Tutorial
Tutorial ©2010 Gary W. Priester
H 1 2 3 4 5 6 7 8 9 Download Zipped Tutorial
Tutorial ©2010 Gary W. Priester


