
For an explanation of any menu item, highlight the menu item and press F1 (the function key) and a Help window and explanation will open.
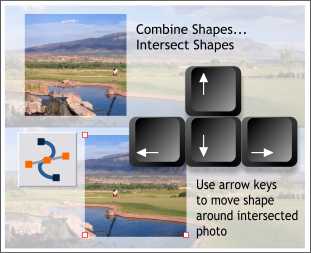
Alternative to Apply ClipView TIP - Arrange > Combine Shapes... Intersect Shapes when used with two shapes, a square and a bitmap image for example, masks the bottom image inside the top shape. Even though you can only see the portion of the image in the containing shape, Xara retains the entire image. You can move the containing shape around by selecting it with the Selector Tool, selecting all the control points with the Shape Editor Tool (the Xara X1 icon is shown above), and then using the arrow keys to move the container around the image.

The ultimate guide to Xara X’s keyboard shortcuts in Flash format for printing or viewing onscreen. This guide covers all the keyboard shortcuts and is color coded for Ctrl, Alt and Shift keys. Big thanks to Jonathan Payne for compiling this valuable tool. Click here to download the Flash file (121K) Click here to download a black and white Xara file (10K).
Scroll Lock TIP: When your cursor goes beyond the borders of the page, Xara scrolls off the page. While this is often helpful, sometimes it is not desireable. In you enable Scroll Lock on your keyboard, Xara will not scroll the page when you move beyond the page borders.
Using the Arrow Keys to increase and decrease the size of selected text TIP: Many graphics applications have small arrow keys that allow users to increase or decrease the size of text. Xara is not one of these. However, if you place the Text Tool cursor inside the text Size box, you can use the Up and Down arrow keys to increase and decrease the size of the text. This tip works with many of the text entry boxes.
Charles Moir’s Top Ten Power Tips:
1) Right click copy
It's surprising how often you want to make a copy of a shape, group or any object. Xara X has an instant way of making a copy, or a number of copies of any object. As you drag the object around the page, right-click the mouse, while continuing to hold the left button for the drag. Each time you right click you get a copy dropped at the cursor, and the original remains untouched.
[Editor’s Note: It sure would be nice to cut and paste highlighted text.]
2) Constrained copy
Particularly useful in conjunction with the above. Hold Ctrl-down while dragging and the object will be constrained to be in an exactly vertical, horizontal, or 45 degree angle from the original. So to make a copy of an object exactly below the existing, just drag the object, while holding the Ctrl-key and right click where you want the copy dropped.
3) Copy and paste styles
You can quickly copy the style of any shape (e.g. the color, line or brush style, fill, transparency etc) to any other shape. Simply select and copy the original shape (Ctrl-C) and then Paste Attributes, key short-cut Ctrl-Shift-A (remember A for Attributes).
This even works across documents, so you could have one document with a library of commonly used styles and then easily paste these onto any other shape.
4) Temporary Tool Selection
Switching tools is one of the most common, and therefore time consuming operations. How often, for instance, are you working on a shape, then need to zoom in some more, before continuing to work. Or perhaps you're editing a shape using the Shape Editor tool and want to select a new shape to edit.
Three tools in particular offer a quick, temporary way of being selected, which then revert to the previous tool afterwards. The Selector tool, push and zoom tools can each be selected using their key short-cuts:
Selector tool: Alt+S or simply press space
Push tool: Alt+X
Zoom tool: Alt+Z
Once selected, if use the same short-cut again, these will revert back to the previous tool. Better still, and perhaps even less known, you can just hold the short-cut keys, perform the operation while holding the keys, and then release the keys, and it will revert back to the previous tool.
So now, say, you're editing the outline of a shape and you want to edit the outline of another shape. Instead of clicking the selector tool, clicking the new shape, then clicking the shape editor tool back again, you can just press and hold the space bar, click the new shape, then release the space bar - you're now back in the Shape Editor.
Illustrator or Photoshop users are used to the space bar being a short-cut to the push tool, but there are other (more OS standard) ways of doing that (see below), and so we feel it's better to use space bar as a short-cut to the most commonly used tool - the Selector tool. Of course this doesn't work if you're in the Text tool. In that case use Alt+S
What's more we deliberately designed it so these short cuts are typically very close to the standard left hand, and thumb, position on the keyboard so very little movement is required to use these short-cuts.
5) Push Tool
How many people know the wheel on their mouse is also a clickable button? There is a sort of Windows standard that says this should be a short cut to a push tool, and Xara X uses this. This has made the above mentioned Alt-X short-cut rather redundant. If you want to push the page around, just press and hold the mouse-wheel, and drag the document around.
(Other good Windows apps also follow this, such as WindowsXP Picture Viewer. Other, less nice Windows apps (e.g. Internet Explorer) use a similar, but backwards control to scroll the page)
6) Quickly switch between open documents
Easy, Ctrl+Tab. This cycles around open documents. If you can press the combination Ctrl+Shift+Tab cycles the other way around the open documents. Or you can go directly to any document by Alt+W and then type a number for the document you want to switch to.
[Editor’s Note: Alt + Tab switches between open applications]
7) Drag the selected object under others
How often have you got an object selected that you want to re-position, but if you try and click-drag, you inevitably end up dragging the wrong object (either because the object is under others, or just too small to easily click on). Well, if you hold Ctrl and Alt keys down together and start dragging anywhere on the document, it drags the selected object (and doesn't select a new one). Once you've started moving the object you probably want to let go of the Ctrl key as this aligns the drag to the vertical, horizontal or 45 degree angle from the original. In fact you only need to hold Ctrl-Alt to start the drag, you can let go of both keys once you've started dragging.
7) Select under. Select inside
Most users know these ones, but these are two of the most common short-cuts. Hold the Alt key down while in the Selector Tool. The mouse-pointer changes to an upside down pointer, and each time you click it will select the next document 'under' in the stack of objects.
You can select an object inside a group (something you can't do in most other illustration software allows) by holding Ctrl while in the Selector Tool. Click on the object and it's selected inside the group.
If all else fails revert to the old Illustrator way and change to outline mode and click directly on the object's outline. You can still use Ctrl to select object inside groups.
8) Marquee select without dragging the wrong object
Again quite a common problem. You try to select a few objects so, in the Selector Tool, you start a marquee drag to surround the shapes, only to find you're dragging an object on top, probably a mostly transparent one. Well if you hold Shift while you start dragging, the object under the mouse-pointer is not moved. So this enables you to marquee select objects under another.
9) Zoom toggle
Again something you won't find in most other graphics software but you'll find Xara X users employing it all the time, and that's to toggle between two zoom scales. There's no key short cut for this, but the 'previous zoom' button next to the zoom scale drop-down on the top bar lets you work, and quickly switch between, two zoom scales.
10) Change the page color
Drag a color blob (from the color bar along the bottom, the color gallery or the preview patches on the color editor) onto the page, but before you drop, hold the Ctrl key. If you drag the lower color blob from the color picker to the page this way, you can now interactively alter the color in the editor and the document page color is updated interactively.
Bonus tip
Not used often, but I know many users don't know this feature exists. You can adjust the order of the colors on the color line. Open the color gallery and just drag the colors around in the gallery - the color line reflects the order in the gallery.
![]()