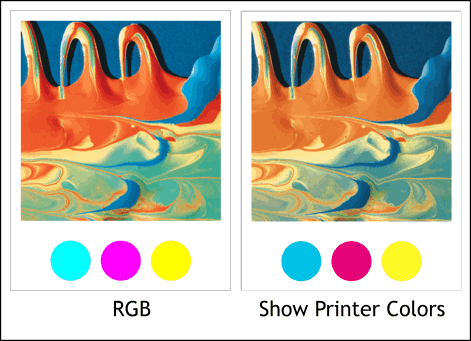
Printing TIP: Many people wonder why the rich vibrant colors they see on the screen print muted and dull on their desktop printers or commercial printer’s printing presses. This is because Xara displays colors in RGB color space, the same color space used to display the images you see on the Web and on Television. These colors are created by mixing red, green, and blue phosphors which are like tiny lights and create a rich, vibrant image.
Printed colors use CMYK color space in which colors are created by mixing CMYK (cyan, magenta, yellow, black) inks and cannot match the intensity and saturation of RGB colors. To get a more realistic preview of how colors will look when printed, use the Show Printer Colors option (Window > Show Printer Colors).
In the two images shown above, the image on the left is displayed in RGB color space while the more muted image on the right is displayed using Show Printer Colors. The CMY primary colors are more accurate to the actual color of the printing inks.
Nigel Willetts’ Template TIP: I have created a custom Template page which I use primarily for website I run. I have set it like this:
My default page is set with 4 named colors, and all the menus I use are open. I have also included a logo, banners and other elements which I work with often. This saves me lots of time.
GIF Exporting TIP: When exporting GIF images, when you try to reduce the number of colors in 256 color space, more often than not, the number of colors does not change. Try this: Place the text insertion cursor inside the Max Colors: text entry box and either use the Delete or Backspace key to delete the 256. Now you can enter any number of colors you want.
GIF Exporting TIP Two: When exporting a GIF image, try the Optimized palette, 16 Colors first. If necessary use Error Diffusion dithering. Many times the image will be very good and the file size will usually be very compact.
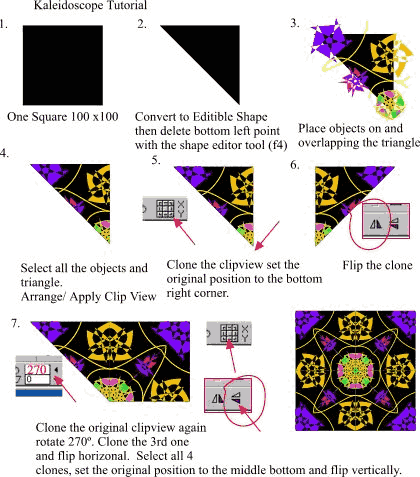 |
Thanks to Judi Assony for this mini -tutorial on creating Kaleidoscopic images.
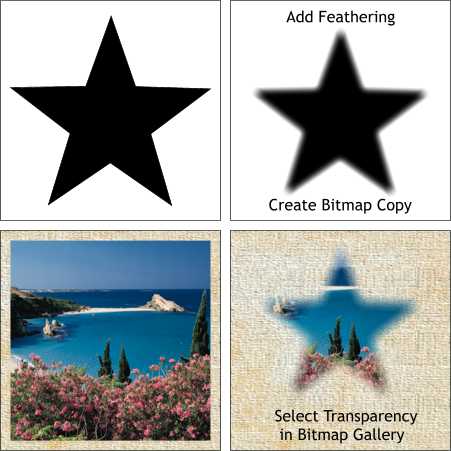 |
Creating a vignetted bitmap over a background Create a black shape that you wish to use for your vignette, in this case a star. Apply feathering to the shape. Draw a rectangle around the shape and select both the rectangle and the shape and Create Bitmap Copy (Arrange menu). The new bitmap copy is automatically inserted into the Bitmap Gallery.
Position the bitmap image that you wish to vignette over your background image. Open the Bitmap Gallery, select the black and white vignette image, and press Transp. The background becomes invisible and the bitmap is vignetted seamlessly over the background.
Keyboard Text Shortcuts:
Most of these shortcuts work in any Windows application, but they can come in very hand when working with text in Xara. The red vertical line (|) represents the text cursor. The arrow keys refer to the arrow keys on your computer's keyboard.
Home: | Jumps to left of the first character in a line of text
End: Jumps to the end of a line of text|
Ctrl - Home: | Jumps to the top left of a column of text
Ctrl - End: Jumps to the very end of the column|
Ctrl - right arrow key: Jumps |to the next word
Shift - right arrow key: Highlights one character at a time
Ctrl - Shift + right arrow key: Highlights one word at a time
Shift + End: Highlights entire line of text
Ctrl - Shift - End: Highlights all lines of text to
the end of the paragraph
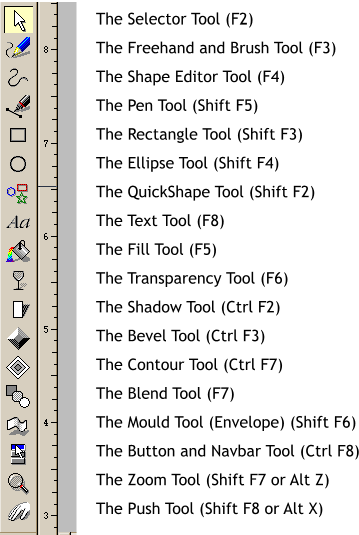 |
Keyboard Shortcuts for the Main Toolbar Illustrated Each of Xara’s Main Tools has its own keyboard shortcut, and while some of the newer tools have rather laborious shortcuts, the core tools, such as the Fill Tool, Text Tool, have one function key short cuts.
The Zoom Tool and the Push Tool have two shortcuts. The ones that use Alt can be toggled off and on by repeating the Alt command.
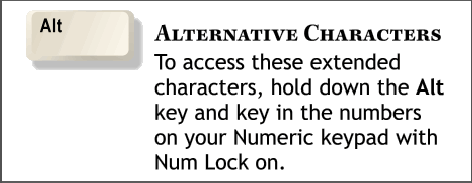
This tip was inspired by an e-mail from Marc Fischer. In addition to the letters and symbols that are accessible from the Western keyboard, there are a number of “extended characters” which are accessible by holding down the Alt key while keying in the numbers on the numeric keypad (including the 0). Not all symbols are available for every font. For example Alt 0142 creates a large round bullet in some fonts and Ž in others.
|
||||||||||||||||||||||||||||||||||||||||||||||||
|
Smack upside the head Department: Several of you contacted me and reminded me that if you have the Character Map utility installed (it’s on the Windows CD and usually found in Start > Programs > System Tools > Character Map) you can see the entire character set for any installed font, and copy and paste from the Character Map utility into your open application. If you do not have Character Map installed on your computer, Character Map Pro v 1.81 does the same thing and can be downloaded at this link (231K) Finally, someone has really gone to a lot of work to produce the VisiBone HTML Chart. This chart shows the entire character chart and tells which characters are supported in which Browsers. It also gives you the HTML code for each of these characters.
|
||||||||||||||||||||||||||||||||||||||||||||||||
