
|
||
|
|
|
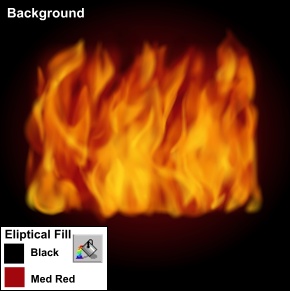
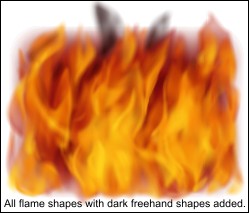
Background. I wasn't sure what to do with the 3 background rectangles at first, so I just gave them a maximum feather each (50 pixels), which turned out reasonably well as this gave the aforementioned glow effect. For the black background draw a larger rectangle and give it an elliptical fill with Black on the outside and Med Red in the centre, and adjust the fill so that it just creates a bit of a glow around the fire. Last bits of tweaking. I created a few flat filled Dk Red freehand shapes (with usual plasma transparency) over the darker parts of the fire, then in the colour editor (using the HSV colour model) changed the colour to an almost black fill (RGB: 31, 1, 2) until I got a reasonable amount of contrast. This creates 'holes' which will also mask out some of the background glow and gives a bit more depth to the overall look. I also drew a few more of these almost black coloured shapes at the top of the flames to break up the top edge glow from the 3 original rectangles and the Black and Med Red elliptical filled rectangle. This creates a more 'jagged' edge or swirly effect at the top, this was a bit of a stop gap measure. However, I haven't yet found a better way to do this; even using a more fire-like shape than rectangles or slicing the 3 original rectangles doesn't give the same effect, due to the large feather used on them. But at this last stage if you have created a more natural shaped fire then you will most likely need to convert the rectangles to shapes and adjust the outline to roughly fit your fire, of course you could do this at the beginning but I imagine it is easier to do at this point, that way the flame shapes will grow more naturally.
Tip: if you find the bottom of your flames has too many dark parts then clone one of the original 3 rectangles (or shapes if you have changed them to shapes) and give it a flat Med Red colour and a linear transparency from a lowish percentage at the bottom and then fading to 100% towards the top to make the fire 'hotter' at the bottom, and put this near the back with the 3 other rectangles/shapes. If you are still following this and I haven't stressed you out too much! Then I'll go through the final bits with the logs and glowing 'coals'. © Copyright 2002 Su Lawrence. All rights reserved. |
|
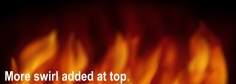 However I did finally create a little bit more 'swirl' at the
top by cloning the Black and Med Red elliptical filled rectangle, giving it a vertically stretched fractal plasma fill (same colours) and an elliptical transparency centred over
the top part of the flames, this got sent to near the back so as not to mask out the freehand flame shapes).
However I did finally create a little bit more 'swirl' at the
top by cloning the Black and Med Red elliptical filled rectangle, giving it a vertically stretched fractal plasma fill (same colours) and an elliptical transparency centred over
the top part of the flames, this got sent to near the back so as not to mask out the freehand flame shapes).