 |
 |
 |
 |
 |
 |
 |
New Users Guide Drawing the Line
We touched upon the Pen and Freehand Tools in an earlier edition. This month we'll look at everything there is to know about outlines in Xara. Starting with a review of the two aforementioned tools, then covering the various ways Xara has for creating and editing outlines and finishing with a fun and easy way to create Neon effects.
The Smoothness slider reduces or increases
the number of nodes in the outline as you can see in the illustration on the left. A lower setting retains more of the nodes whereas a higher setting smoothes the outline and reduces the number of nodes.
As long as the line and the Freehand tool are selected, you can move the slider one way or the other and the line will redraw. Once the line has been deselected, however it can not be modified with the slider.
If you set the Smoothness slider before you use the Freehand Tool, the resulting lines will reflect the setting.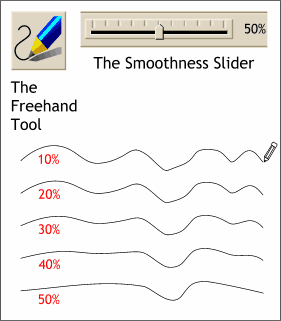 The Freehand Tool
, as the name implies, is for drawing freehand lines and shapes. When the Freehand Tool is selected, the Smoothness slider appears on the Infobar.
The Freehand Tool
, as the name implies, is for drawing freehand lines and shapes. When the Freehand Tool is selected, the Smoothness slider appears on the Infobar.
You can enter a custom line weight by highlighting the
current setting and keying in a new figure. The default units are points. To make the line in inches use 0.0in. For pixels use 0pix. The value will be reflected in points. For example, to create a line
that is 1/4 inch wide, key in .25in. The line will be come 1/4 inch and the setting will reflect the line weight in points, 18pt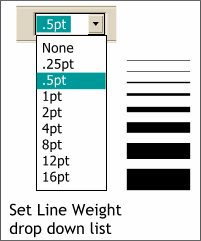 The default Outline weight is .5 or 1/2 point. The Line Weight drop down list contain several other preset line weights. The smallest preset weight is .25 point. In commercial printing, this is considered a hairline and
used for registration marks. Selecting none has the same effect as right clicking on the hatched box to the left of the color palette.
The default Outline weight is .5 or 1/2 point. The Line Weight drop down list contain several other preset line weights. The smallest preset weight is .25 point. In commercial printing, this is considered a hairline and
used for registration marks. Selecting none has the same effect as right clicking on the hatched box to the left of the color palette.
TIP: If you are preparing art for commercial 4-color printing, you can add 4-color registration marks. Make your registration marks .25 points and change the outline color to C=100%, Y=100%, M=100%, K=100%. The marks will appear on all four pieces of film.
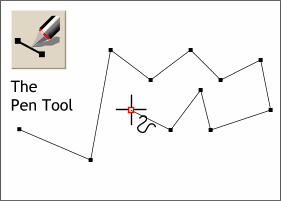 The Pen Tool
has two modes of operation, straight line segments, and Bezier curves. Straight line segments are a breeze, just click the first anchor point where you want the line to begin, then click the second anchor
point. To add another segment, click another anchor point. Clicking an anchor point directly over the first point creates a Closed Path. Only closed paths can be filled.
The Pen Tool
has two modes of operation, straight line segments, and Bezier curves. Straight line segments are a breeze, just click the first anchor point where you want the line to begin, then click the second anchor
point. To add another segment, click another anchor point. Clicking an anchor point directly over the first point creates a Closed Path. Only closed paths can be filled.
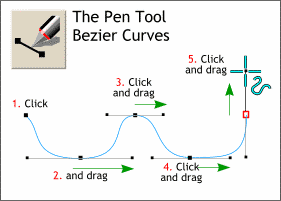 Bezier curves are like ice skating or cross country skiing. You need to get into a rhythm. 1. Click to add the starting point. 2. Click to add the end of the curve. Drag in
the opposite direction you want the curve to be drawn. Dragging to the right extends the curve to the left. 3. Click the next anchor point and drag. 4. Click and drag. 5. Click
and drag. 6. Click and... Just like skating.
Bezier curves are like ice skating or cross country skiing. You need to get into a rhythm. 1. Click to add the starting point. 2. Click to add the end of the curve. Drag in
the opposite direction you want the curve to be drawn. Dragging to the right extends the curve to the left. 3. Click the next anchor point and drag. 4. Click and drag. 5. Click
and drag. 6. Click and... Just like skating.
TIP: Drawing with Bezier Curves is difficult because you have to visualize not only the shape you want to draw, but where the points need to go. A more intuitive use for Bezier Curves is tracing a bitmap template. Put the bitmap on a separate layer and trace it using Bezier curves.
Tool Review Continued on the Next Page