|
|||||
|
|
|||||||||||||||||||
|
Select Inside can be used to select an object inside a compound object. This can be done in the Selector tool by Ctrl clicking or by Alt Ctrl -clicking on the object. Objects are said to be "inside" a group when they are members of the group. Normally, clicking on the object would select the group but a Ctrl click selects the object that you clicked on inside the group. Select inside works with any compound object. When any selected object is inside another one, the status line shows for example: "2 shapes selected ("inside")". Select-inside is just like select member (see next paragraph), except it goes straight to the innermost object. It is a quick way to select the object you actually click on, irrespective of whether it is part of a group, blend, or mold. Some operations are unavailable when any selected object is inside another one. TIP: Once you have selected an inside object, press the Tab key to cycle though the other objects inside the group. Select Member to select an object which is a member of a group. (This is a special form of Select inside.) This can be done using the Selector Tool by Alt Ctrl clicking on the object. Objects are said to be "inside" when they are members of a group. Normally, clicking on the object selects the group but Alt Ctrl click selects the object inside the group containing the clicked object. That object may itself be a group and then further Alt Ctrl clicks can be used to select members of that group, etc. When the last selected object is not a group, it cannot have any members and so the next Alt Ctrl click will select the outermost group again. Select member also works inside blends, molds and text. When any selected object is inside another one the status line shows, for example "2 shapes selected ("inside") " Some operations are unavailable when any selected object is inside another one. For more details, see the Selector Tool in WebXealot 17. Select Under (also called digging or drilling down) allows you to select an object which is underneath another object. This can be done using the Selector Tool by Alt clicking on the top object. Select under is most useful when one object is completely covered by another one. Clicking on the top object selects the top object Alt clicking on the top object selects the object underneath. If there are several objects covering each other, repeatedly using Alt click selects the next object underneath the one that was last selected. When the last selected object is the one at the back, the next Alt click will start at the top again and select the top object. For more details, see the Selector Tool in WebXealot 17. Selection Selection refers to all the currently selected objects. The selection is most often manipulated using the Selector Tool. For more details, see the Selector Tool in WebXealot 17. Selection Handles (also called bounding box handles) are displayed when the Selector Tool is the current tool and selection handles have been enabled. They are displayed around the boundary of the selection and allow the selection as a whole to be scaled, rotated, skewed and stretched. They operate in two modes: Scale mode and Skew/Rotate mode. Also see Scale Mode.
Selector Tool Infobar The Infobar is a special context sensitive control bar which displays options and actions appropriate for the selected tool. For a complete discussion of the Infobars, see WebXealot 25. Service Bureau The Service Bureau takes your work in electronic form and then produces high quality originals from that. In some cases the print shop and service bureau are part of the same company. Often though they are completely separate. For simple jobs the originals may be on photographic paper. Color work usually requires film which is slightly more expensive. The service bureau can usually provide color proofs of your job if you need it. Often a bureau offers a range of other functions such as high-quality scanning of photographs. Most service bureaus are Macintosh based and can be very uncooperative to persons submitting documents created in Windows. This is their problem not yours. Whenever possible, try to find a Windows-friendly service bureau. If you do a large volume of business with your service bureau, you might ask them to install a copy of Xara X and to print your documents directly from Xara X.
Shape A Shape is a solid (or closed) object. The difference between a line and a shape is that a shape has no start or end. Because a shape is a closed object it can be filled with a color. A thickness can be applied to the outline of the shape. Xara X sometimes uses 'Shape' as shorthand for 'Line or Shape'. In PostScript terminology, a shape is a "closed path". Shapes can have two main attributes applied - a fill and an outline color. The line color is the color used for the outline of the shape and the fill can be a simple color or a more complex fill (for example a gradient, bitmap or fractal). A new feature in Xara X permits paths (lines) to be converted to shapes (Arrange menu) in which case the line or path becomes a fillable shape. For more details, see The Freehand Tool in WebXealot 17.
The Special Effects dialog box contains three levels of Sharpening - Low, Medium and High. One of these can be selected, and the slider used to set the level more accurately. For more details, see Bitmap Effects in WebXealot 27.
Snapping (Magnetic) Snapping causes an object or point to be pulled to a certain place while it's being dragged. There are three forms of snapping: Grid snapping, Guide snapping and Object snapping. Snapping is useful for precisely aligning points or objects with each other. See the Snap To Functions section in WebXealot 27.
Spread A Spread is the name given to a number of pages that are joined together. The two pages in the middle of a magazine or brochure are often referred to as the 'center spread'. Xara X supports two types of spread, single-page-spreads and double-page-spreads (DPS). A single page spread is just one page on its own. A double-page-spread is two pages side by side. The line where two pages join on a double page spread is often used to fold the paper that the document is finally printed out on. To specify a spread, go to the Page tabbed section in the Page Options dialog and check Double Page Spread. Square Caps are a type of ending which can be applied to lines. There are three types of 'cap'. See Round Caps for examples of all three caps.
Technically the Stained Glass transparency process is known as Subtractive in RGB color space. Bleach is also known as Additive.
Template A Template Document is a blank document that you can use to create regular documents from. Xara X includes templates for drawings and animations and you can create other templates as you need them. To create a new template, set up your page as you want it to appear each time you open a new template. For example, set your rulers to the units you wish to work with. If you use a logo or other elements, include them in the template. When you are finished select Save Template... from the File menu. Save your template with a new name that relates to what the template will be used for. To use a new template, select New... from the File pull down menu and a list of available templates will appear in a pop up window. Select the template and that's all there is to it. NOTE: It is best to keep all your template files in Xara's Templates folder. This is where Xara expects to find them and if you specify a different folder, Xara may become confused and you never know what will happen in that case. Temporary Folder Xara X locates a Temporary folder using the 'TEMP' environment variable. If this variable is not set to a proper folder, various features of the program, such as the remote index building in the library galleries, will not work.
Before you click the Text Tool cursor on the page the cursor shows a cross hair with a mirrored Y-shape. When the cursor has been inserted in text, it becomes a vertical red line the height of the tallest ascender and the deepest descender. To highlight text, drag the text cursor over the text. For an overview of the Text Tool, see WebXealot 20. Text Object A Text Object is one or more lines of text which can be moved and copied like any other object. The Text Tool allows you to edit the contents of text objects by typing new characters, changing the font, font size, etc. You can apply all the normal attributes to text objects, such as line widths, fills, dotted lines, color and even transparency. Text objects can be fitted to a curve and they remain editable when the Text Tool is selected. If you use Select Member (see paragraph below) on a text object you first select the whole object, then a line of text in it, then a single text character in the line. Text objects come in three forms, simple, column and fitted to a curve. For more details, see Creating new text or the Text Overview. Select Member To select an object which is a member of a group. (This is a special form of Select inside.) This can be done in the Selector Tool by Alt Ctrl clicking on the object. Objects are said to be "inside" when they are members of a group. Normally, clicking on the object selects the group but Alt Ctrl click selects the object inside the group containing the clicked object. That object may itself be a group and then further Alt Ctrl clicks can be used to select members of that group, etc. When the last selected object was not a group, it cannot have any members and so the next Alt Ctrl click will select the outermost group again. Select member also works inside blends, molds and text. When any selected object is inside another one the status line shows, for example "2 shapes selected ("inside") " Some operations are unavailable when any selected object is inside another one. Keyboard Text Shortcuts: Most of these shortcuts work in any Windows application, but they can come in very hand when working with text in Xara. The red vertical line (|) represents the text cursor. The arrow keys refer to the arrow keys on your computer's keyboard. Home: | Jumps to left of the first character in a line of text
Text Tool Infobar The Text Tool Infobar is a special context-sensitive control bar which displays a range of controls that pertain specifically to the Text Tool such as character and paragraph attributes, tracking and kerning controls, styles, line and character spacing, and more.
Tiling is the way some fills, transparencies and bitmaps are repeated across objects or the page. In the two previous examples above the three-color fill and the three point transparency, the effect has been tiled by using the Repeating Fill Tiling option on the Infobar.
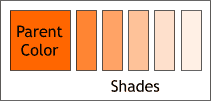
Simple Tile places a single copy of the bitmap or fractal inside the filled shape. The shape may not be entirely covered by the bitmap or fractal. You can scale up the bitmap or fractal to fill the shape but the individual pixels may then be noticeable. Repeating Tile repeats the bitmap or fractal to fill the shape. Flat & Conical Fills cannot be tiled. In other fill types, Simple takes the colors of the fill and extends them out to infinity, while Repeating copies the fill over the entire shape. Tint Colors (also see Shade Colors) are a type of named color. They are based on another named color (called the parent color) but with the addition of white, so any changes made to the parent color will be reflected in the tint. Use tints:
A tint can be based on any other named color, including another tint.
Toolbar The Toolbar is a special control bar containing buttons for all the Tools available in Xara X. The icons shown in the last paragraph makeup the buttons on Xara's main Toolbar. Toolbars can be made visible and non-visible. From the Window pull down menu, select Control Bars... to open the Control Bar dialog. Check or uncheck toolbars you wish to make visible or non-visable. You can also create custom toolbars using any combination of buttons you desire. Click Here for a quick tutorial on Creating a Custom Button Bar.
Trackbar (See Sliders).
TIP: If you don't want to see transparency arrows when dragging, press the Ta b key when using the Fill Tool or Transparency Tool. For more information, see the Transparency Tool overview in WebXealot 21. Transparency Handles are the tiny squares at the ends of the Transparency fill path arrows. Drag the handles to change the direction and size of the graduated transparency. Select a handle and drag the slider on the Transparency Tool Infobar to change the amount of transparency applied. To easily cycle between the start and end handles, press the Tab key. Transparency Tool Infobar The Infobar is a context-sensitive special control bar which changes depending on which tool you have selected. For a complete description of all options and functions available to the Transparency Tool Infobar, see the Transparency Tool overview in WebXealot 21. TrueType is a font format native to the Windows platform. There are two principal font formats in use: TrueType and Adobe Type 1 PostScript fonts. Xara X supports both types. You will find a large selection of fonts in both formats on the Xara X CD, appropriately enough, in the Fonts folder. Another emerging type of font is called OpenType and is a cross-platform font format developed by Adobe and Microsoft that simplifies font management and provides both richer linguistic support and advanced typographic control. While TrueType and Type 1 fonts are limited to no more than 256 characters, OpenType fonts can contain 65,000 glyphs or characters permitting one font to contain all the standard characters, plus all the foreign characters, old style characters and numerals, ligatures (characters that are joined together) and obviously much more. Bitstream, a major developer of fonts and font technology, has developed an extended font format called WGL4 (Windows Glyph List 4). This character set was created to include characters for Western, Central, and Eastern European writing systems (Greek, Turkish, Cyrillic, etc.). As with the OpenType format, WGL4 support well in excess of 256 characters or glyphs. NOTE: Most service bureaus prefer Adobe Type 1 fonts as these are more compatible with the Macintosh platform which most service bureaus use. |
|

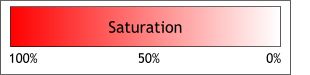 Sat
Sat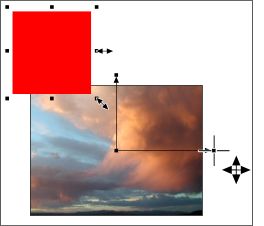 Scale Scaling resizes or stretches
something. You can scale any object using the Selector Tool. You can also scale some objects using the Tool they were created with (for example Ellipse Tool) and you can scale fills and transparencies
using the Fill Tool or the Transparency Tool.
Scale Scaling resizes or stretches
something. You can scale any object using the Selector Tool. You can also scale some objects using the Tool they were created with (for example Ellipse Tool) and you can scale fills and transparencies
using the Fill Tool or the Transparency Tool.
 Scale M
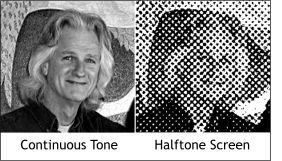 Screen Frequency This applies to
imageset and printed output. It has no connection with the computer's monitor screen. Screen frequency is often called just 'screen'. Printers and printing machines reproduce tints of a basic ink
color as small dots arranged in rows. Screen frequency is the spacing of these rows and is usually measured in lines per inch (lpi). A desktop laser printer often has a coarse screen of about
60 lpi and the individual dots are very noticeable. Imageset output is normally 65-80 lpi (newspaper) 133 to 300 lpi (high quality printing) and you need a magnifying glass to see the dots. For imageset output, your
print shop can tell you the screen frequency to use. Unscreened photo images are referred to as continuous tone images because the image is comprised of a smooth range of values. Commercially printed images have
to be broken down to dots in a process called halftone because the tone can only be black or white. Varying the width of the dot makes that portion of the image lighter or darker. A newspaper photograph is a good
example of a halftone screened image as the dots are large enough to be seen with the naked eye. For a detailed look at printing an imagesetting and commercial printing, see
Screen Frequency This applies to
imageset and printed output. It has no connection with the computer's monitor screen. Screen frequency is often called just 'screen'. Printers and printing machines reproduce tints of a basic ink
color as small dots arranged in rows. Screen frequency is the spacing of these rows and is usually measured in lines per inch (lpi). A desktop laser printer often has a coarse screen of about
60 lpi and the individual dots are very noticeable. Imageset output is normally 65-80 lpi (newspaper) 133 to 300 lpi (high quality printing) and you need a magnifying glass to see the dots. For imageset output, your
print shop can tell you the screen frequency to use. Unscreened photo images are referred to as continuous tone images because the image is comprised of a smooth range of values. Commercially printed images have
to be broken down to dots in a process called halftone because the tone can only be black or white. Varying the width of the dot makes that portion of the image lighter or darker. A newspaper photograph is a good
example of a halftone screened image as the dots are large enough to be seen with the naked eye. For a detailed look at printing an imagesetting and commercial printing, see  Selection Markers are small squares displayed
on all selected objects. The purpose of selection markers is to show which objects are selected. Text will not show a selection marker unless it has been converted to editable shapes. When a group of objects are selected,
each selected object will show a selection marker.
Selection Markers are small squares displayed
on all selected objects. The purpose of selection markers is to show which objects are selected. Text will not show a selection marker unless it has been converted to editable shapes. When a group of objects are selected,
each selected object will show a selection marker.
 Sha
Sha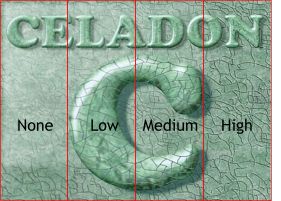 Sharpen exaggerates the boundary
between colors in bitmaps. It is useful for bringing out detail. It is not useful for:
Sharpen exaggerates the boundary
between colors in bitmaps. It is useful for bringing out detail. It is not useful for:
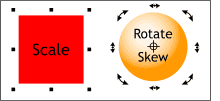
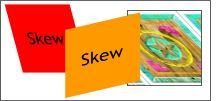 Skew Skewing is often called shearing and
involves sliding the top (or side) of something to stretch it, without moving the opposite side. You skew objects using the Selector Tool. You can also skew fractal and bitmap fills and transparencies using the
Fill Tool or the Transparency Tool. Rotating and Skewing is covered in
Skew Skewing is often called shearing and
involves sliding the top (or side) of something to stretch it, without moving the opposite side. You skew objects using the Selector Tool. You can also skew fractal and bitmap fills and transparencies using the
Fill Tool or the Transparency Tool. Rotating and Skewing is covered in 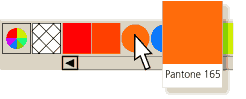 Spot Colors can be used in work that will be
printed on a commercial printing press. Spot colors appear as circles on the Color Line and Color Gallery and each spot color produces an extra separation when you generate color separated output. For simple
two and three color jobs you can use spot colors in place of the four process CMYK colors. This usually reduces printing costs. For complex, multicolor jobs, spot colors let you use special inks such a metallic or
specific ink colors that CMYK cannot reproduce. Using spot colors like this increases the cost of printing the job. Always talk to your print shop before using spot colors. The most common spot colors are Pantone
Matching System colors. Xara has a palette of Pantone spot colors that are based upon the
Spot Colors can be used in work that will be
printed on a commercial printing press. Spot colors appear as circles on the Color Line and Color Gallery and each spot color produces an extra separation when you generate color separated output. For simple
two and three color jobs you can use spot colors in place of the four process CMYK colors. This usually reduces printing costs. For complex, multicolor jobs, spot colors let you use special inks such a metallic or
specific ink colors that CMYK cannot reproduce. Using spot colors like this increases the cost of printing the job. Always talk to your print shop before using spot colors. The most common spot colors are Pantone
Matching System colors. Xara has a palette of Pantone spot colors that are based upon the  Stained Glass is a transparency type associated with the
Transparency Tool. The effect is similar to viewing underlying objects through colored glass. It is useful for the simulation of glass and selectively darkening objects.
Stained Glass is a transparency type associated with the
Transparency Tool. The effect is similar to viewing underlying objects through colored glass. It is useful for the simulation of glass and selectively darkening objects.
 Stroke Shape In Xara X you are not limited to
plain lines. You can also profile the line (for example to make it tapering). The Line Gallery includes a selection of profiles (called "stroke shapes") See
Stroke Shape In Xara X you are not limited to
plain lines. You can also profile the line (for example to make it tapering). The Line Gallery includes a selection of profiles (called "stroke shapes") See 
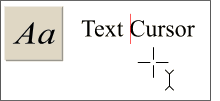 Text Cursor The Text Cursor is displayed when the Text Tool
is selected. The cursor shows you where characters will appear if you start typing or where editing will take place if the cursor is inside an existing text object. To move the cursor click the mouse where you want the
cursor. No cursor is displayed if there is a selected (highlighted) text region. You can apply attributes to the text cursor which will be used when you type.
Text Cursor The Text Cursor is displayed when the Text Tool
is selected. The cursor shows you where characters will appear if you start typing or where editing will take place if the cursor is inside an existing text object. To move the cursor click the mouse where you want the
cursor. No cursor is displayed if there is a selected (highlighted) text region. You can apply attributes to the text cursor which will be used when you type.
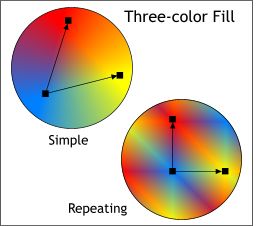 Three Color Fills give the effect of three
colored spotlights lighting the object. The fill is controlled using three fill handles. Unlike other types of fill you can apply different colors to all three handles (the center and the two end points). The object
can contain just one copy of the fill with the colors spreading out to infinity, (Simple) or multiple copies (Repeating). In addition two of the fill path arrows can be independently arranged and colored.
For more details, and a list and description of all Xara's 11 fill types, see the Fill Tool overview in
Three Color Fills give the effect of three
colored spotlights lighting the object. The fill is controlled using three fill handles. Unlike other types of fill you can apply different colors to all three handles (the center and the two end points). The object
can contain just one copy of the fill with the colors spreading out to infinity, (Simple) or multiple copies (Repeating). In addition two of the fill path arrows can be independently arranged and colored.
For more details, and a list and description of all Xara's 11 fill types, see the Fill Tool overview in 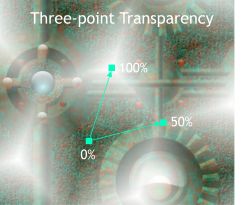 Three Point Transparency consists of
three points each with its own transparency level. The transparency of the object is defined by the graduations between these three transparency handles. In the example, the left point is not transparent, the right
point is 100% transparent and the bottom point is 50% transparent. Three point transparency is ideal for drawing highlights and quickly drawing complex looking transparency effects. For more details, and a
list and description of Xara's 11 transparency types, see the Transparency Tool overview in
Three Point Transparency consists of
three points each with its own transparency level. The transparency of the object is defined by the graduations between these three transparency handles. In the example, the left point is not transparent, the right
point is 100% transparent and the bottom point is 50% transparent. Three point transparency is ideal for drawing highlights and quickly drawing complex looking transparency effects. For more details, and a
list and description of Xara's 11 transparency types, see the Transparency Tool overview in 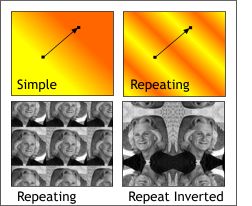 Bitmap Fills & Fractal Fills
 Tool A Tool is much like a tool in normal life. It is
used for a specific job. Xara is divided into well-defined tools each of which has a specific purpose. When you choose a Tool, the Infobar changes to give you a set of context-sensitive options
and operations specific to the selected Tool leaving more editing area available on the page. For more information on Xara's individual tools, see the Index page on the
Tool A Tool is much like a tool in normal life. It is
used for a specific job. Xara is divided into well-defined tools each of which has a specific purpose. When you choose a Tool, the Infobar changes to give you a set of context-sensitive options
and operations specific to the selected Tool leaving more editing area available on the page. For more information on Xara's individual tools, see the Index page on the 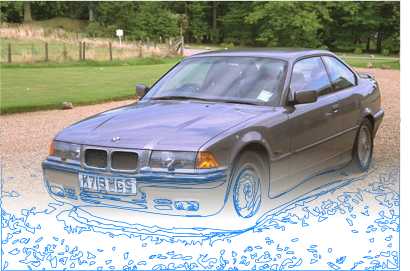 Tracer The Bitmap Tracer produces a set of
shapes that look like a bitmap. (The trace results more closely resemble a paint-by-numbers painting). It examines a bitmap and tries to determine the shapes that best approximate the areas of color in the bitmap. The bitmap
tracer has options to control the minimum size of the shapes, how many different color levels it should try to find and others. Bitmap tracing will never be able to recreate a photograph. But you can use it to create some
interesting effects. For more information on the Bitmap Tracer, see
Tracer The Bitmap Tracer produces a set of
shapes that look like a bitmap. (The trace results more closely resemble a paint-by-numbers painting). It examines a bitmap and tries to determine the shapes that best approximate the areas of color in the bitmap. The bitmap
tracer has options to control the minimum size of the shapes, how many different color levels it should try to find and others. Bitmap tracing will never be able to recreate a photograph. But you can use it to create some
interesting effects. For more information on the Bitmap Tracer, see 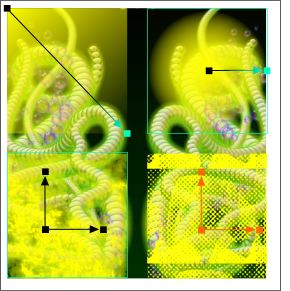 Transparency Arrows (also referred
to as Fill Path arrows) let you control graduated transparency. The direction and length of the arrow directly control the direction and extent of the graduated transparency. The arrow has handles at either end which can be
selected and the transparency set using the slider in the Transparency Tool Infobar is applied to the selected handles.
Transparency Arrows (also referred
to as Fill Path arrows) let you control graduated transparency. The direction and length of the arrow directly control the direction and extent of the graduated transparency. The arrow has handles at either end which can be
selected and the transparency set using the slider in the Transparency Tool Infobar is applied to the selected handles.