|
|
 |
 |
|
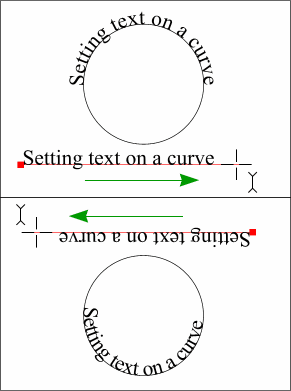 TEXT on a PATH TIP: Marc Fisher
discovered that if you drag the text cursor from right to left (bottom example), key in your text in Leonardo da Vinci fashion (upside down and backwards), then select the text and a path (in this case a
circle that has been Converted to Editable Shapes) then select Fit Text to Curve (Arrange menu), the text will be placed on the inside of the circle instead of the top as
shown in the first example. TEXT on a PATH TIP: Marc Fisher
discovered that if you drag the text cursor from right to left (bottom example), key in your text in Leonardo da Vinci fashion (upside down and backwards), then select the text and a path (in this case a
circle that has been Converted to Editable Shapes) then select Fit Text to Curve (Arrange menu), the text will be placed on the inside of the circle instead of the top as
shown in the first example.
Follow Up TIP: While it is always fun to key in text upside down and backwards, right clicking on the first example and selecting Reverse Text on Curve
achieves the same effect.
|
 |
 |
|
 Where Did It Go TIP:
Some times you know you created something but cannot for the life of you find it. Sound Familiar? Try pressing the Zoom to Drawing button on the Infobar (actually the Standard Toolbar
). This will zoom out to reveal all objects in your document. Often we move objects off the page to make room and forget that we moved them (especially those of us past 50). Where Did It Go TIP:
Some times you know you created something but cannot for the life of you find it. Sound Familiar? Try pressing the Zoom to Drawing button on the Infobar (actually the Standard Toolbar
). This will zoom out to reveal all objects in your document. Often we move objects off the page to make room and forget that we moved them (especially those of us past 50).
Another Related TIP: Your missing object may not have been revealed with the last tip because it might be right in front of your eyes, just
hidden behind another object. In that case try this: Switch to Outline View mode (move the View Quality slider all the way to the left or select Window > Quality > Outline.
If it is hidden behind another object this should reveal it.
Related to a Related TIP TIP: You can also try pressing the Tab key repeatedly until you locate the object. Pressing the Tab key selects
objects on your page in reverse order of creation—the last object created is selected first, then the second to the last, etc.
Selecting a Hidden Object Tip: Hold down the Alt key and click. Every click "digs" down a layer. So if you have a stack of several objects, Alt
click until you dig down to the desired object (your object of desire?). Look at the status bar in the lower left part of the screen to determine which object has been selected.
File Association TIP: Having trouble opening a file because Windows doesn't know what application to use? Find the file in the Windows
Explorer and select it.
Hold down the Shift key and right click on the file name. A pop-up menu will appear saying Open File With...
Browse to the application you wish to use to open the file and locate the executable (.EXE) file.
|
 |
 |
|
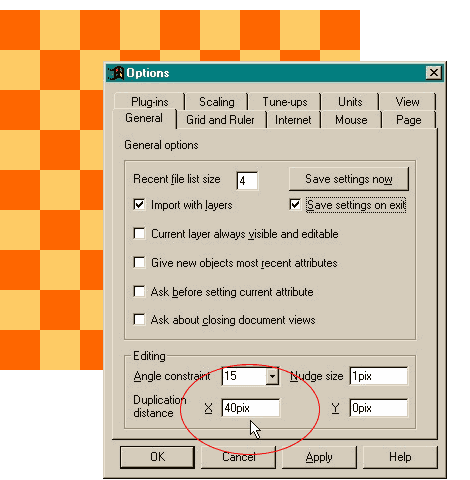 Joel Schilling suggested this TIP after trying
to create a checkerboard. Joel Schilling suggested this TIP after trying
to create a checkerboard.
Let's say your checks are 40 pixels. Set the X (horizontal) Duplication Distance to 40pix and the Y (vertical) distance to 0pix.
Select the square and press Ctrl D to add the next square. Repeat until you have enough squares.
For the columns, switch the settings.
|
 |
 |
|
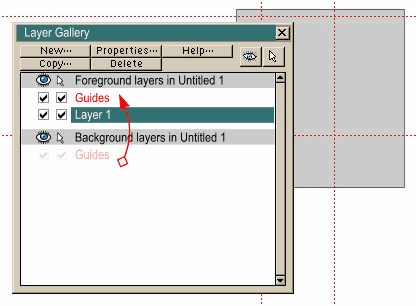 Piled Higher and Deeper TIP: Michael
Schaefer wrote to correct your editor's comment made that guidelines are hidden behind objects, etc. Michael writes: "Your statement that you can't put guide lines in front of objects in not true, you can.
Open the Layers Gallery and drag the Guides layer from Background Layers to Foreground Layers and put it above the Layer 1. (Make sure you select Layer 1 or
whatever layer you are working on before you return to work.") Piled Higher and Deeper TIP: Michael
Schaefer wrote to correct your editor's comment made that guidelines are hidden behind objects, etc. Michael writes: "Your statement that you can't put guide lines in front of objects in not true, you can.
Open the Layers Gallery and drag the Guides layer from Background Layers to Foreground Layers and put it above the Layer 1. (Make sure you select Layer 1 or
whatever layer you are working on before you return to work.")
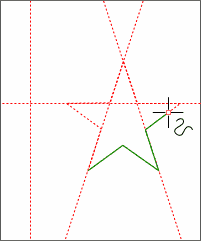 Guides TIP TOO: Of course Michael is
correct. I also remembered (because I used this before), you can paste any object or line into the Guides Layer and the outline becomes a guideline which can be used with Snap to Guides
like any other guidelines as shown in the example on the left. Guides TIP TOO: Of course Michael is
correct. I also remembered (because I used this before), you can paste any object or line into the Guides Layer and the outline becomes a guideline which can be used with Snap to Guides
like any other guidelines as shown in the example on the left.
Objects pasted into the Guides Layer are also just like objects on any other layer and can be duplicated, rotated, and deleted.
|
 |
 |
|
 Robert Steflik's Sanity-Saving TIP:
Robert writes: I was working on a Xara project for about 8 hours over the course of a week... suddenly I had a system crash and when I got everything back up again Xara would not let
me open the file (some type of access file error) - this has happened about 3-4 times in the last two years—not a lot I know—but when you loose several hours of work it can be a real
setback. Anyway, when you look at the file in Windows Explorer the file size has been set to 1k and it is toast! Robert Steflik's Sanity-Saving TIP:
Robert writes: I was working on a Xara project for about 8 hours over the course of a week... suddenly I had a system crash and when I got everything back up again Xara would not let
me open the file (some type of access file error) - this has happened about 3-4 times in the last two years—not a lot I know—but when you loose several hours of work it can be a real
setback. Anyway, when you look at the file in Windows Explorer the file size has been set to 1k and it is toast!
Yesterday this happened and I just was not ready to accept loosing all my work, so, before I shut down my machine, I checked the Windows/Temp
folder where I found a .bak file with the same name as my xara file. I renamed it from .bak to .xar and moved it out of temp and was back in business (I think it will be the last saved version,
but this is still better than loosing hours and hours of work).
 Robert Steflik's Top the Last Tip, TIP: Robert
continues: I save my files frequently, but when a file is corrupted the file is trash. So, on real important projects, I save a new file each day so that I have a series of backups. Robert Steflik's Top the Last Tip, TIP: Robert
continues: I save my files frequently, but when a file is corrupted the file is trash. So, on real important projects, I save a new file each day so that I have a series of backups.
I use a system like this, chevy0508.xar (project chevy / may / 8th), chevy0509.xar (same project next day), chevy0509a.xar (same project
later that day after intense revisions).
This has saved my sanity (not to mention my work) a number of times. And another benefit of this is when I find a client really liked something
better from last week, after all, and wants to go back to that version. I just open the appropriate backup file and I'm in business.
|
 |
 |
|
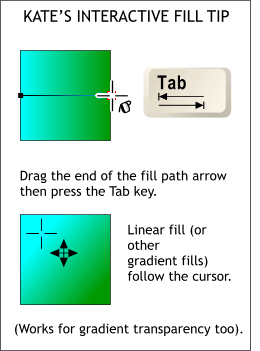 Kate Moir from Xara opened my eyes on this one. Kate Moir from Xara opened my eyes on this one.
To create truly interactive gradient (fountain) fills, create a Linear fill (select the Fill Tool then select Linear from the Fill Type
drop down list on the Infobar). With the Fill Tool cursor drag the end of the fill path then tap the Tab key on your keyboard. The fill will now follow the cursor as you drag. The fill
path arrow will only be visible if you pause.
If you don't like this method, "Some love it, some hate it!", Kate tells me, hold down the Tab key and drag the fill path
arrow and you're back to the default method.
|
 |
 |
|
Final Tip of the Year TIP:
Remember to take frequent eye breaks and from time to time, stare at something that is in the distance to keep your focussing muscles pliant. Do something nice for someone less fortunate than yourselves. And above all, have a safe, wonderful, warm (northern hemisphere -- cool southern hemisphere) holiday! See you next year.
|
|

