The WebXealot  Page 5

Best of the WebXealot Tips

Page 1
Page 2
Page 3
Page 4
Page 5
Page 6
Page 7

Click here to download a Zipped copy of
(332K)

I've published a lot of tips in the WebXealot since it went Web. I will include some of my favorite on the next few pages for you to review. If you have a tip that you think ought to be here, e-mail me.

Math For the Math-Challenged

As your editor was never good at math, faced with a question such as what is one third of 4 13/16, your editor would often break into fits of uncontrollable sobbing. Not any more since he has discovered this handy trick illustrated on the left.

OK, you say, this only visually divides the object, how do you get the numerical answer to the question?

Simple. To find the numerical value for 1/4 of 260.7 pixels, enter 25% in the Scale Width text entry box and hit Enter. The result (rounded off to the nearest 1/10th pixel is 65.2.

Reader TIPS: Catharina Hogarth discovered that pressing the comma (,) and period ( . ) when nothing is selected is the keyboard shortcut for Undo (comma) and Redo (period). If you have trouble remembering which is which look at the shifted version of each < (Undo) and > (Redo).

Robert H. Olley offers this tip to overcome problems encountered when exporting large bitmap images. To increase the bitmap export size:

  • 1. Close down XARA.
  • 2. Go to the folder where you installed XARA.
  • 3 . Rename the xaradraw.dll file to xdsmall.dll
  • 4. Rename the xdlarge.dll file to xaradraw.dll

What Does It All Mean? If you don't know what a specific menu function does, highlight it and press the F1 function key. A context sensitive Help menu will pop up and explain it all.

A picture is worth a thousand words TIP . Press the same combination to return to your last used tool.


Hidden TIP: To select an object hidden beneath another object hold down the Alt key and click. The object or objects will be selected in reverse order.

Nested TIP: Once you've selected the hidden object you can move it by holding down the Ctrl and Alt keys whilst dragging.

TIP Nested within a Nested TIP: You can select an object, and a hidden object, if you Alt select the hidden object first and then select the top object.
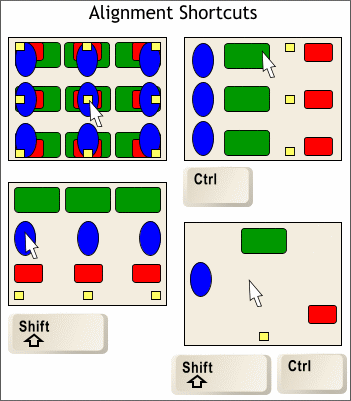
Using the Alignment menu Efficiently TIP: Clicking inside the preview window sets the alignment options as follows.

TOP LEFT: The nine basic alignment settings. Click in any of these positions to align as shown.

BOTTOM LEFT: Hold down the Shift key and click to align vertically.

TOP RIGHT: Hold down the Ctrl key and click to align horizontally.

BOTTOM RIGHT: Hold down the Ctrl and Shift keys and click to distribute equally.

Customizing the Toolbars TIP: Buttons on the Infobar or Main Toolbar can be repositioned by holding down the Alt key while you drag the button to a new location. Be careful, however, if you drag and drop a button off the bar upon which it resides, you will have discovered how to delete a button!

Click Here to learn how to create your own custom button bar From WebXealot #7).
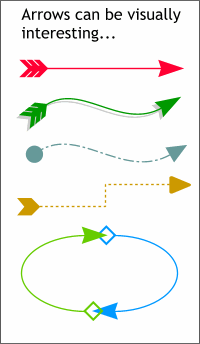
Arrowheads TIP: Even though there are not very many options for arrowheads, with a little imagination you can create some cool looking and decorative arrows.

Double Pointed Arrowheads TIP: Want to create an arrow with two points? Select your line, open Line Gallery, open the Arrowheads section and double click on the arrowhead you want to use. Now hold down the Ctrl key and double click the arrowhead again.

If you have tried to make your arrowhead larger by increasing the point size only to be appalled at how clunky it looks, try this: Create your arrowhead and tail. Convert Line to Shape (Arrange menu), now you can scale the arrowhead up or down proportionately.


Doug Bastron stumbled onto something really cool which is something I never figured out how to do: place right reading text on the inside, bottom of a circle.

All I can add to this is after I clicked the Text Tool on the top center of the circle, I changed the Text Alignment on the Infobar to Center Alignment.

Wheeling and Dealing - More Wheel Mouse Tips:

Thanks to Dennis Cox for reminding me about these wheel mouse goodies:

Roll the wheel to scroll the page up and down.

Hold down SHIFT to scroll left or right.

Hold the wheel down to slide the page around in the window.

Click the wheel to center the view around the mouse pointer

CTRL-click to zoom in SHIFT - click to zoom out

Hold down CTRL for variable zoom in (scroll the wheel up) or zoom out (wheel down).

Ed Nadie Clarifies Xara's Nudge Factor (nudge refers to using the arrow keys on your keyboard to move a selected object or objects)

If you have your nudge factor set to 1 pixel,
(Page Options > General) you probably know you can use Ctrl Shift with a cursor arrow key to nudge 0.2 pixel.

Sometimes that doesn't position your objects the way you want — but you don't have to reset your nudge factor, or call it close enough: zoom in and nudge with Alt.

With the nudge factor set at x:
» arrow 1x
» Ctrl arrow 5x
» Shift arrow 10x
» Ctrl Shift arrow 0.2x

Nudge distance (at zoom 100%):
» Alt arrow 1 pixel
» Alt Shift arrow 10 pixels

The four x-factor nudges are independent of zoom; and one and ten pixels sound like set amounts, but with Alt and Alt Shift, the nudge distance changes in proportion to zoom — the more you zoom in, the smaller the nudge. (Not mentioned in Help.)

Alt arrow nudge examples:
at zoom 10%: 10.0 pixels
at zoom 100%: 1.0 Pixel
at zoom 1000%: 0.1 pixel
at zoom 2000%: 0.05 pixel
at zoom 25000%: 0.004 pixel

Selecting options within a group TIP:. Ivan Louette, the Brushmeister, points out, "If you hold down Ctrl and Shift keys while clicking, you can select several objects in a group and not just one!" Ivan adds, "With Ctrl Shift you can even select obects inside several different groups and give a name to your selection, which is another method of grouping objects!"

Alternate selection technique within a group TIP: To select an object in a group of objects click on the object while holding down the Ctrl key. With one object in the group selected, press the Tab key to cycle though the group of objects.

To drag-and-drop a color onto an object in a group, hold down the Ctrl while you drag the color from the screen palette and drop it onto the grouped object.

Leroy Stanley's Printing TIP: Printing the Xara tutorials and WebXealots cuts off some of the right hand side of the page. Here is how I get around this problem. In Microsoft Internet Explorer 5.5, select Page Set Up (File pull down menu) change the margin settings from 1" all around to .25" for the left and right margins, and .300 for the top margin. You must leave the bottom margin at .70 These settings will remain until you change the settings again.

I was asked by rgremill in the Xara Conference how to offset text from a path. I had thought about doing that but here is how to do it. Select the text and increase or decrease the Baseline Shift (shown in the insert top right). This does the trick. To move text on a path, select the text with the Text Tool then drag the small red square. The text will follow like an obedient dog.

Two Timely TIPs from Klaus Nordby:
1
. Each node which makes up a vector object (and each anchor point for the color fills) takes up a little bit of screen redraw time. When selecting very many and/or very complex objects, this can affect performance. But merely by grouping an object ­ even a single one! ­ you can prevent Xara X from having to display the nodes, and thus speed up the screen redraw.

2. Using TIFFs and BMPs and other uncompressed bitmaps makes Xara X very slow when saving its native XAR files, as the program by default will perform lossless compression on such data. But merely by using high-quality JPGs you can save huge amounts of bitmap data embedded in native XAR files in almost no time at all, as Xara X will not try to further compress JPG data.