
Xara Modules Tutorial (Continued)
|
||||||
|
Xara Modules Tutorial (Continued) |
||||||
|
|
|||||||||||||||||||||||||||||||
|
Step 9 After you select your first image, you are returned to the Editor window from where you can preview your page, determine the Flipping Effects direction. When you are satisfied with the results, press Add New Image to return to the page with your images. Select the second image. You will return to this window where you can modify the current Flipping Effect if necessary. Repeat these two steps and add the third and fourth image.
|
|
Select any loaded image from the drop down list and change the effects settings. You can also modify the Pause time between frames and the Speed of the flipping transition.
|
|
This opens a window informing you that your effect has been saved and published successfully. You will see a text entry window with a line of script. This line of text needs to be inserted into your application.
|
|
|
|
Here is the final effect. I tried to keep the example simple and straightforward so you could see just how easy the whole process is. You are only limited by your imagination. There are hundreds of uses for these modules. I use them to highlight the steps used in a tutorial. You could use one of the Photo effects for a cool web page header. How many animated web page headers have you seen? So give Xara Modules a try. And remember, you have 15 days to decide if the effect is cool or not. If you decide you don't like it, you pay nothing. What have you got to lose? |
|
 Step 8 Once all the images have been
loaded you will be taken to an intermediate page (not shown here) where you can select a single image to link to on the Xara Modules site. But I am not sure why you would want to do this unless you do not have
a web publishing application. And if that is the case, why are you bothering with this in the first place? Press Continue to move on to the Module Picker page.
Select the first image. Xara Modules will now return to the Effect Editor window.
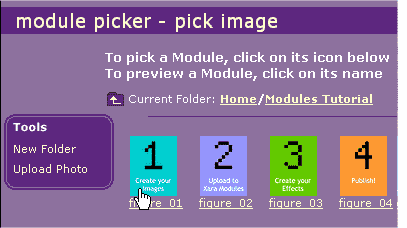
Step 8 Once all the images have been
loaded you will be taken to an intermediate page (not shown here) where you can select a single image to link to on the Xara Modules site. But I am not sure why you would want to do this unless you do not have
a web publishing application. And if that is the case, why are you bothering with this in the first place? Press Continue to move on to the Module Picker page.
Select the first image. Xara Modules will now return to the Effect Editor window.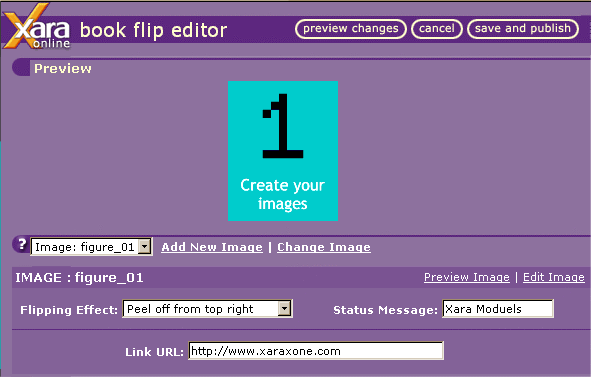
 TIP: If at any time in the creation process you feel overwhelmed and need help, locate the cute little Mr. X icon and follow the advice in his little message board.
 Step 10 After you have two or more images you can edit
the effect. (This is true for most Photo effects).
Step 10 After you have two or more images you can edit
the effect. (This is true for most Photo effects).