
Tutorial - Creating Connected Colors
|
||||
|
Tutorial - Creating Connected Colors |
||||
|
|
||||||||||||||||||||||||||||||||
|
|
|
|
|
Click the yellow tag icon (New Named Color) to open the New Named Color dialog. Type in Bottle Green, make sure the check box is unchecked and press Create. The new Named Color, Bottle Green, can now be found in the Color Editor's Choose Color to Edit drop down list as well as in the on-screen palette and the Color Gallery on the Infobar. |
|
|
|
|
|
|
|
Open the Color Gallery (The color wheel icon on the top right portion of the Infobar). Scroll down the list of names to Bottle Green. Press Edit. The Color Editor will open. Now drag the Hue slider, or any of the other sliders, to alter the color and all the colors on the cylinder change as well. Cool? The one problem with this cool trick is once you alter the Parent color, the cylinder changes its colors accordingly and the original color version is lost. What would really be cool is some way to keep the original colored version and to change the color on duplicate. Well there is a way and here is how to do it. Select the cylinder and copy it (Ctrl C or Edit > Copy). Select the Parent color in the Color Gallery (not the Color Editor) and press the Name button. Change the name to Bottle Green 2. Now paste a copy of the cylinder onto the page (Ctrl V or Edit > Paste). Notice that the Parent name of Bottle Green which disappeared from the list when you renamed it, reappears in the Color Gallery just above Bottle Green 2. Select Bottle Green 2, press Edit , and make your changes. The original cylinder stays the same while the duplicate cylinder changes. Repeat this process to make more independent versions. If you are designing a product, and want to see how it will look in a variety of colors, this is a terrific way to accomplish it. You can also use this technique to draw an automobile, airplane, motorcycle, and so forth, and then produce a range of color alternates. NOTE: The is a JavaScript animation created with Xara Modules on Page 1 that cycles through a range of colored duplicate Gel buttons . You need to be connected to the Internet in order to see it. So what do you think? Did you learn anything new? Please use the form on the next page to send me your comments, questions, and suggestions. Criticisms are helpful too. Sometimes. |
|
 Using the Ellipse Tool and the
Rectangle Tool, draw two ellipses and one rectangle to the sizes shown.
Using the Ellipse Tool and the
Rectangle Tool, draw two ellipses and one rectangle to the sizes shown.
 Select the rectangle and the bottom ellipse and
from the Arrange pull down menu, select Combine Shapes > Add Shapes. This makes the bottom ellipse and the rectangle one combined object.
Select the rectangle and the bottom ellipse and
from the Arrange pull down menu, select Combine Shapes > Add Shapes. This makes the bottom ellipse and the rectangle one combined object. Select both objects and apply a Spring Green Cyan
fill. (Spring Green Cyan is the color to the left of Cyan on the screen palette).
Select both objects and apply a Spring Green Cyan
fill. (Spring Green Cyan is the color to the left of Cyan on the screen palette). With the objects selected, open the Color Editor
by clicking the small color wheel icon to the left of the on-screen palette.
With the objects selected, open the Color Editor
by clicking the small color wheel icon to the left of the on-screen palette.
 Apply Linear Fills
to the top ellipse and to the bottom shape. On the Linear Fill on the bottom shape, add another color station about 1/3 of the way in from the left by double clicking on the fill path arrow.
Apply Linear Fills
to the top ellipse and to the bottom shape. On the Linear Fill on the bottom shape, add another color station about 1/3 of the way in from the left by double clicking on the fill path arrow. Select each of the color stations on the fill
paths and change the colors to Shade of Another Color, and selecting Bottle Green from the Parent drop down list. Don't worry about modifying the color. That is the next step.
Select each of the color stations on the fill
paths and change the colors to Shade of Another Color, and selecting Bottle Green from the Parent drop down list. Don't worry about modifying the color. That is the next step.  One by one, select each of the color stations
and modify the colors by changing the two Shade: values (found at the bottom of the Color Editor) to those shown on the left. The numbers in the second text entry boxes should be proceeded by the minus sign (-
). Key in each pair of numbers for each color station, the colors will change automatically as the values are changed.
One by one, select each of the color stations
and modify the colors by changing the two Shade: values (found at the bottom of the Color Editor) to those shown on the left. The numbers in the second text entry boxes should be proceeded by the minus sign (-
). Key in each pair of numbers for each color station, the colors will change automatically as the values are changed.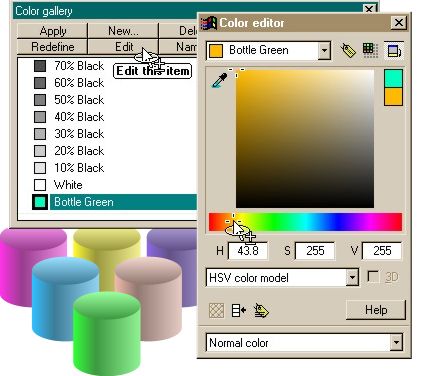 Now here comes the fun part.