
|
||||||
Xara X. Chapter 14 The Color Line |
||||||
|
|
||||||||||||||||||||||||||||
|
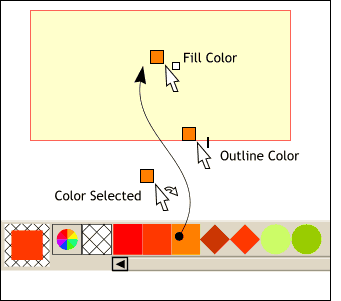
TIP: While the line and fill status of a selection might appear obvious, many times if you are drilling down though several stacked objects, (Hold down the Alt key while clicking over an object to "drill down" to the next object, and the next object, and so on), you can refer to the Current Line and Fill Color status box, along with the text on the Status Bar, to identify objects hidden beneath other objects. There are several ways to apply a fill to an object or text object. With an object, text objects, or a group of objects selected, click any color on the screen palette with the left mouse button to apply a Fill color, or with the right mouse button to apply an Outline color.
When you drag the color from the on-screen palette onto the screen, the cursor changes to the arrow pointer, with a square indicating the selected color, and a small downward pointing arrow. When the cursor is over an outline, the downward-pointing arrow changes to a narrow rectangle indicating an outline color if you release the left mouse button at this point. If you continue past the edge of the object, the cursor changes to an unfilled white square indicating the color will be applied as a fill color as soon as you release the left mouse button. You can also apply a fill or outline color from the Color Editor (covered next page) or from the Color Gallery (which is covered extensively in WebXealot #22). |
|
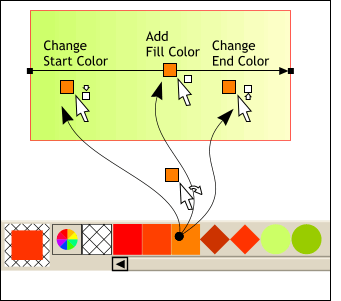
And, you can drag-and-drop a color onto the fill path arrow (if the Linear filled object has been selected with the Fill Tool). (You can also double click on the fill path arrow with the Fill Tool to add a new color station). When you drag a color to the left half on a Linear filled object, the cursor changes to a tiny down-facing arrow indicating you are about to change the starting fill color. As you pass the vertical center of the object, the tiny square and arrow reverse indicating you are about to change the end fill color. |
|
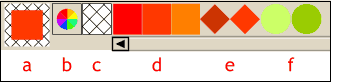 We'll begin with what Xara calls the
Color Line. The Color Line contains the on-screen color palette and a few other color-related items which are described below.
We'll begin with what Xara calls the
Color Line. The Color Line contains the on-screen color palette and a few other color-related items which are described below.
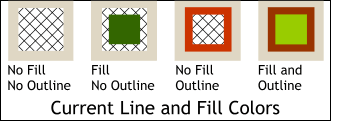 The Current Line and Fill Colors box (item a in the illustration in the last section) resides just above the status bar at the
bottom of the screen and shows at a glance the color status of the current selection. There are four possible states as shown here.
The Current Line and Fill Colors box (item a in the illustration in the last section) resides just above the status bar at the
bottom of the screen and shows at a glance the color status of the current selection. There are four possible states as shown here.
 You can also drag a color from
the on-screen palette and drop it onto a non-selected object or text object.
You can also drag a color from
the on-screen palette and drop it onto a non-selected object or text object.
 You can drag-and-drop colors from the on-screen palette
onto a Linear gradient fill.
You can drag-and-drop colors from the on-screen palette
onto a Linear gradient fill.