|
 I've promised for some time to
attempt to cover the Bitmap Tracer in more detail. But because the Bitmap Tracer is so complex and has so many subtle nuances, it is a little like trying to write about every grain of sand on
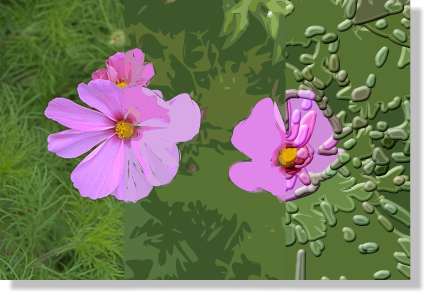
the beach or every blade of grass in a field. The image shown here has three parts: the original image (from Xara's Photographs 2 section in the Clipart Gallery
images are on the Xara X CD), the center portion is a bitmap tracing, and the section on the right is a section of the traced bitmap with a Rounded Bevel applied. I've promised for some time to
attempt to cover the Bitmap Tracer in more detail. But because the Bitmap Tracer is so complex and has so many subtle nuances, it is a little like trying to write about every grain of sand on
the beach or every blade of grass in a field. The image shown here has three parts: the original image (from Xara's Photographs 2 section in the Clipart Gallery
images are on the Xara X CD), the center portion is a bitmap tracing, and the section on the right is a section of the traced bitmap with a Rounded Bevel applied.
Tad Bridenthal, who has done a lot more experimenting with this feature than most of us, sent your editor a list of TIPS which I though I
would publish here to start the old ball rolling (or tracing as it were).
The Fish In The Window
Thoughts on the Bitmap Tracer by Tad Bridenthal
1. Most important thing is to KEEP NOTES. Lots of notes. Lots and lots of NOTES.
2. The size of your image (in pixels) is more important than ANY of the Tracer settings. Since this is also true for halftoning and printing, it
should come as no surprise. If you are not happy with your results after messing with the settings, try RESIZING your image.
3. Do not expect the Bitmap Tracer to "trace" anything. It should have been called the "Vector Enabler". It is a creative tool. If you wish to
trace something, do it by hand on a separate layer.
4. The Tracer is very sensitive, and the slightest change will have significant effect. See the Help file for advice, but mainly, try different
settings without preconceived notions. Save each setting with a screen grab (Print Screen works fine) BEFORE you insert. Then, if you like the
result, print it out and make your notes right on the sheet (B&W OK). By and large, the Tracer settings should be considered "fine tuning". More important is the image before you hit the Trace button.
5. Consequently, ALL the Bitmap Effects will cause major differences in the final trace. Forgetting about the special effects, Color Reduction
alone can entertain you for days. At one extreme is mono diffusion. This can create amazing squiggles, which can look like calligraphy, and create a strange type of halftoning. The 16 color diffusion can make a
traced image look somewhat like an oil painting. (There is a 1324 pixel width limit, however.)
6. Too many lines and points can cause trouble. I have had files that took 15 minutes to open (on a PIII) and 10 minutes to close. Check the
"Done" box to see what you have before inserting. You might wish to reconsider.
7. If the Tracer creates a shape with too many points, it might not print. The particular shape may be isolated through trial and error, then
reduce the number of points, or delete it. The easiest shape to get rid of is the "background" shape. Set the image quality to wireframe and click on the outside shape. Another solution is to export the image as a
bitmap. Scale to final size first, and choose whether to anti-alias.
8. Beveling a traced image can give astounding images. You must first ungroup. HOWEVER, it is so CPU intensive that your machine may
appear to lock up. Just wait. Read a good book or something. Then immediately export as a bitmap, because you may never see the sucker again. (You may tire of waiting for Xara to close the file.)
9. Did I mention to keep notes? It's a REAL GOOD idea. I once created a traced image of the house in which my grandmother was born. It is in
Fort Gibson, Oklahoma across the street from the Fort. The image looked as if there were a fish in the window. I thought it was fabulous, but didn't take notes. For over two years now I have been trying to
reproduce that image. No luck yet. The Tracer is subtle.
Tad
Thanks Tad for those terrific TIPS.
The Limitations of Bitmap Tracing
 Many people see Bitmap Tracer and
think, cool! this will create an exact copy of my image or logo. Well, not exactly. Bitmap tracing is inexact to say the least. Not because the computer is not capable of the mathematics needed, but because of
the nature of bitmaps in general. Many people see Bitmap Tracer and
think, cool! this will create an exact copy of my image or logo. Well, not exactly. Bitmap tracing is inexact to say the least. Not because the computer is not capable of the mathematics needed, but because of
the nature of bitmaps in general.
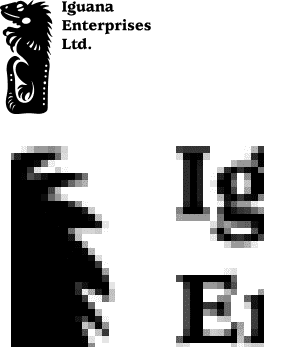
Consider the logo shown top left. While it looks pretty simple, the enlarged portion (enlarged 800 times) illustrates the problem. Bitmap
images are Anti-aliased or smoothed to soften the jagged edges.
But when the bitmap tracer looks at the image closely, it sees ambiguous shapes in many shades of gray and has to make some hard decisions as
to what is supposed to be black and what is supposed to be white. Could you decide?
 Instead of producing a sharp
recreation of the original bitmap logo, the trace at best is a mushy, inaccurate attempt as you can see here. And this logo bitmap was traced with the settings set to produce the most accurate trace. Instead of producing a sharp
recreation of the original bitmap logo, the trace at best is a mushy, inaccurate attempt as you can see here. And this logo bitmap was traced with the settings set to produce the most accurate trace.
So is there a way to increase the accuracy of the trace? Yes. But it is usually not an option. Especially if all you have is a small bitmap logo to begin with.
 Starting with a larger bitmap
will produce a more accurate trace. The traced logo shown on the right in the second example was traced from a bitmap that was 600 times larger than the size shown here and then reduced to the same size. At screen
resolution, it is hard to see the difference between the two logos. Printed output would not be quite as forgiving as the screen resolution however. Starting with a larger bitmap
will produce a more accurate trace. The traced logo shown on the right in the second example was traced from a bitmap that was 600 times larger than the size shown here and then reduced to the same size. At screen
resolution, it is hard to see the difference between the two logos. Printed output would not be quite as forgiving as the screen resolution however.
Enlarging the original small bitmap 600 times, and tracing produced the exact same mushy image in the first example. So the best way to
produce a more accurate image is, if at all possible, to start with a large, high resolution bitmap.
If you need to accurately reproduce a logo, your best bet is to use Xara's tools and recreate the logo by hand. The success of this will
depend upon your skills with Xara and basic design expertise.
|