|
||||||
Xara X. Chapter 13 The Bevel Tool |
||||||
|
|
||||||||||||||||||||||||||||||||
|
After you apply a bevel (which you can edit and change any time you want, by the way), a red arrow appears originating in the very center of the object. The arrow points towards the light source. To change the Light Angle, simply drag the black box at the end of the red arrow to position the light source. The image updates automatically. |
|
Select one and then use the slider to set the amount, or enter the desired amount in the text entry box to the immediate right of the slider and press Enter on your keyboard to apply the changes. Size: Depending upon whether your bevel is to the inside or outside, this setting increases the bevel amount using the unit amount specified in the Units tabbed section of the Page Options dialog (Utilities > Options > Units). Contrast: 50% is the default setting. Increasing the slider setting makes the dark portions of the bevel increasingly darker and the lighter portions of the bevel increasing lighter. Moving the slider below 50% makes the light bevel colors darker and the dark bevel colors lighter. Light Angle: This is another way to control the angle of the light source on the bevel. The default setting is 300 degrees or about 11:00 o'clock on a clock face. The values start at 0 degrees at 9:00 o'clock and sweep around counterclockwise increasing until they reach 360 degrees just above the 0 degree mark. Light Elevation: controls the height of the light source. To visualize the difference between Light Angle and Light Elevation, picture the sun in the sky. The direction the sun is shining is the same as the Light Angle while the height of the sun in the sky is the Light Elevation. The default setting is 45 degrees. The maximum setting is 90 degrees. At 90 degrees the lighting on the bevel becomes perfectly flat and almost 2-dimensional. |
|
|
|
0 degrees would place the shadow to the right of the object. |
|
Decreasing the Light Elevation raises the shadow portion of the bevel. This is most noticeable on a rounded bevel such as the one shown here. When the setting approaches 90 degrees the shadow portion of the bevel becomes almost invisible, |
|
 Applying a simple bevel to
an object, or group of objects, is as easy as selecting the Bevel Tool, clicking on an object, and dragging any of the red control arrows. (All 8 produce the same results).
Applying a simple bevel to
an object, or group of objects, is as easy as selecting the Bevel Tool, clicking on an object, and dragging any of the red control arrows. (All 8 produce the same results).
 Changing the Light Angle is about as easy as falling off a log.
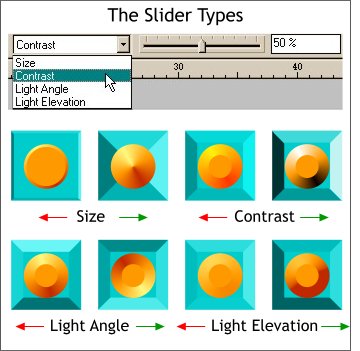 While dragging the red arrows and the Light Level
arrow is very intuitive, sometimes you might need to apply a more precise adjustment. The Slider Types drop down list offers four different adjustments.
While dragging the red arrows and the Light Level
arrow is very intuitive, sometimes you might need to apply a more precise adjustment. The Slider Types drop down list offers four different adjustments.
 Illustrated here are four Contrast
settings. While the default setting of 50 percent should work for most bevels, there may be times when increasing or decreasing the Contrast settings can be beneficial. When the beveled object is small, increasing
the contrast will enhance the bevel effect.
Illustrated here are four Contrast
settings. While the default setting of 50 percent should work for most bevels, there may be times when increasing or decreasing the Contrast settings can be beneficial. When the beveled object is small, increasing
the contrast will enhance the bevel effect. I've added shadows to indicate the direction of the
light source when the Light Angle slider is used.
I've added shadows to indicate the direction of the
light source when the Light Angle slider is used.
 The default Light Elevation
setting of 45 degrees works well for most bevels.
The default Light Elevation
setting of 45 degrees works well for most bevels.