The WebXealot  Page 6

Xara X. The Line Gallery

Page 1
Page 2
Page 3
Page 4
Page 5
Page 6
Page 7
Page 8

The Line Gallery has expanded in Xara X to include new features including brush strokes, stroke shapes, and support for pressure sensitive drawing pads. The Line Gallery works hand-in-glove with the expanded Freehand and Brush Tool. As most of the features relating to the Line Gallery are also covered in the Freehand and Brush Tool section of WebXealot #17, please refer to WebXealot #17 for more detailed information.

In the Line Gallery, you can apply various line end and join attributes, select from a variety of pre-designed brush and stroke shapes, and add dash patterns and arrowheads. Let's examine these features more closely.

The two buttons in the Line Gallery are Apply, which applies a selected line attribute or brush stroke to a selected line or closed path outline, and Help which provides context - sensitive help topics.

The first drop down list contains preset line widths measured in points. (There are 72 points to an inch). The center drop down list contains join types, and the third drop down list contains line endings. We'll explore these in a short while.

Any new brush strokes created in a document are saved with the document and can be found in, and applied from, the New Brush Strokes folder.

There are two types of line embellishments, Brushes and Strokes. Brushes can apply a repeating pattern to a selected line, or they can be used to draw or paint with. The Brushes are found in two folders, Novelty Brushes and Natural Media . A good example of a Novelty Brush is the Phone Cord shown top left.

Natural Media brushes mimic the look and feel of artistic media such as paint, markers, charcoal, airbrush and so forth.

Strokes impart a thick-thin quality to a selected line. As with Brushes, Strokes can be used to draw with, mimicking the strokes of a brush dipped in paint or ink. Strokes can be used to alter the brush patterns as shown in the bottom right example. When used with a pressure-sensitive drawing tablet, strokes and brushes can be varied in width and intensity more closely imitating natural media.

As Brushes and Strokes are line embellishments, varying the width of the line, increases or decreases the effects as shown on the left. Using a pressure sensitive drawing pad works much the same way except you don't have to change the line weight, the pressure exerted on the pad does the same thing.

In the Line Gallery , you can determine how line segments join, the shape of the end of the lines (the cap), as well as the placement of the line's offset.

The illustration on the left shows the three Joins applied to a 12 point line with a 1 point line superimposed on top showing the end points and joints. All three line segments are butt capped. You can see the effect of the joins where the two line segments come together and form an angle. The Miter Join is pointed, the Round Join is rounded and the Beveled Join is blunted. (No real surprises here). In some cases where the angle of the line segments is very sharp, say 15 degrees for example, the resulting point caused by a Miter Join can be out of proportion to the rest of the line. Choosing a Beveled or Round Join eliminates this.

Shown on the right are the three line endings or Caps . The default Cap is called a Butt Cap (I will resist comment on the cap name or the visions it conjures up). The end of the line is tangent to the end of the line shape. In the case of a Round Cap or a Square Cap, the line shape extends beyond the physical end of the line by a distance of one half the line weight. So in the case of a 12 point line, the cap for a Round or Square Cap extents 6 points beyond the end of the line.

The Line Gallery contains a variety of Dashed Line styles. The dash pattern change as the line weight increases. You can also specify a line Cap such as the Round Cap added on the right column, which produces with some dashed line patterns, the appearance of linked sausages.

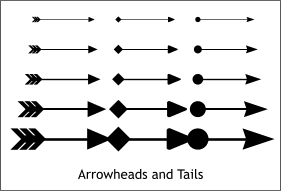
The last section in the Line Gallery is Arrowheads. Xara gives you the option of adding both a head (the pointed part) and a tail. Plus, you can mix and match heads and tails. Fun!

You can only have one head and one tail, not two heads or two tails. To turn off a head or a tail, click the box at the top of the window that says No Heads and No Tails. As is the case with dashed lines, arrowheads and tails change as the line weight increases.

TIP: You can make an arrowhead and tail scale proportionately by converting the arrowhead to shapes (Arrange > Convert Line to Shape).

Some of you new users may be scratching your heads saying OK Mr. Editor guy, how do I get these different shapes, and arrowheads and stuff to apply to my lines? Good question. Remember at the top of the page I mentioned there were two buttons and one of these buttons was named Apply? Select a line, or group of lines, select a shape or effect from the Line Gallery, and press Apply. Simple, no?

You're next question should be, OK, I applied this silly brush pattern to my line and A. How do I get rid of it, and B. Since I created a custom brush shape, every line I draw has the same silly pattern.
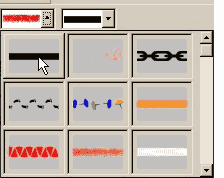
The solution to this problem (or is it an opportunity?) can be found, not in the Line Gallery where somehow you would expect to find it, but on the Infobar. Select the line from which you wish to remove the effect or shape, then select the Freehand and Brush Tool . The Existing Brush and Existing Shape drop down lists (shown here) will appear on the Infobar at the top of the screen. Select the appropriate drop down list and scroll to the top where you will see top left, a black rectangle. This is not really a rectangle but a simple unadorned line. Click this line and all your troubles will vanish.

Finally, you can create your own brushes which is a lot of fun. Or you can use the brush shapes available in the Xara Line Gallery. But here's a useful tip: visit the Ivan Louette's Art page in the XaraXone Shareware Page . Ivan is the master of the brushes and here you will find Ivan's latest set of free brush shapes, which I plan to post as soon as I get this posted, and several other collections of Ivan's imaginative brushes. You'll also find a mini-tutorial for using Ivan's brushes.